Tutorial: Address Book App
In this tutorial, we’re going to build a minimal address book application, just enough for us to learn about how to use databases inside Appli.
Begin by creating a new project called Address Book and a phone application with the same name as that project in portrait orientation. Just like you did for the Cool Coffee Shop tutorial.
Creating the contacts table
Databases are used by apps to record and retrieve data. They are organised into collections of similar records, so a project management database might contain projects and also tasks. All records in each of these collections have the same structure as the other records in the same collection. In Appli, we call these collections _tables__.
Your application can have as many tables as it needs. For our sample address book management application, we’re going to have just one table called contacts.
To create a new table, click the data modeler icon in the footer. It looks like a stack of discs. Use the New Table button to create a new table named contacts.

All Appli projects come with to tables — one for storing binary data called cdbBlobs and another to store user accounts called cdbUsers — even if you don’t plan to use those features, they are part how Appli works and will always be there for you.
Right-click the background of the data modeler tool to display the context menu. You’ll see an Add New Table item, click it to add a new table.

A table has keys in them. Think of each key like a field in a paper
form. Based on the screenshot below, add keys for
firstName, lastName, phone, and
email. These are the data that we’re going to collect for
each entry in our address book.
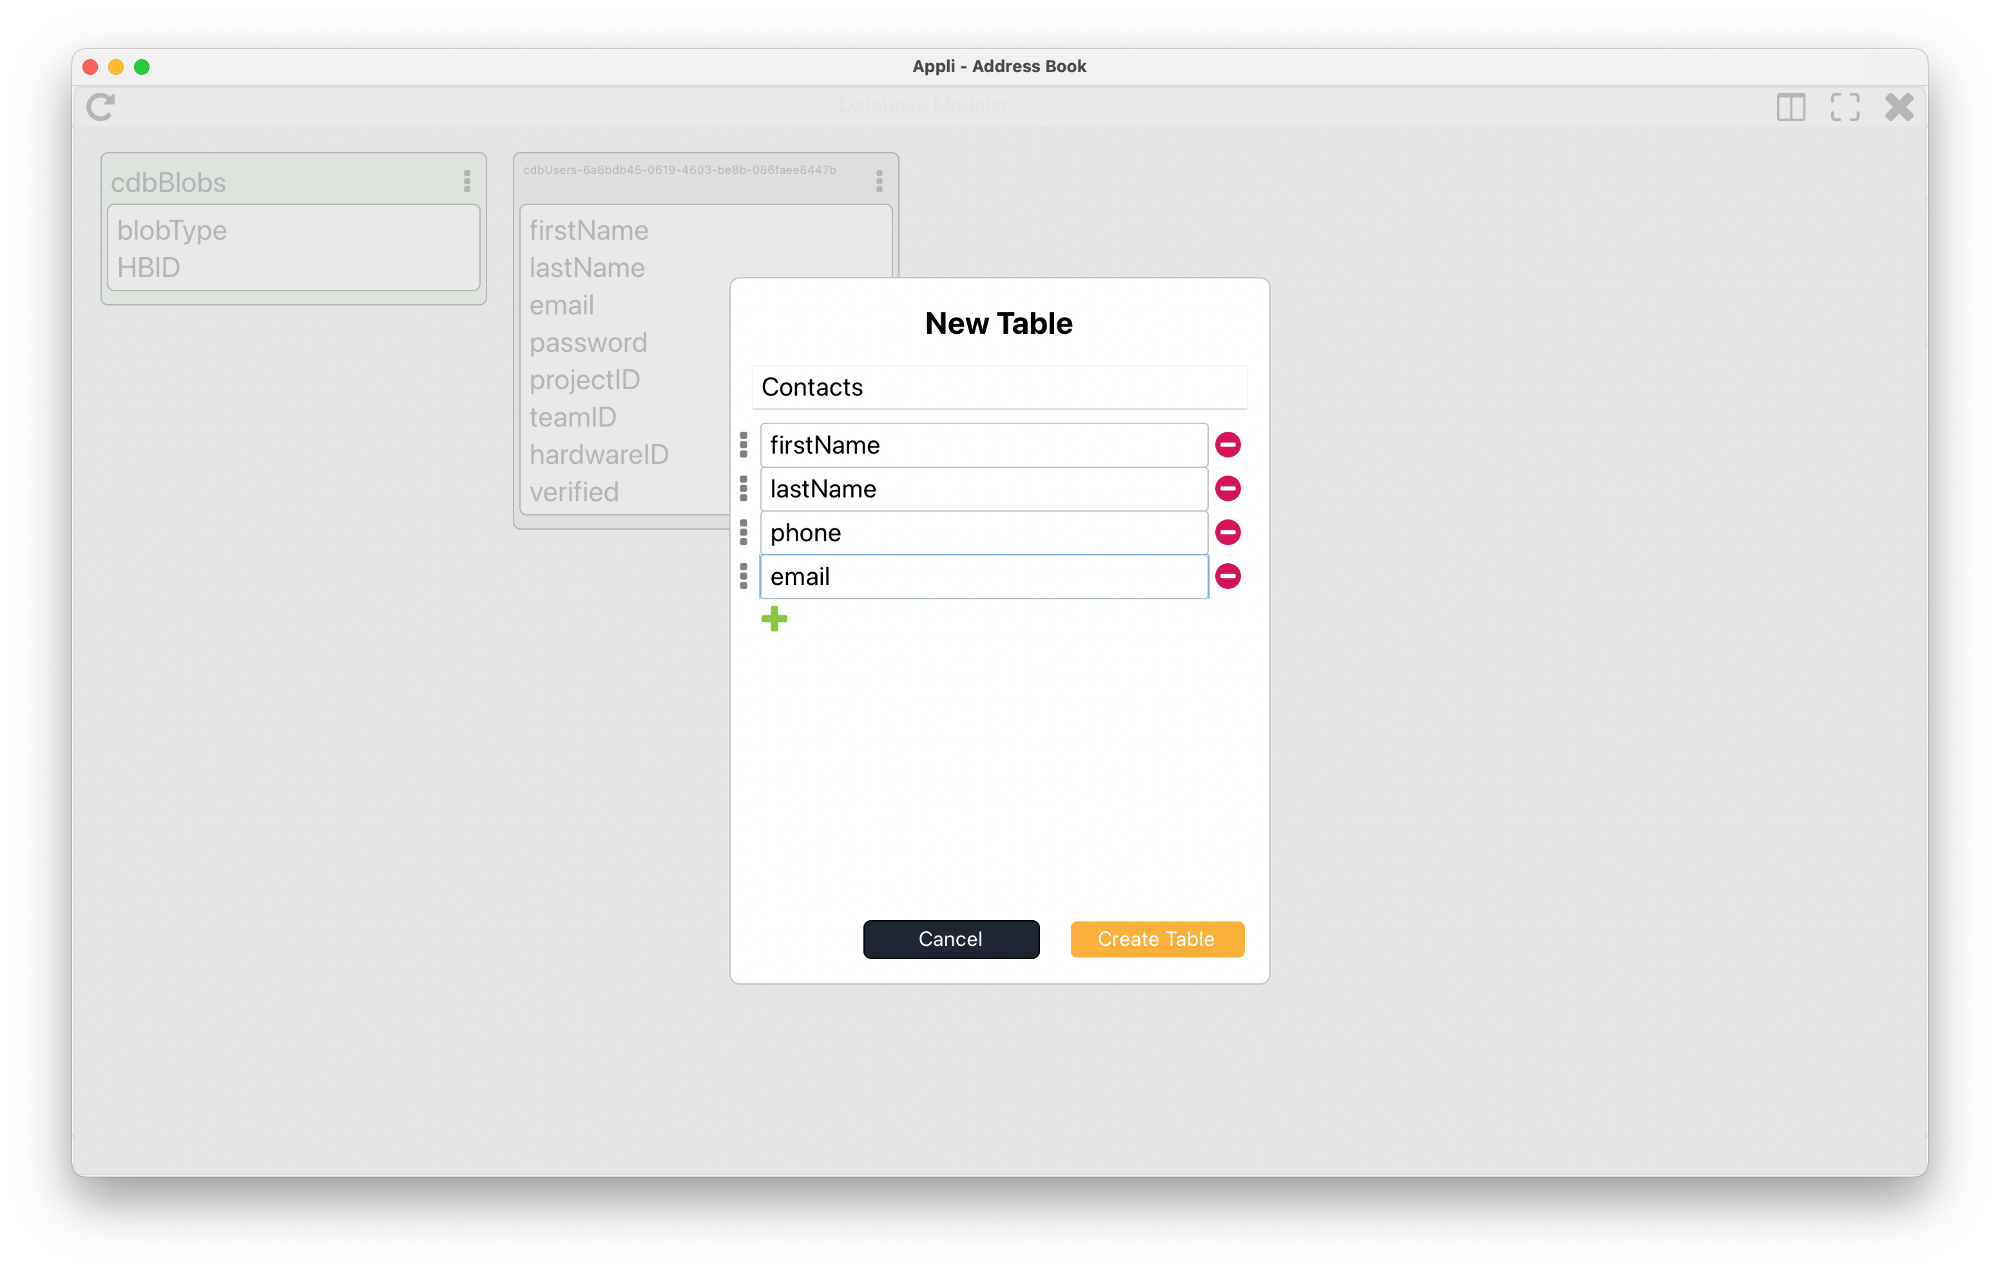
Once you click Create Table we’re ready to move along and create a record.
Creating a form
Rename the current screen to New Contact by clicking its name on the footer. This will help us later as we create more screens.
Our aim for this section is to create a form that enables us to add records to our contacts table. There are two ways of doing this. You can do it all manually by creating each field and button by yourself and connecting them with the table, it is good to learn this way because that teaches you how things work. There is an easier way this is using a tool that does the work for you and essentially goes through the same steps but in an automated way. We’ll do the manual one first and then I’ll show you the automated one.
Creating a form, manually.
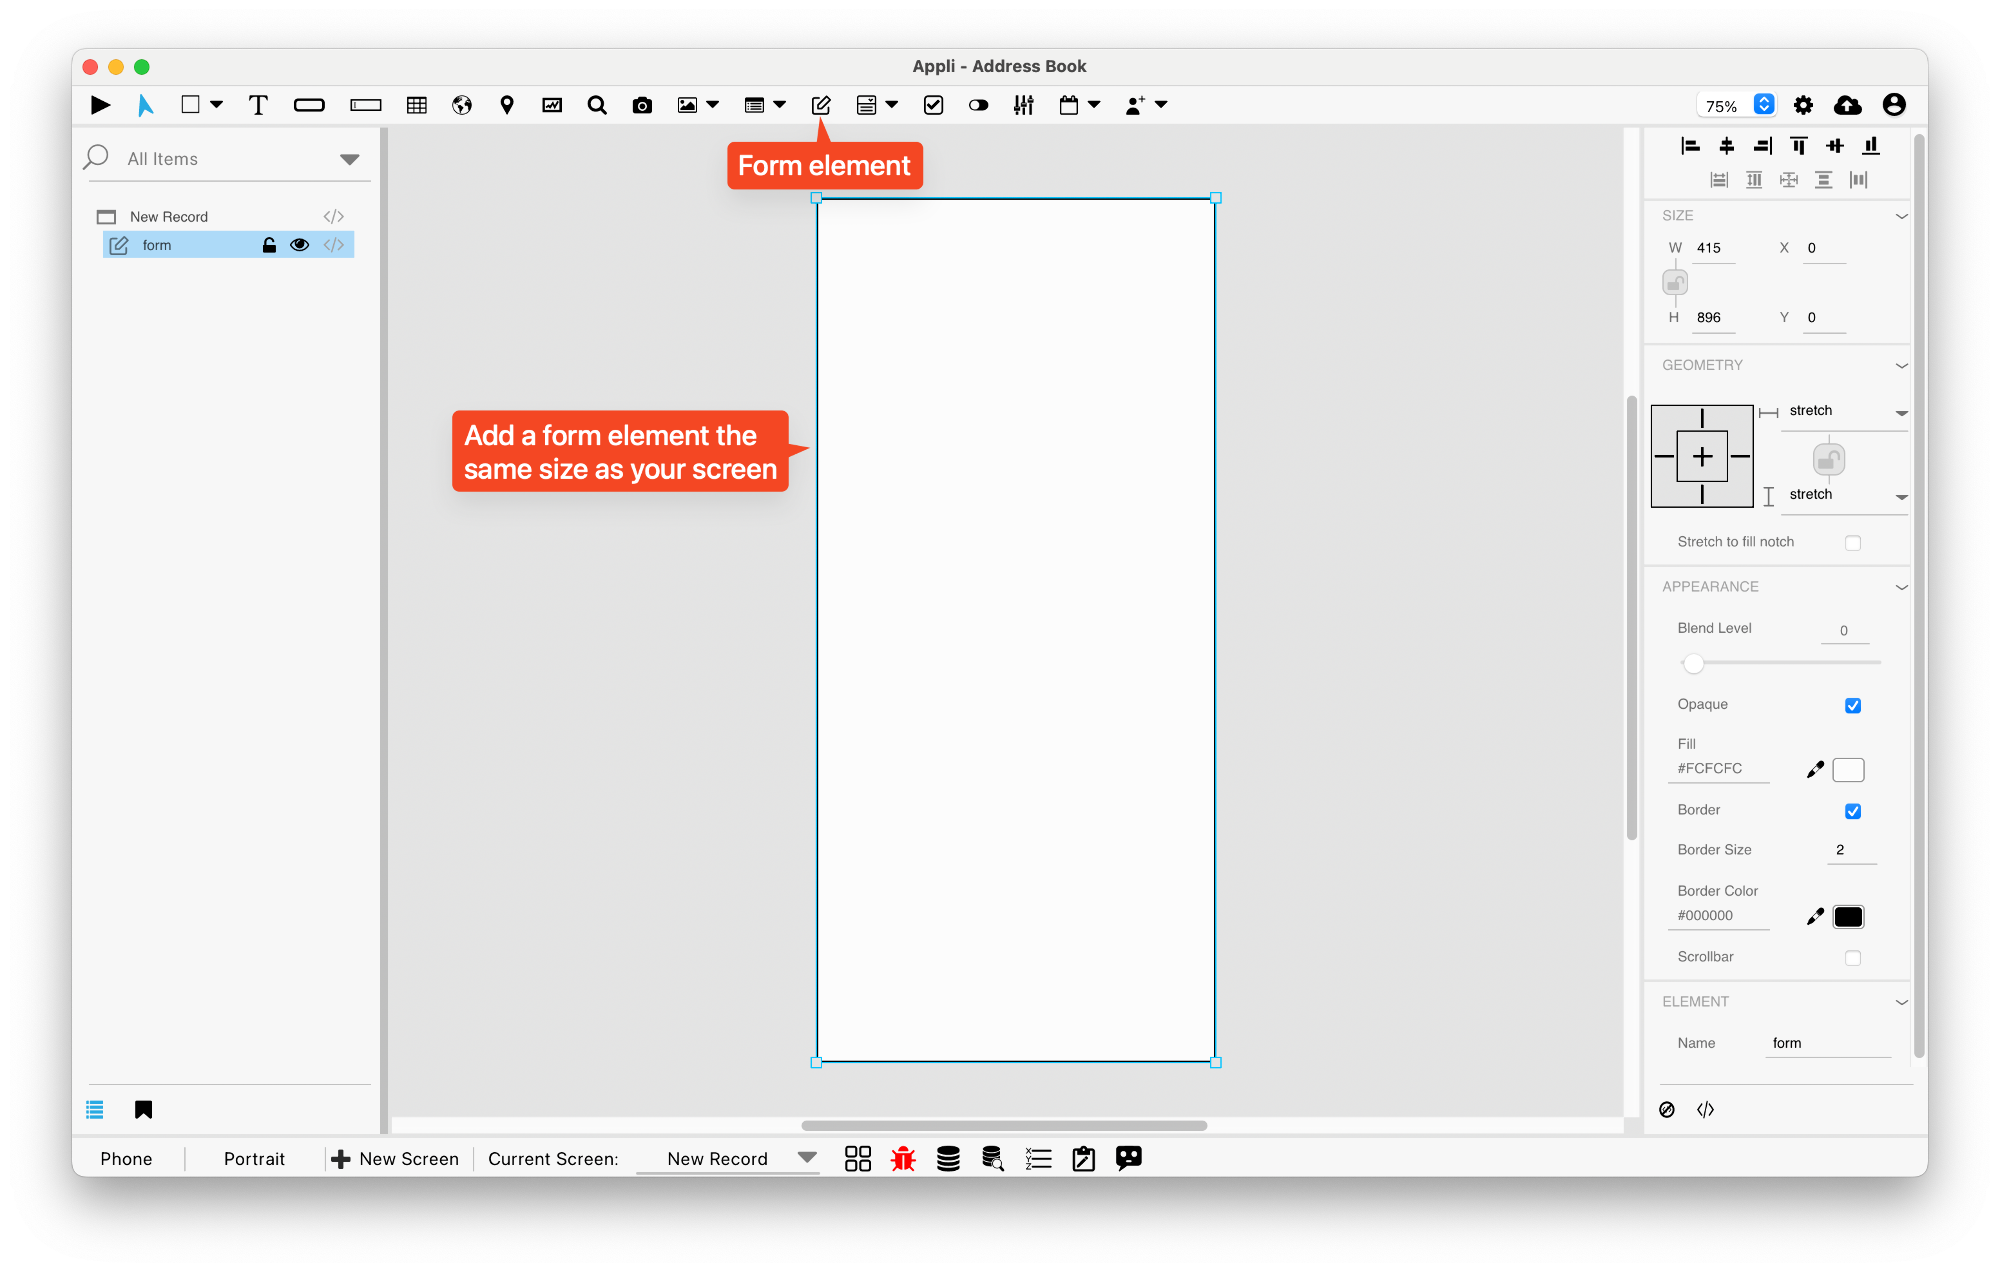
To do that, we’re going to use a form element. This element is a container element. This means we’re going to place it on our screen and then we’re going to place other elements inside it.
The form element is the one that looks like a paper with a pencil pointing at it. It can be selected with the mouse or by its keyboard shortcut SHIFT+F. Select it and draw a square the same size as the screen with it.
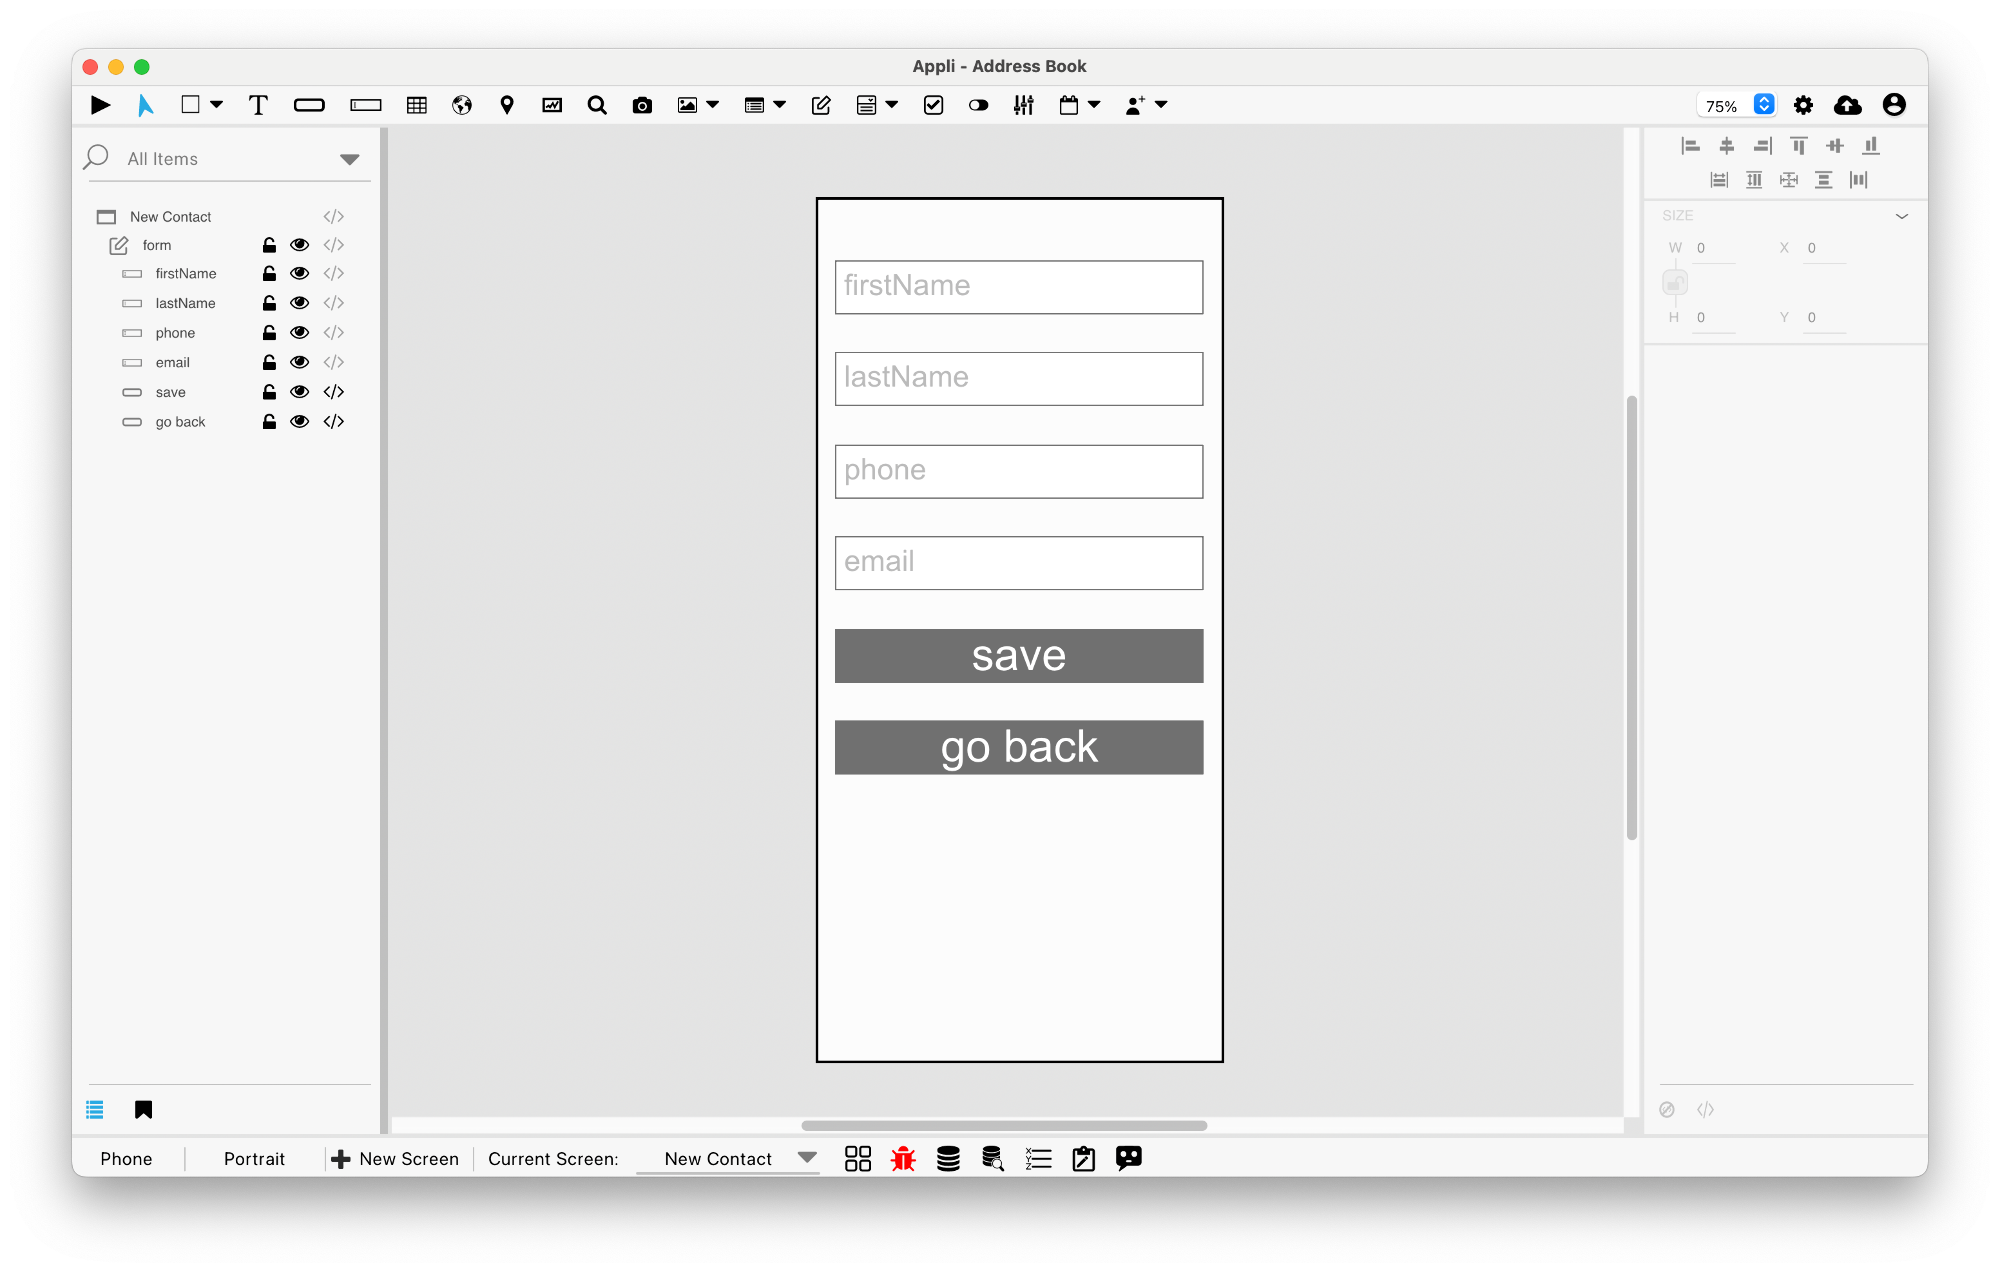
Let’s add some fields to our form and some buttons. We’re going to name them with the same names as the keys we created on the table. This will make it easier for us to remember their name. We’ll also create two extra buttons, one for saving and another for going back to the main screen (which we’ll create later).
To create a field, select the field element (keyboard shortcut: F) and draw each field inside the form rectangle. You should see them appear under the form in the project browser panel.
What we’re going to do next is a simple action, but one that takes a very long time with other programming tools. We’re going to connect the fields we just created with keys in the contacts table, and we can do all that with just no-code.
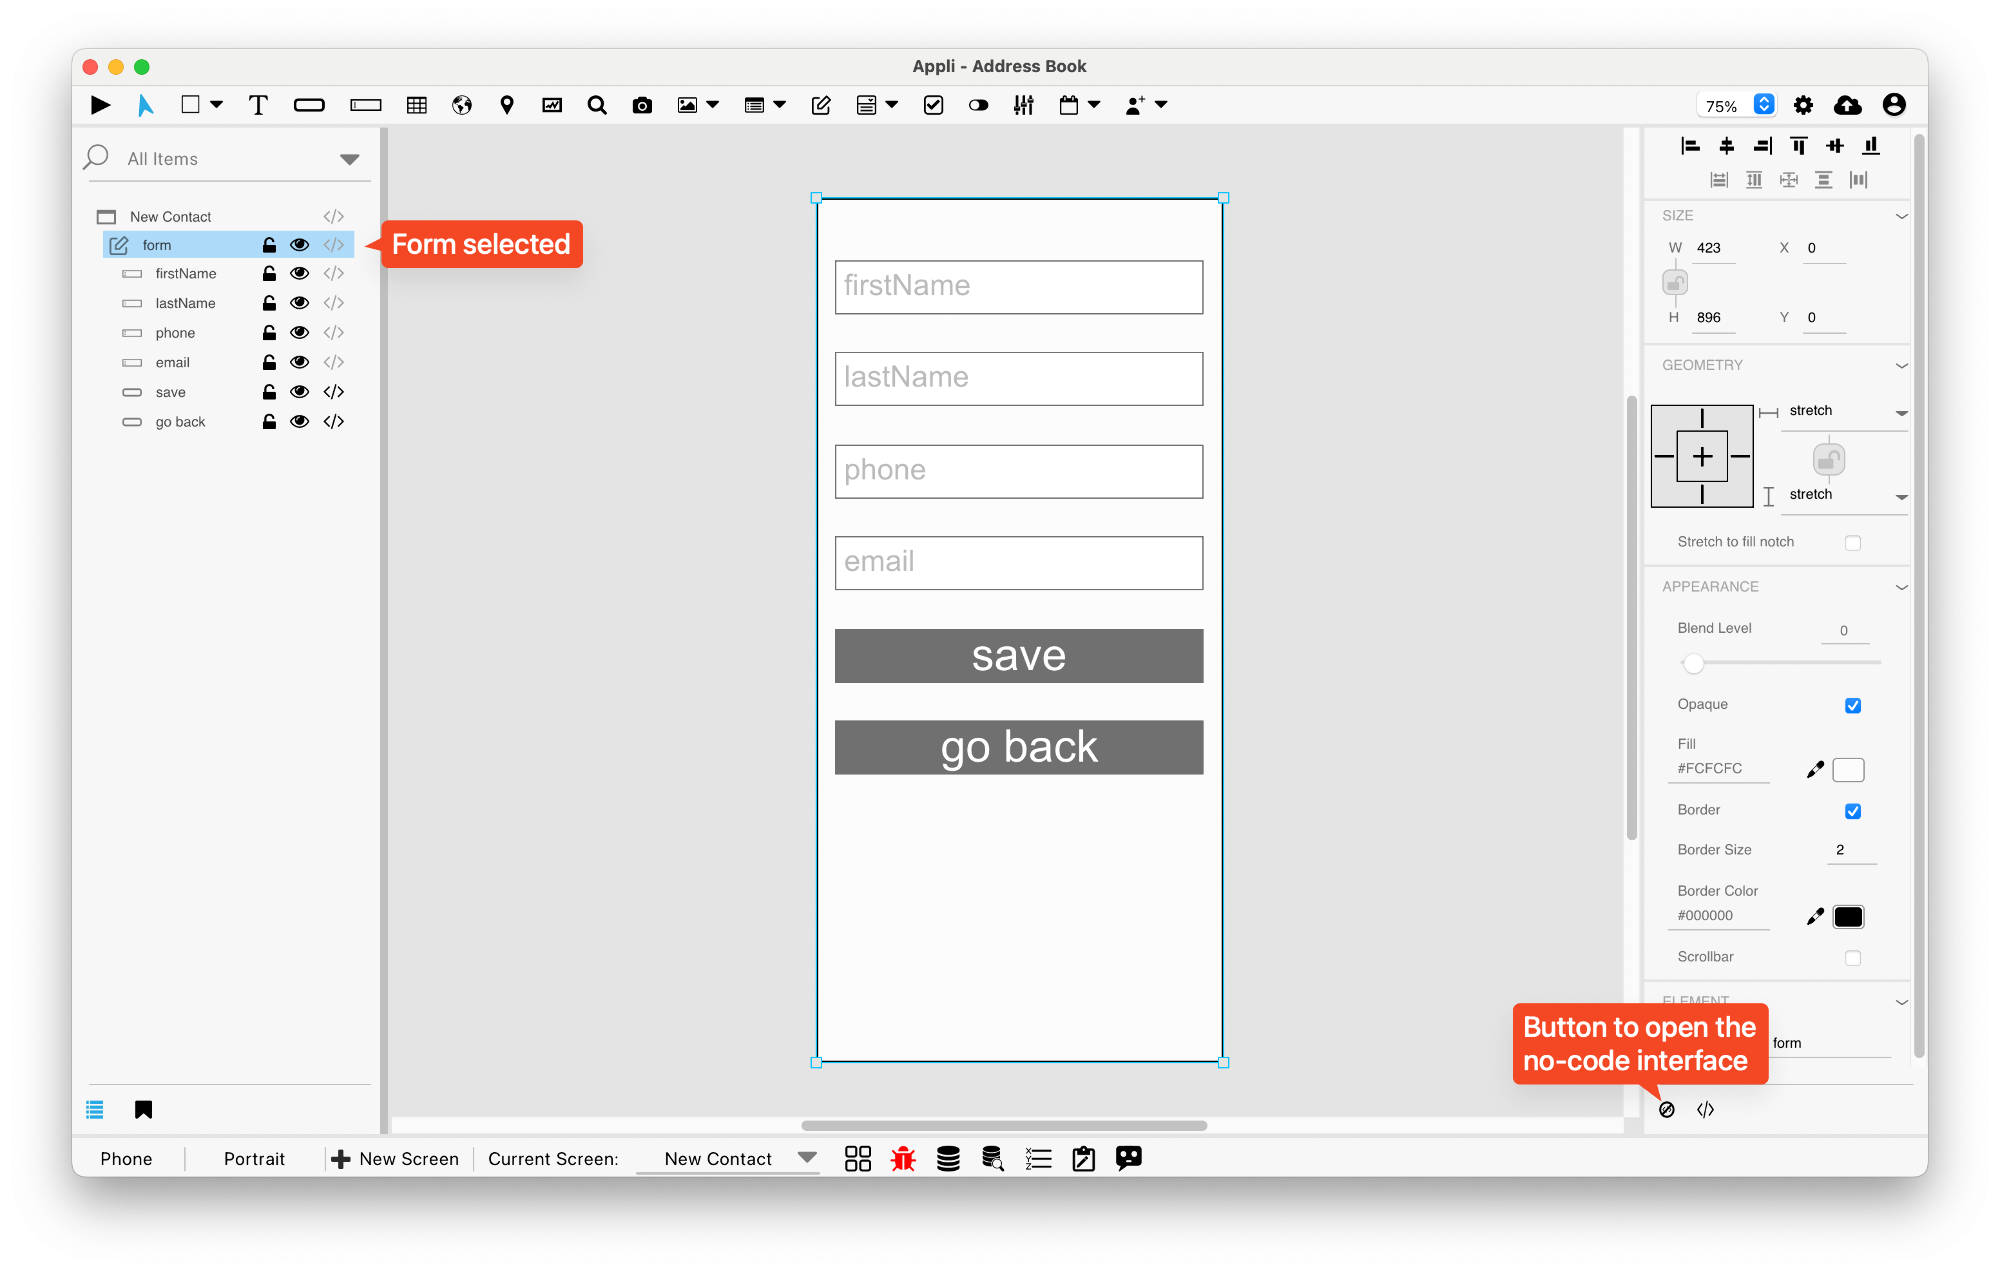
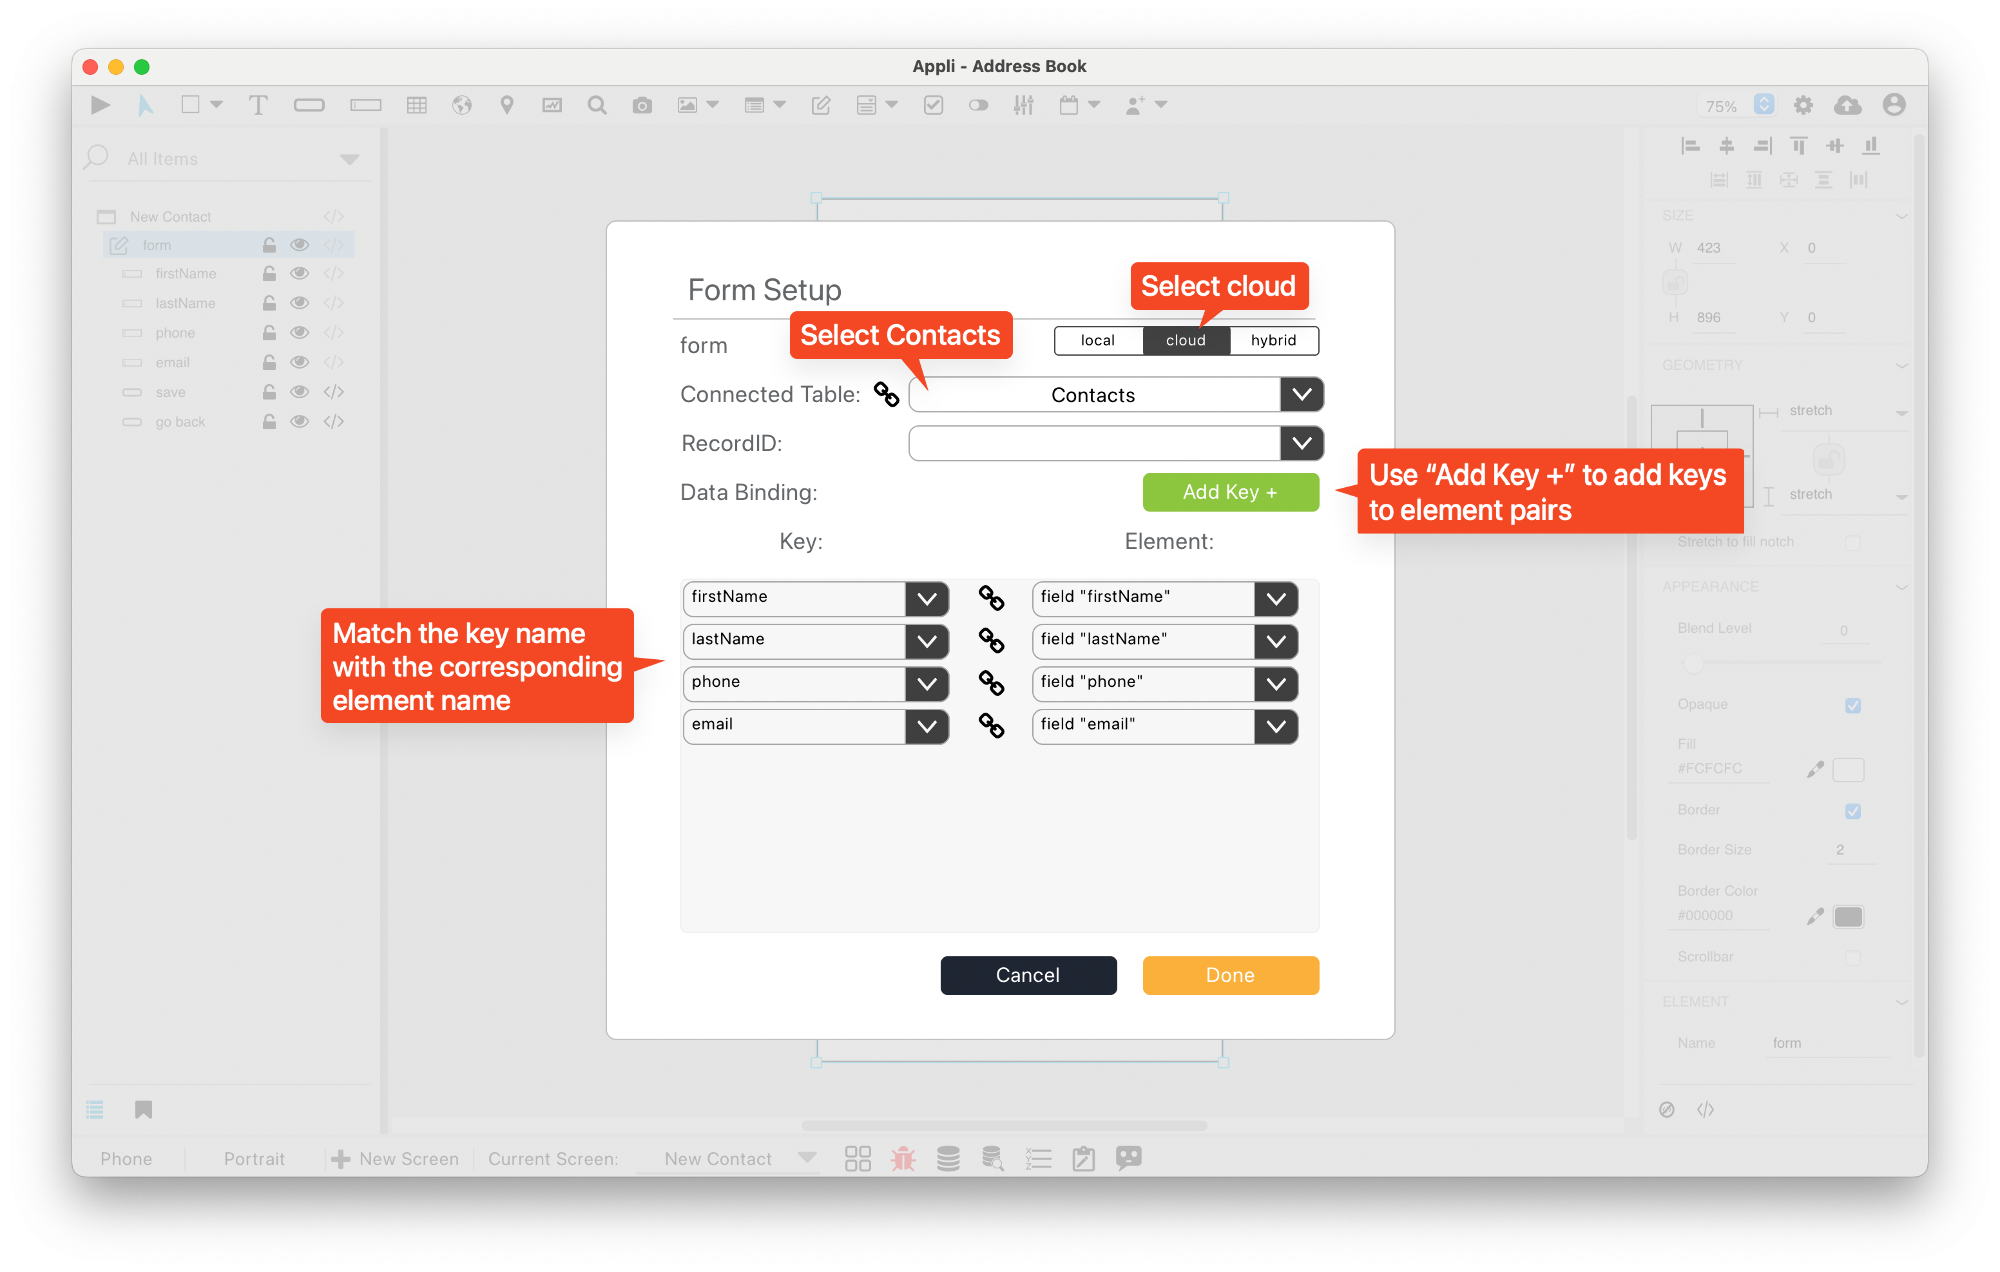
Select the form by clicking it either on the playground or in the project browser. On the property inspector for the form, click the no-code button at the bottom of the interface.
In the no-code interface, do the following:
- Select cloud.
- Select the contacts table.
- Using the Add Key + button, add as many entries as necessary to cover all keys on the table.
- For each entry, select the table key and the field of the same name to connect them.
It should look like the screenshot below after you’ve finished adding everything.
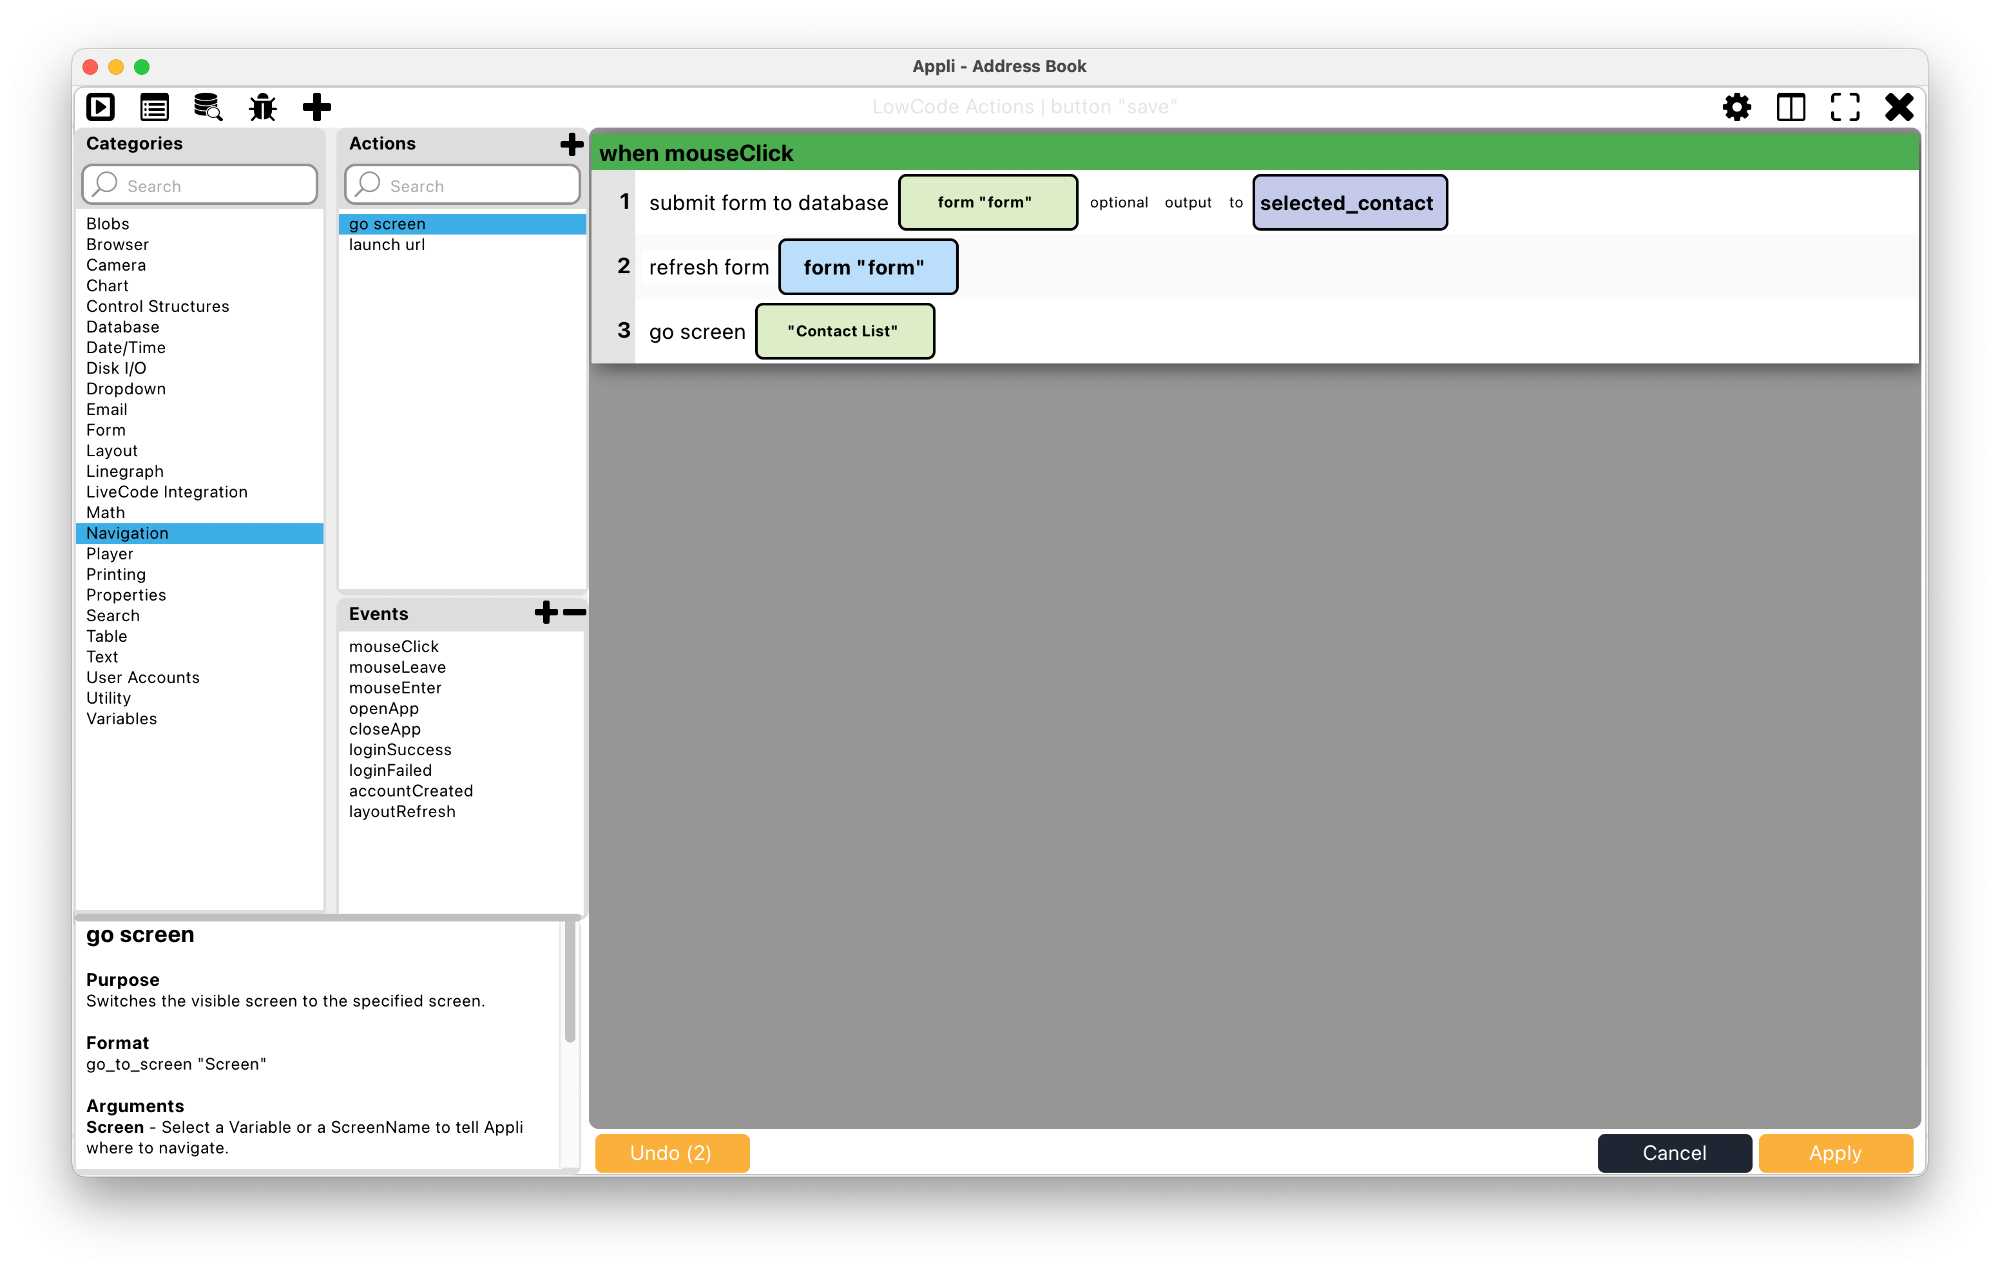
Now that the form fields are all bound to their respective keys, we
can use the low-code interface to save the record to the table. Select
the Save button element on the form, open its low-code editor
to add a mouseClick event. Be aware that to select elements
inside a form, you need to double-click them. You can also select them
by clicking on them on the project browser.
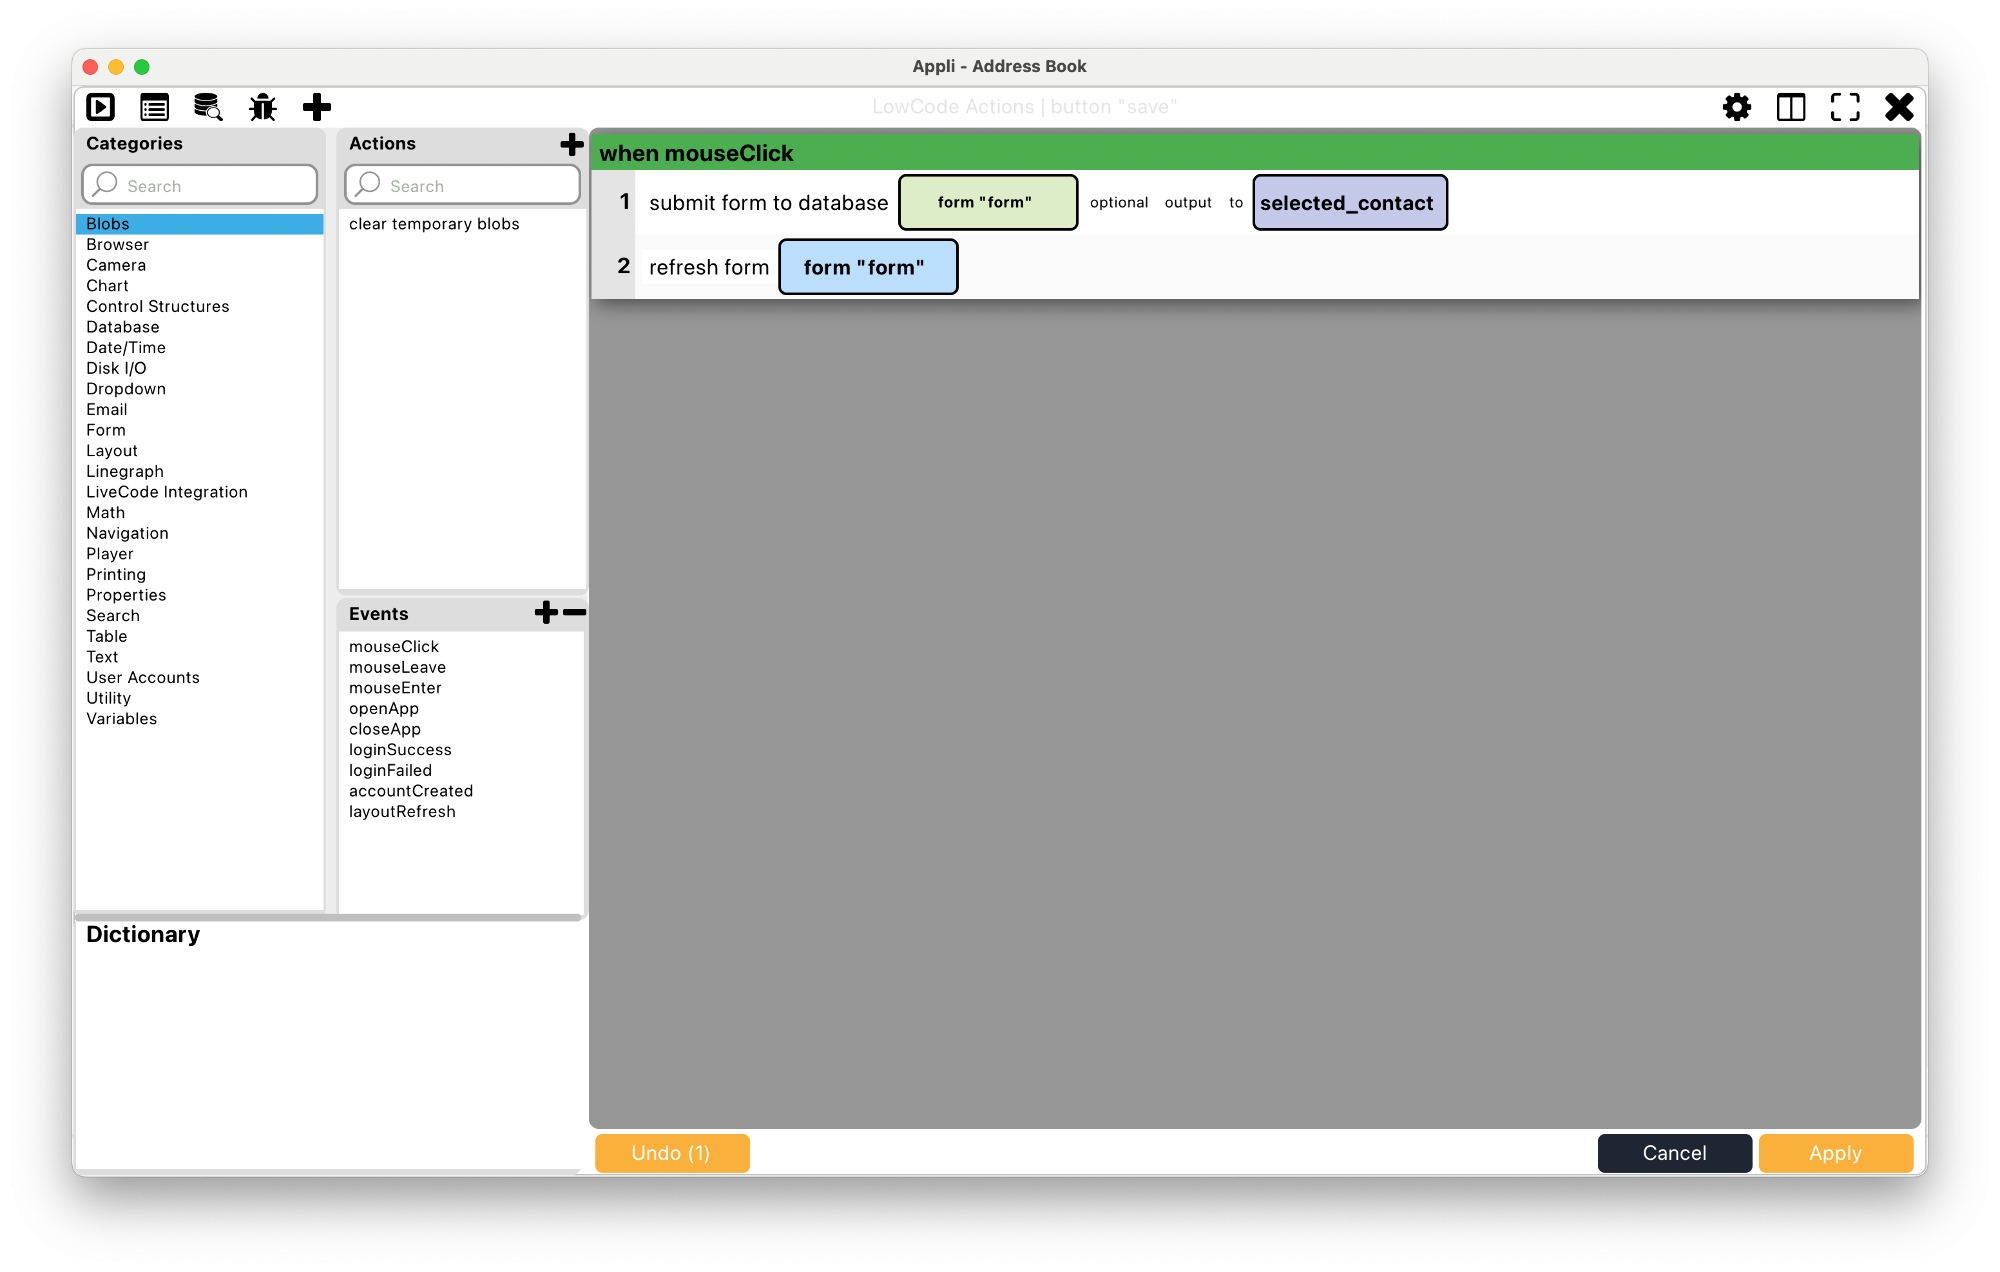
That code will send the form data to Appli and save the record. The refresh action will empty the form after the contact is saved. Both actions are under the form category. Remember to select the form element as the argument to those actions.
Go into play mode and add a couple of records of your own.
Using the form builder to create a form
This is another way to build a form, it is much faster. The form builder tool is located at the footer. It is an icon shaped like a clipboard. When you first launch it, it shows some pre-made templates you can add to your project.
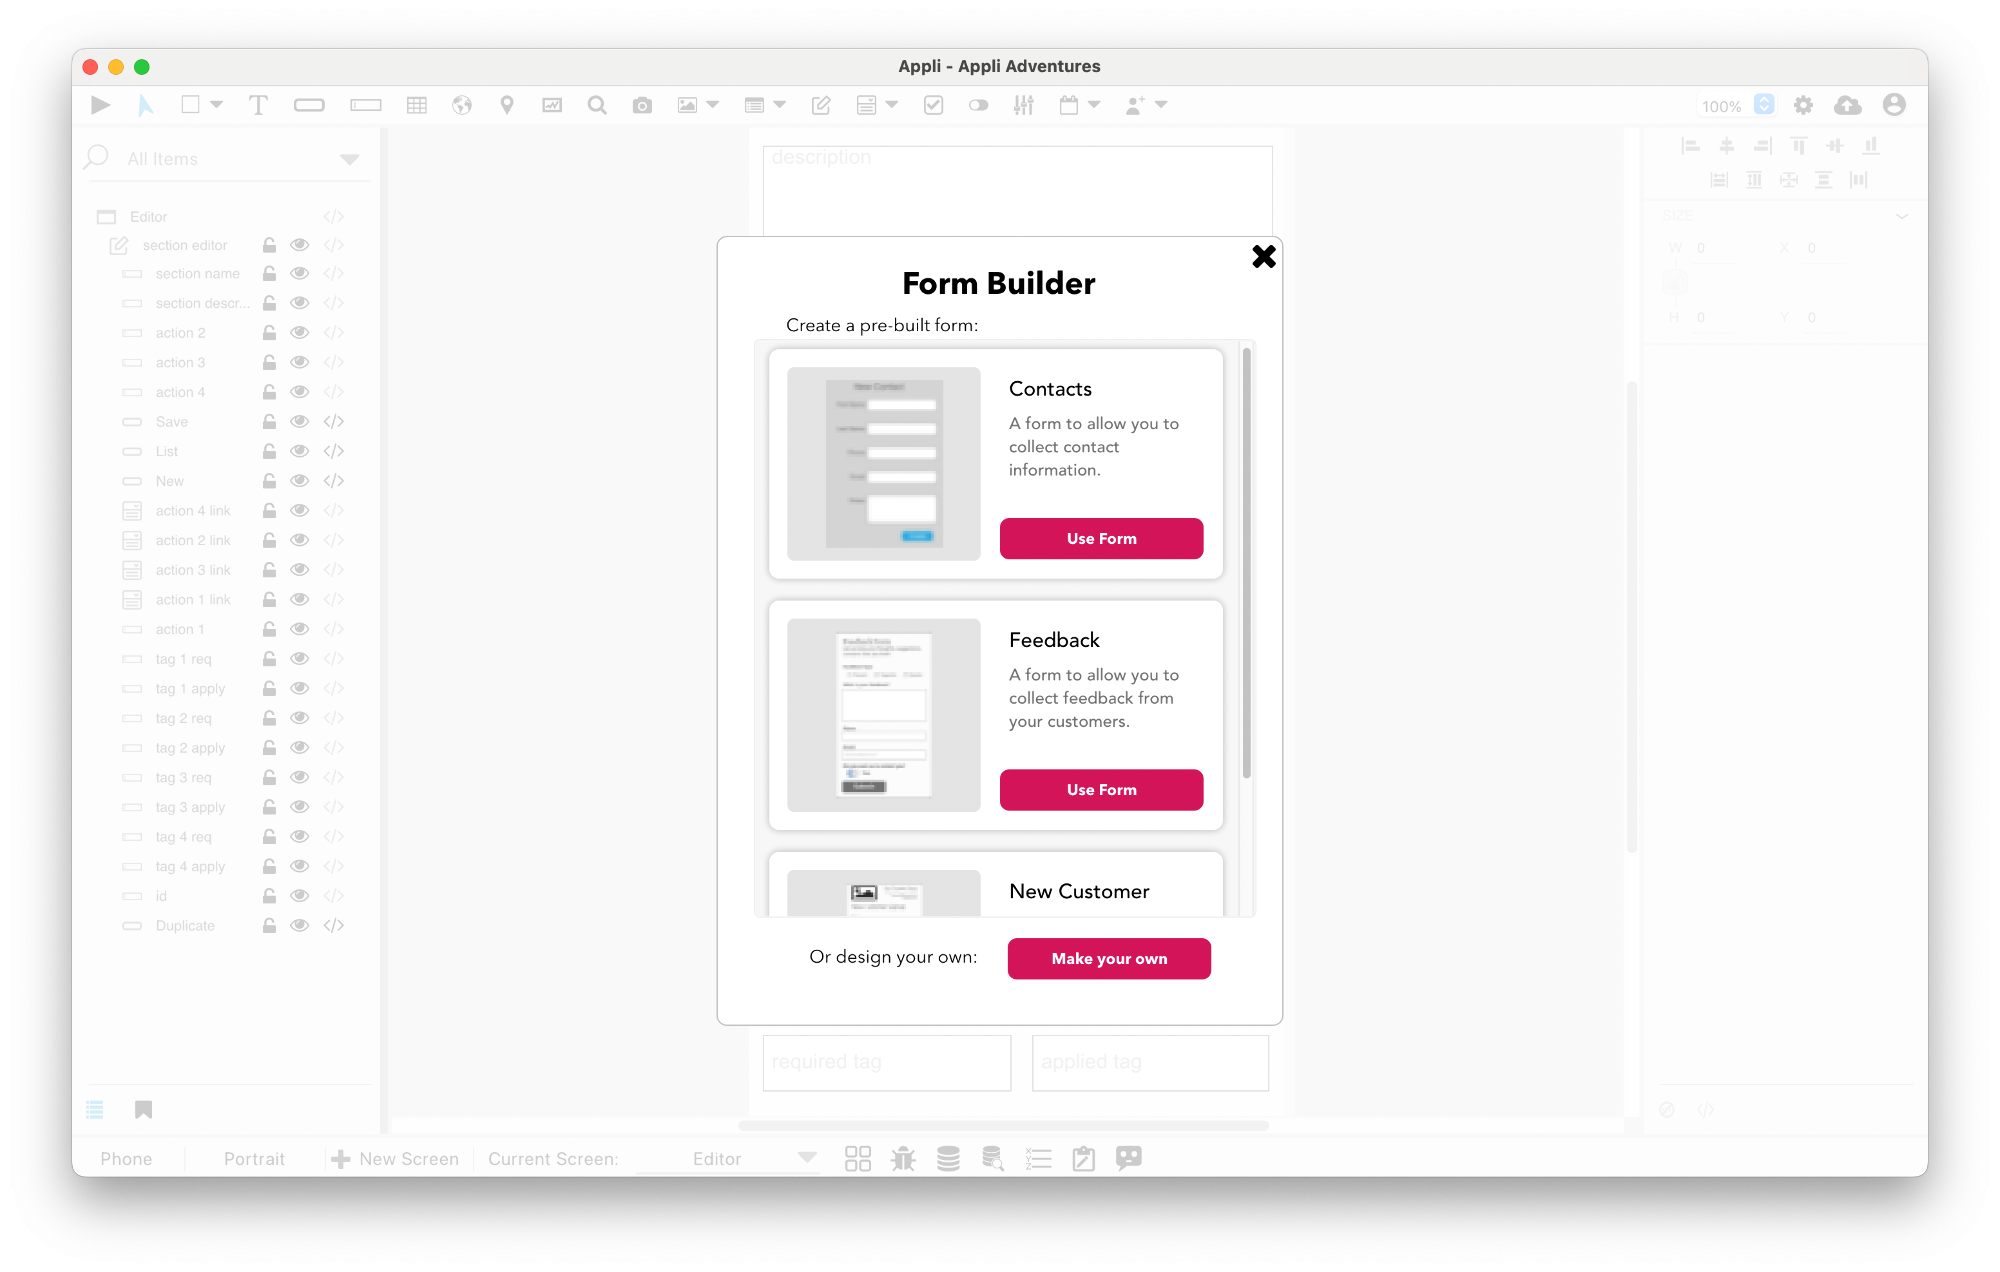
Instead of picking any of those, we’ll select Make your own from the bottom of the form builder window.
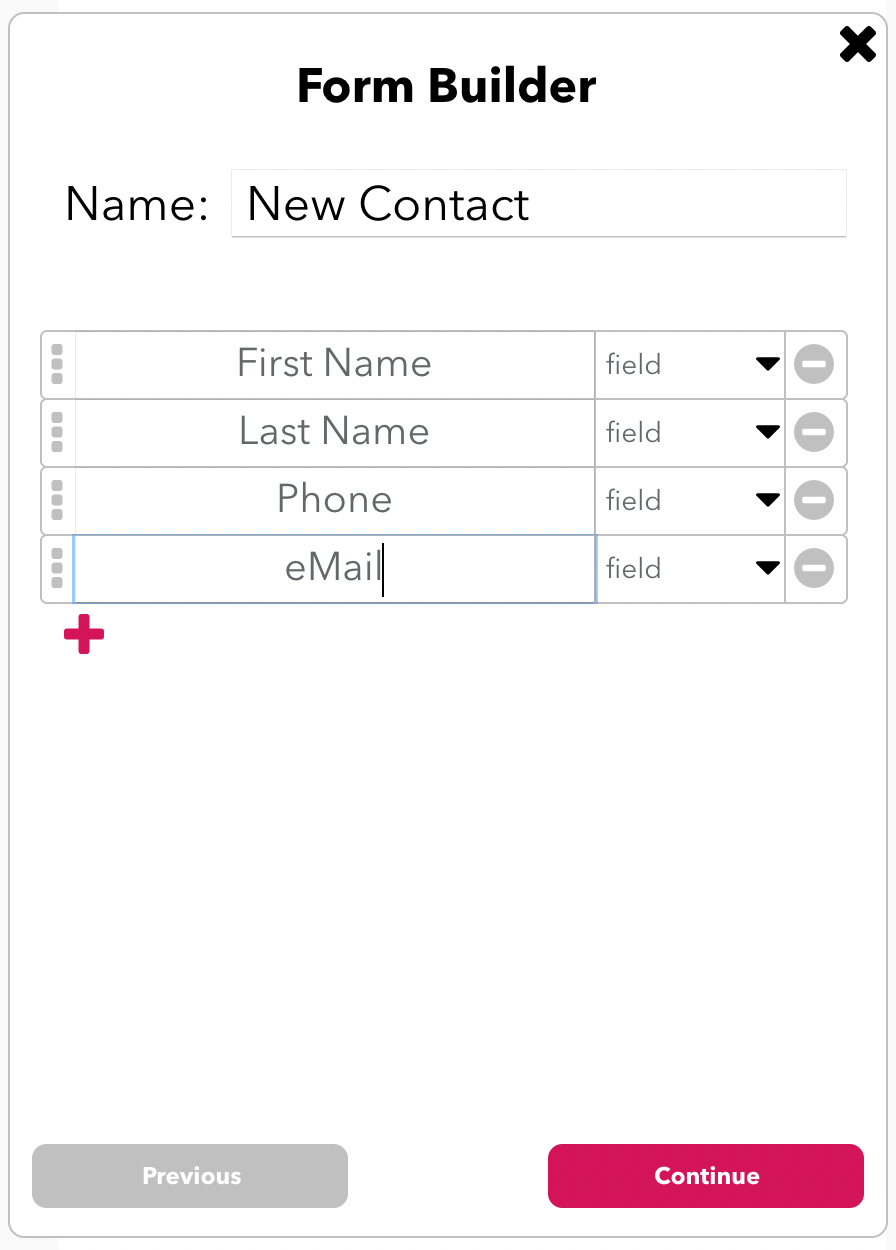
It will open a new editing window to specify the form name and its fields. For each field, you can pick a label and a type.
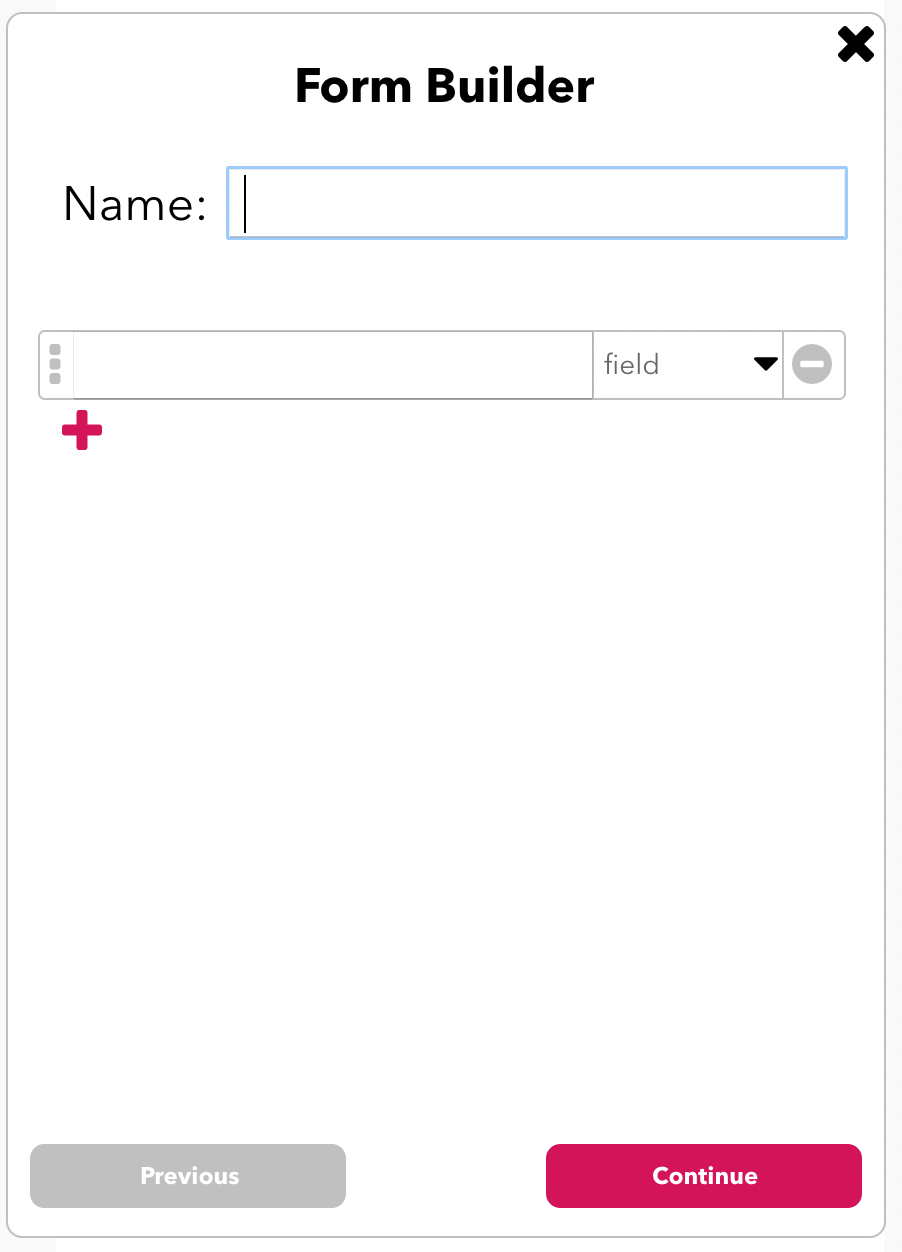
Let’s fill it in with our address book fields.
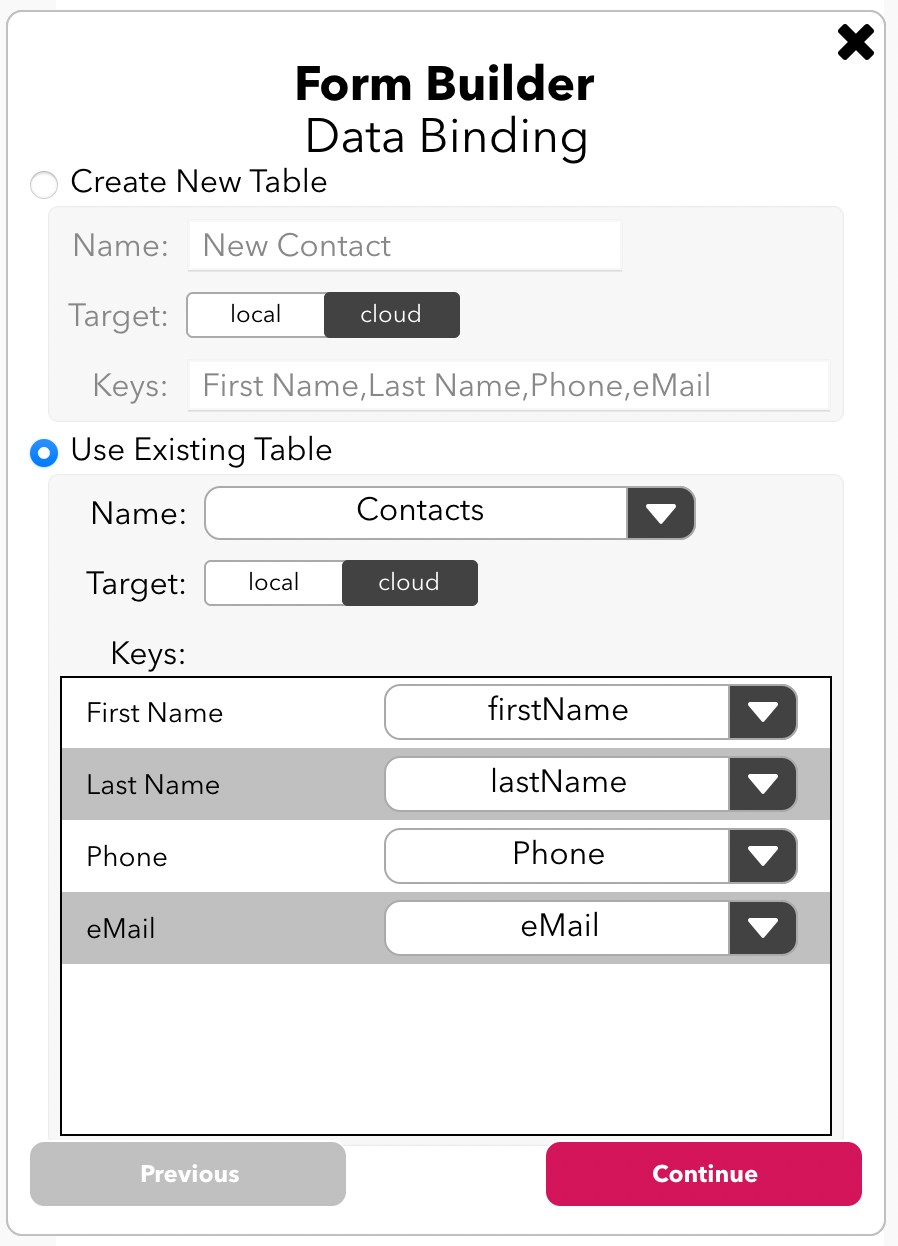
After specifying the fields, it is time to do data binding. You can create a new table or use an existing one. Since we already have the table in place, lets select it and then use the dropdown menus next to each label to select which table key they connect to.
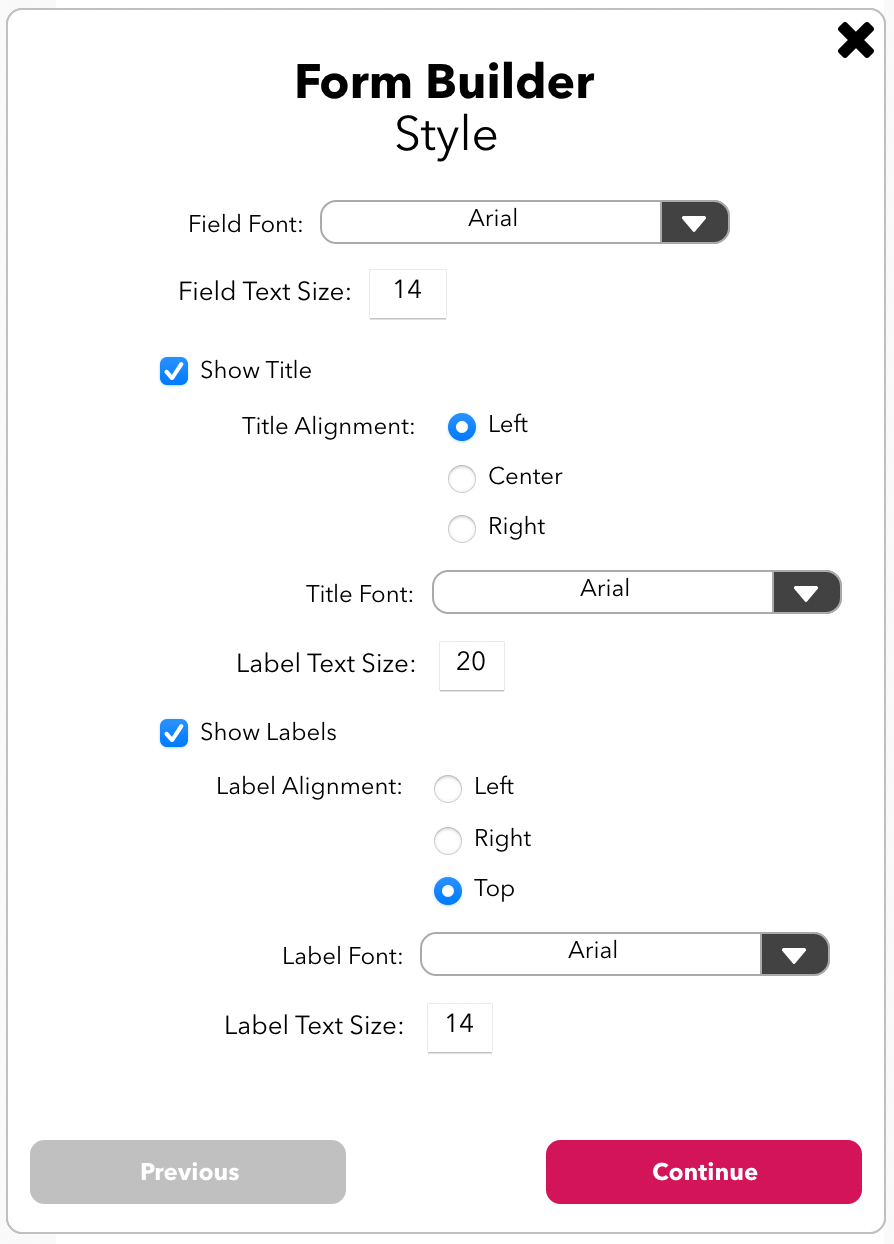
Next step is customising the style used for the form. That means fonts, sizes and alignment.
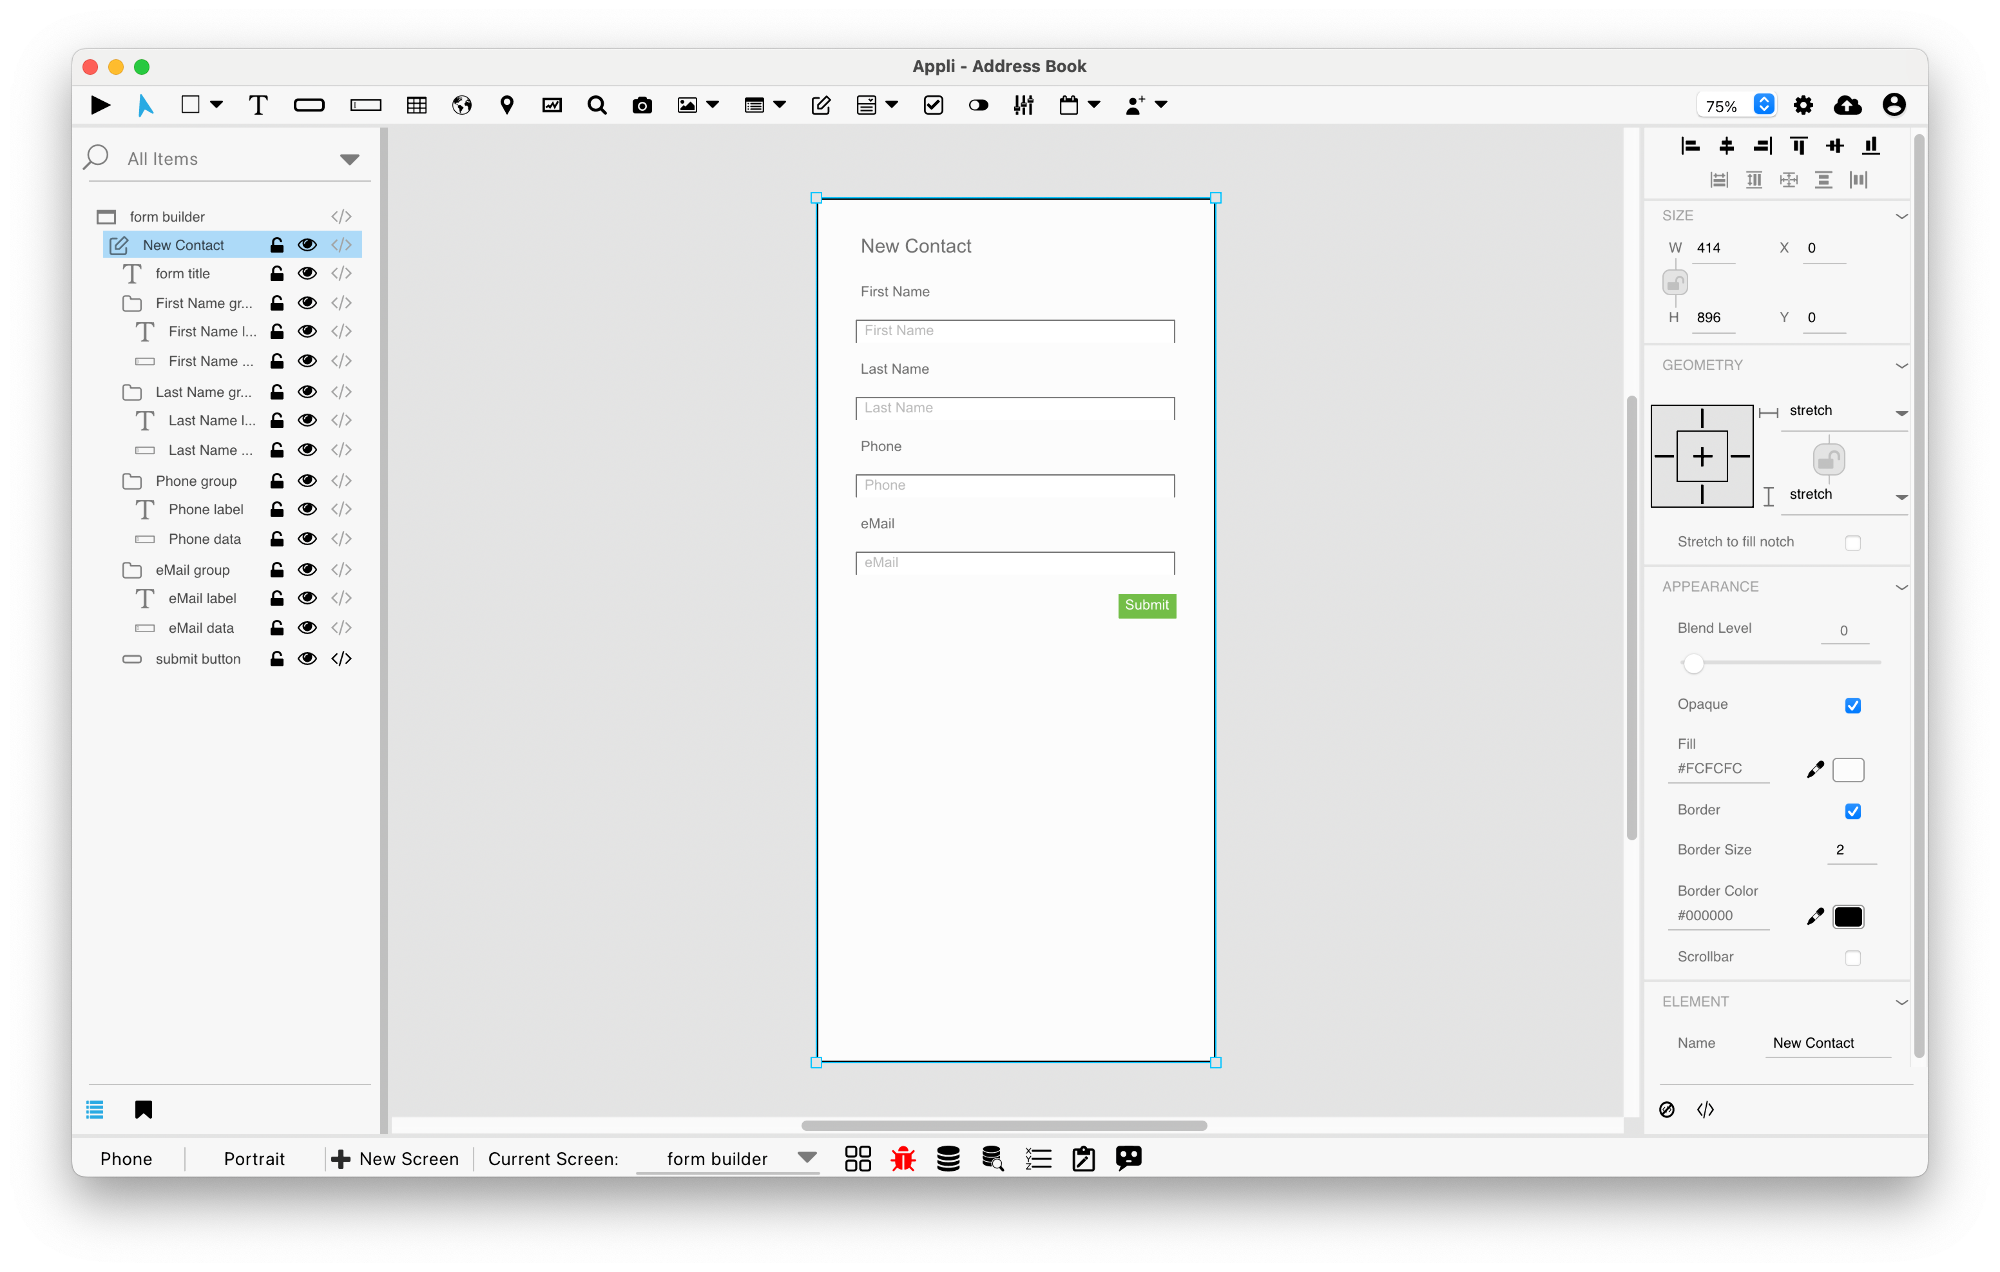
With that done, Appli will build the form with all the necessary elements and data bindings as if you had done it yourself.
Listing contacts
Create a new screen named “Contact List”. Listing records is similar to creating records in which we’ll use a container element to connect elements inside it to the database. Here, we’re going to use a layout element. These elements can list records from a table and create scrollable regions in your app.
Add a layout element to your new screen, leaving some space at the top for other controls we’ll be adding shortly. The layout will appear like a rectangle. Using the property inspector, enable Multiple Rows for the layout. It will become a list of rows with alternating colors.
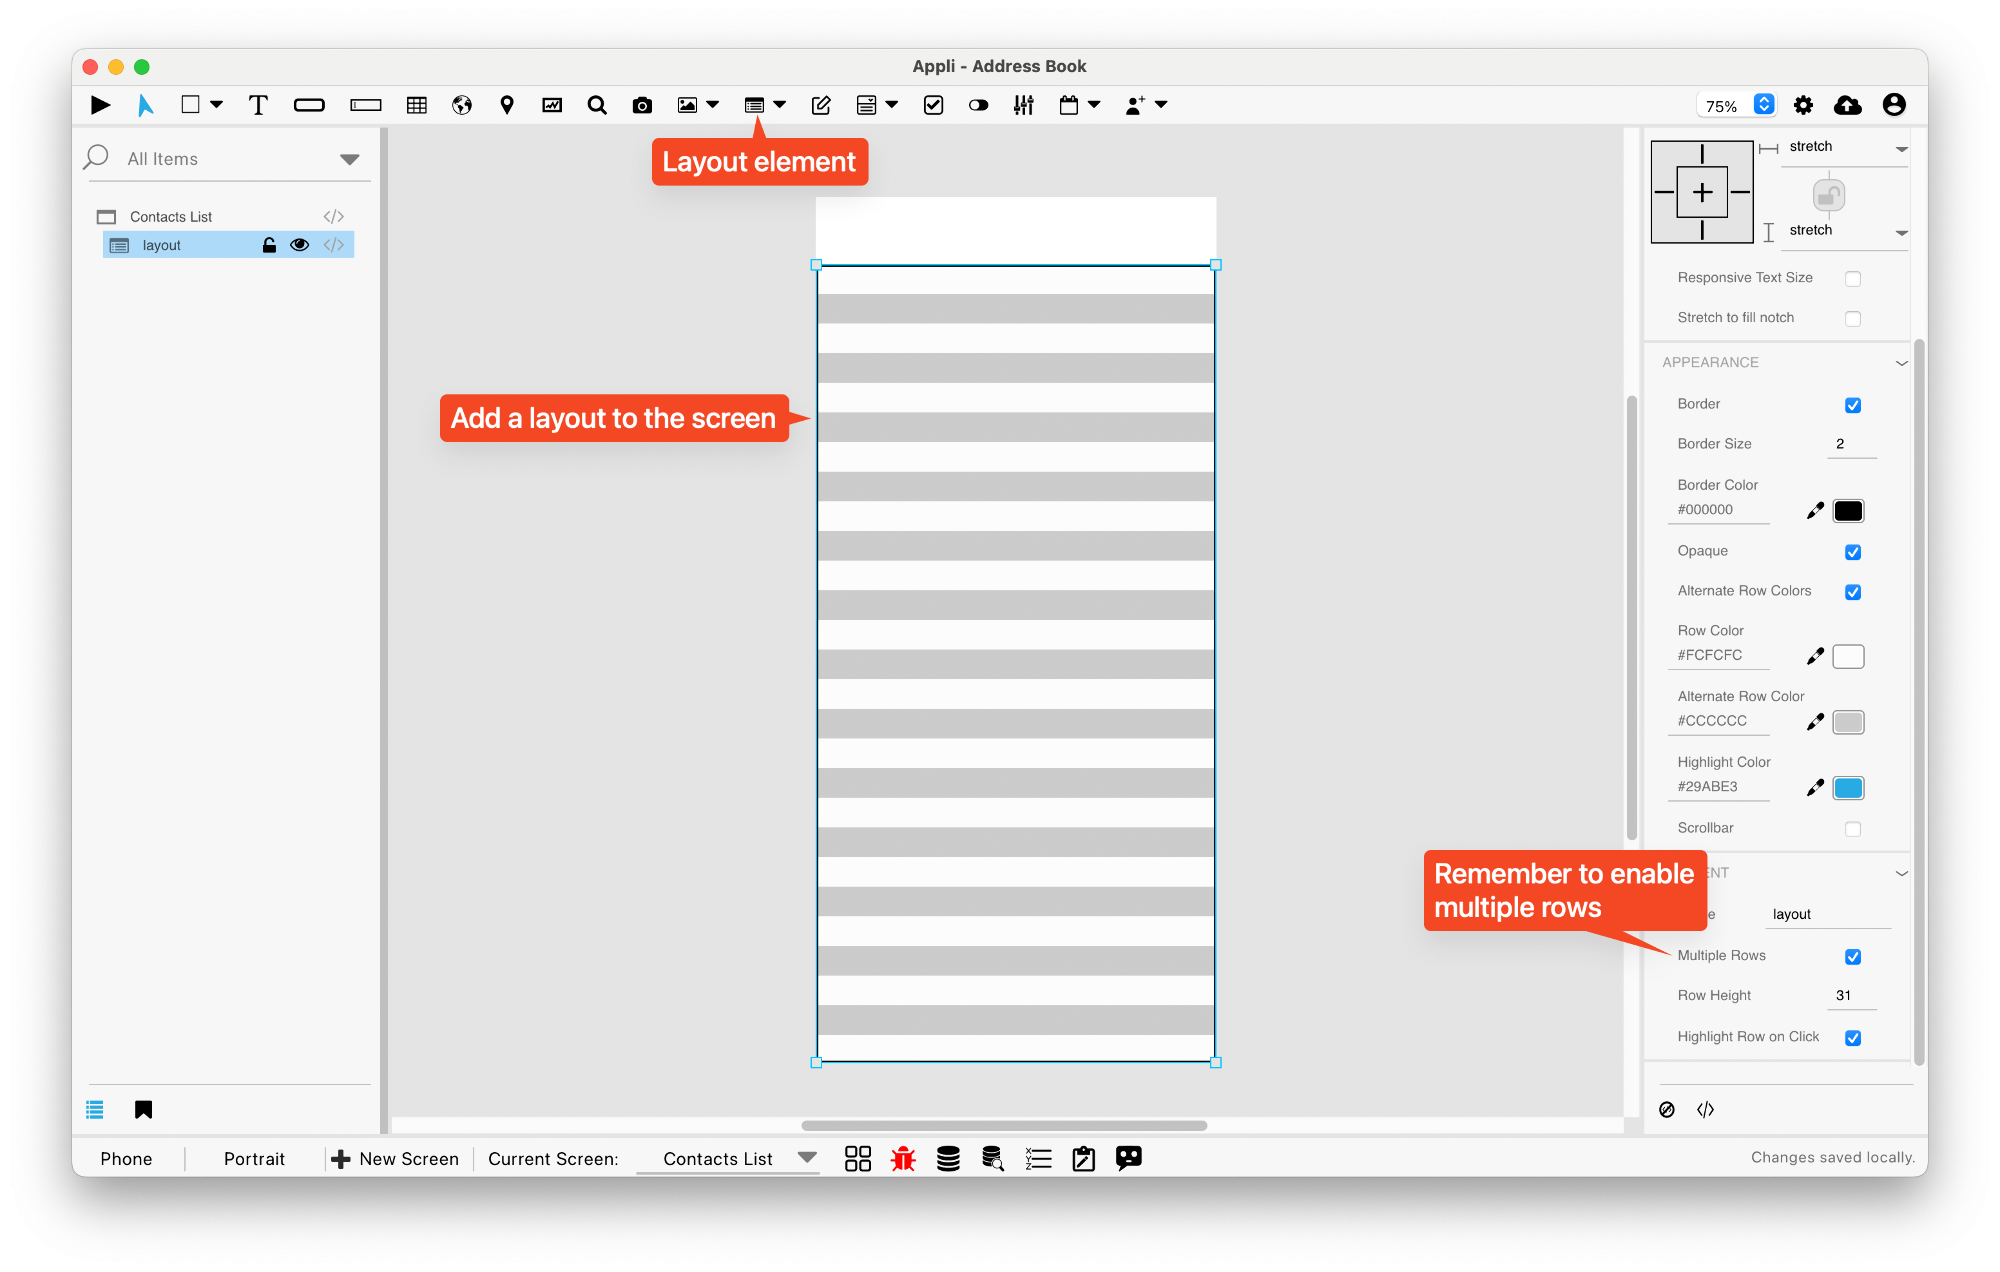
When we enable multiple rows for a layout, Appli picks up the elements we have in it, and repeats them for each record in the table. So, if we add a text element to the layout, it will repeat this element for all records. This is how we create a list of records. Imagine you’re just creating the first line of a list. You can make it as complex as you want with multiple elements in it if you need them. Appli will pick those elements and assemble a list using them as a model for each item in the list.
To keep things simple, we’re going to just add a single text element to the layout. Position it so that it matches the space in the first line of the layout. If the line is too narrow, use the property inspector to make it larger (by changing the layout row height property). Name that text element “fullName” (notice that we don’t have a full name on the table, only firstName and lastName).
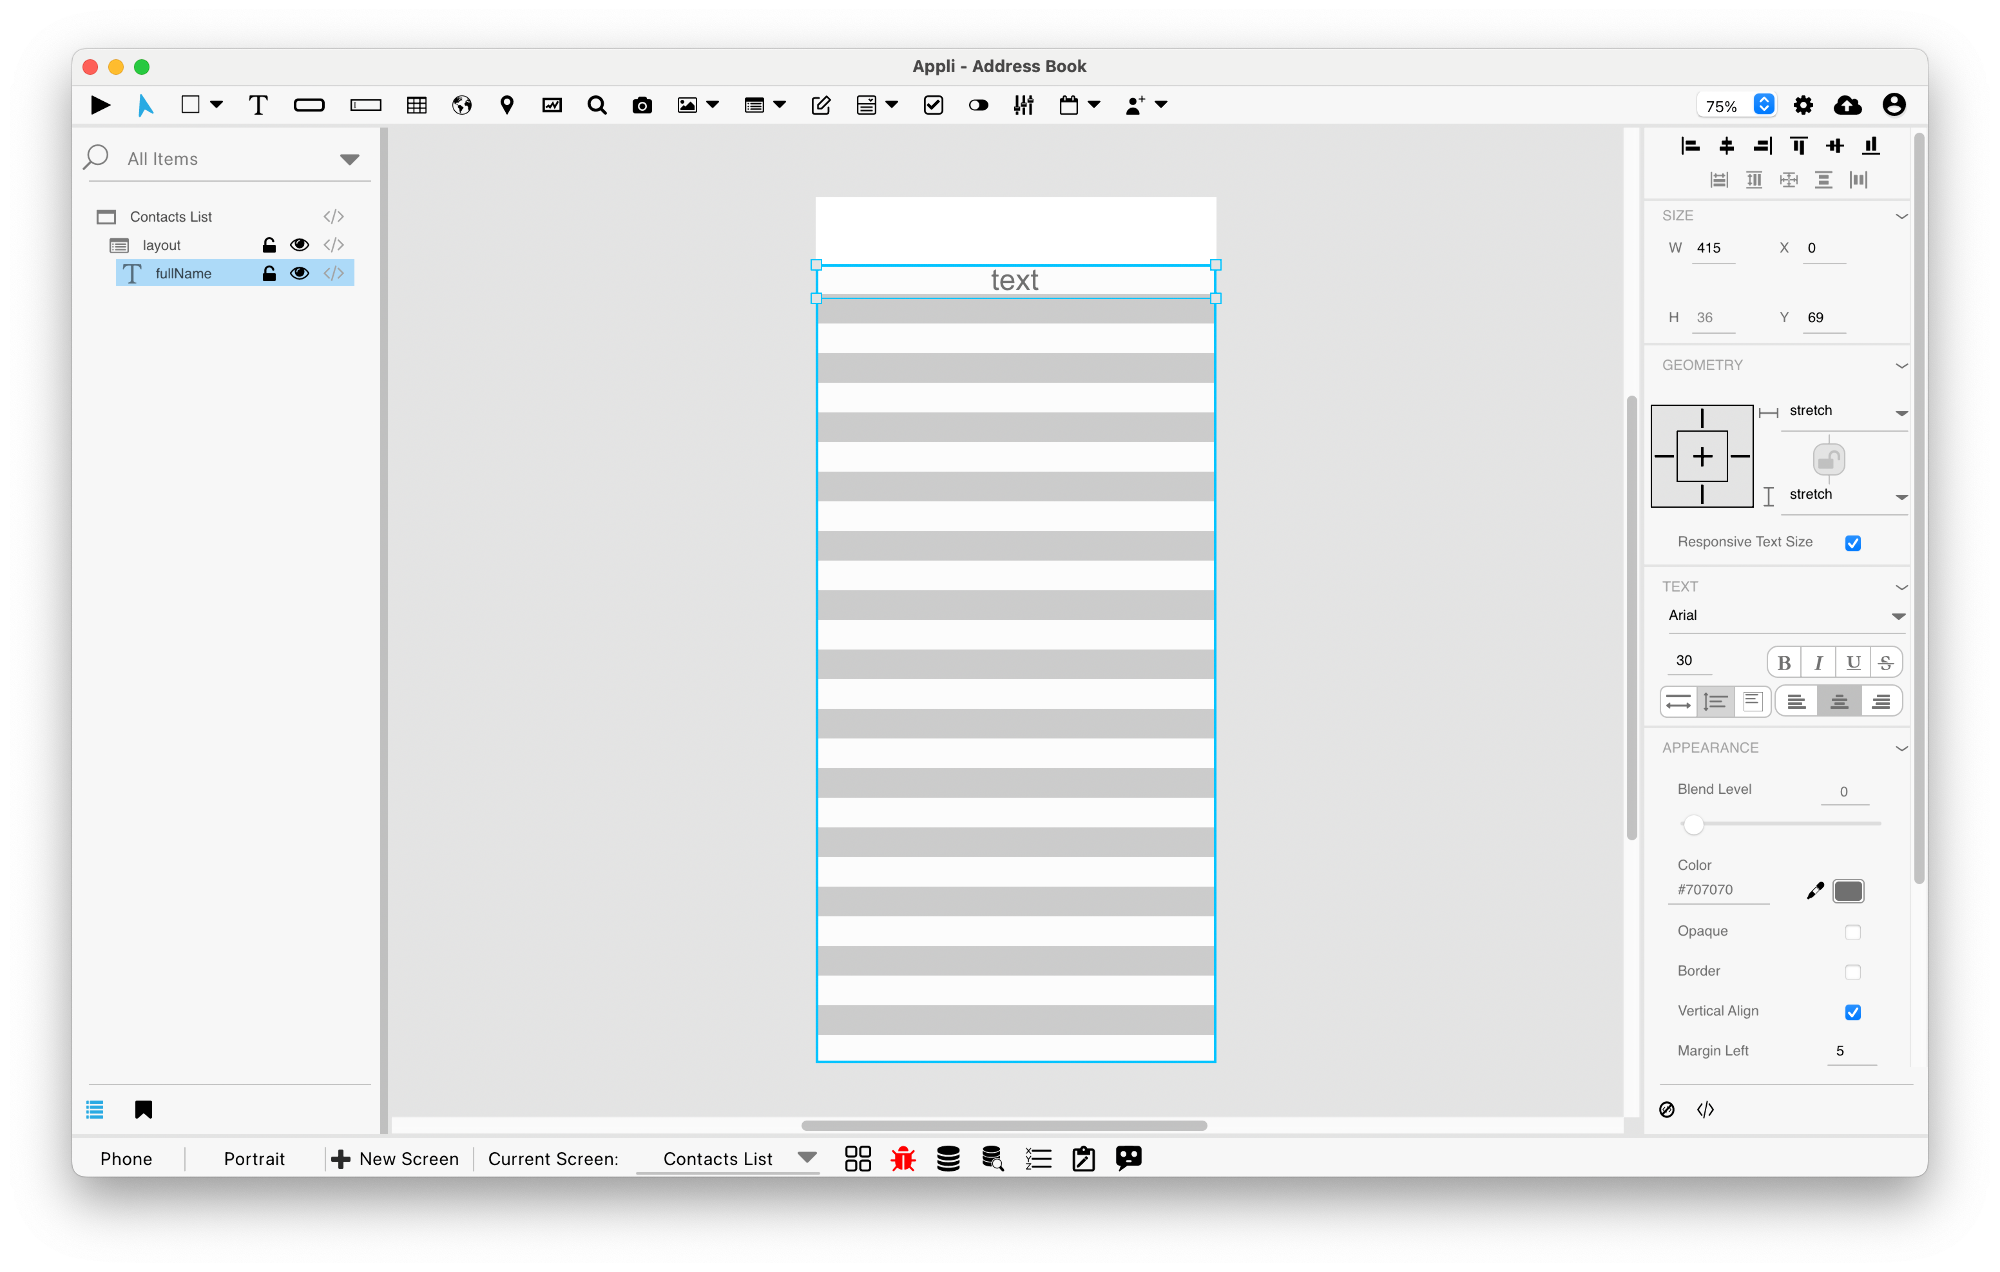
The text element will appear inside the layout in the project browser. Use the no-code interface for the layout to connect it to the contacts table.
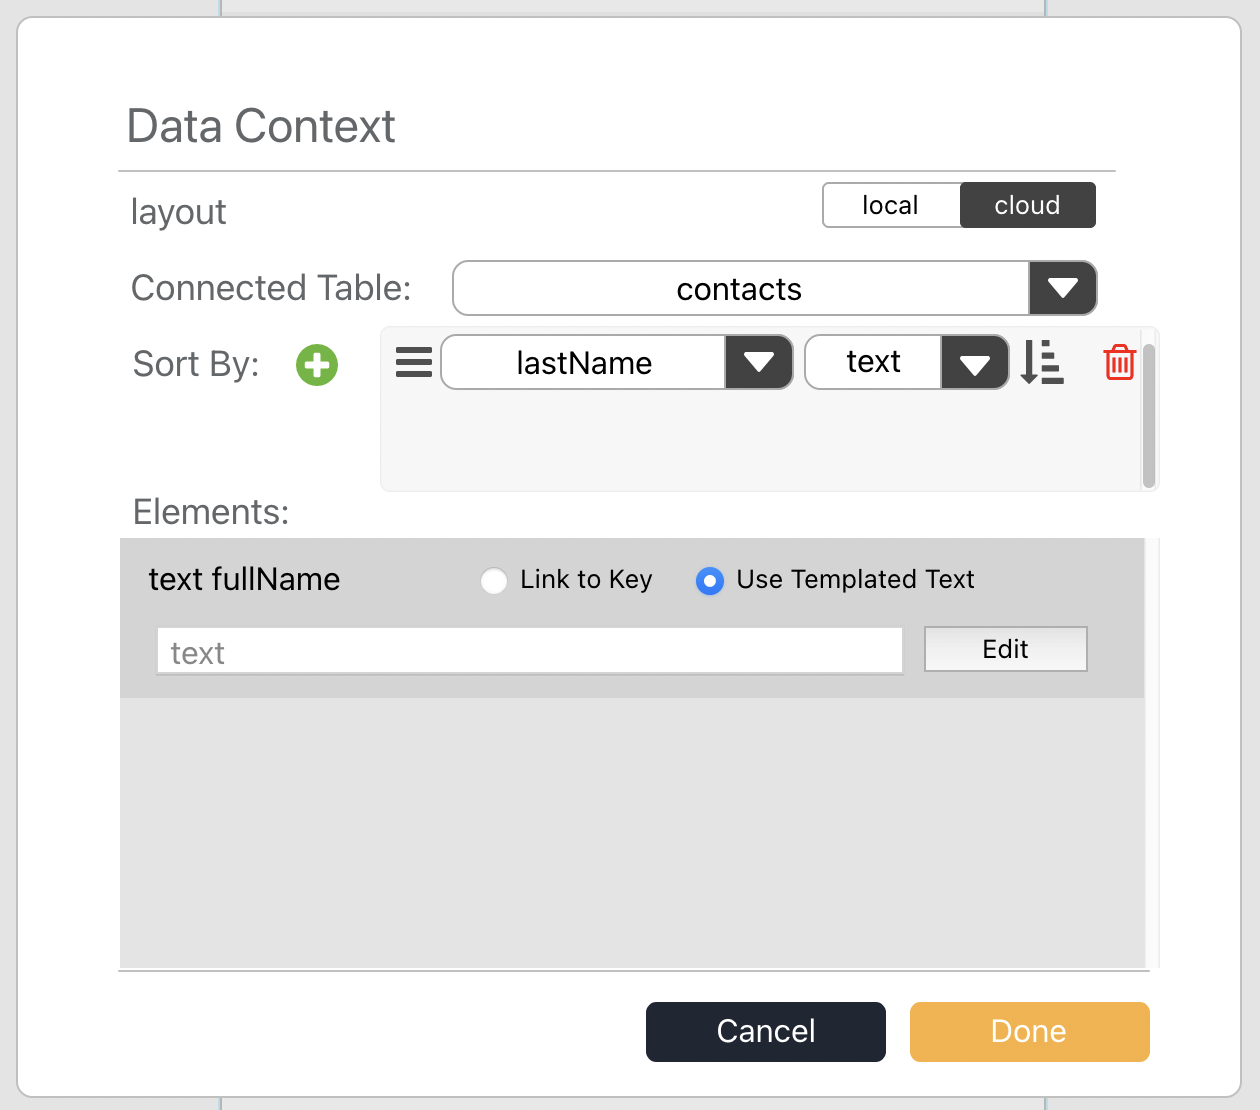
Select cloud and the contacts table. Sort the
layout by the lastName field, select text as the
ordering format and make it ascending. Don’t click done yet, we
still need to set up the elements inside the layout.
We have a single element inside the layout, a text element called
fullName. That is why it is the only element appearing in
the elements section in that dialog. If we had more elements in the
layout, they would all appear inside this section.
Keep the Use template text radio selected. Template text is a way for us to change the content of a field by adding text of our own and interpolating that content with data from the database.
The preview shown in that section shows text because that is what we currently have set as the content for that field. Click edit to change it, a new dialog will appear.
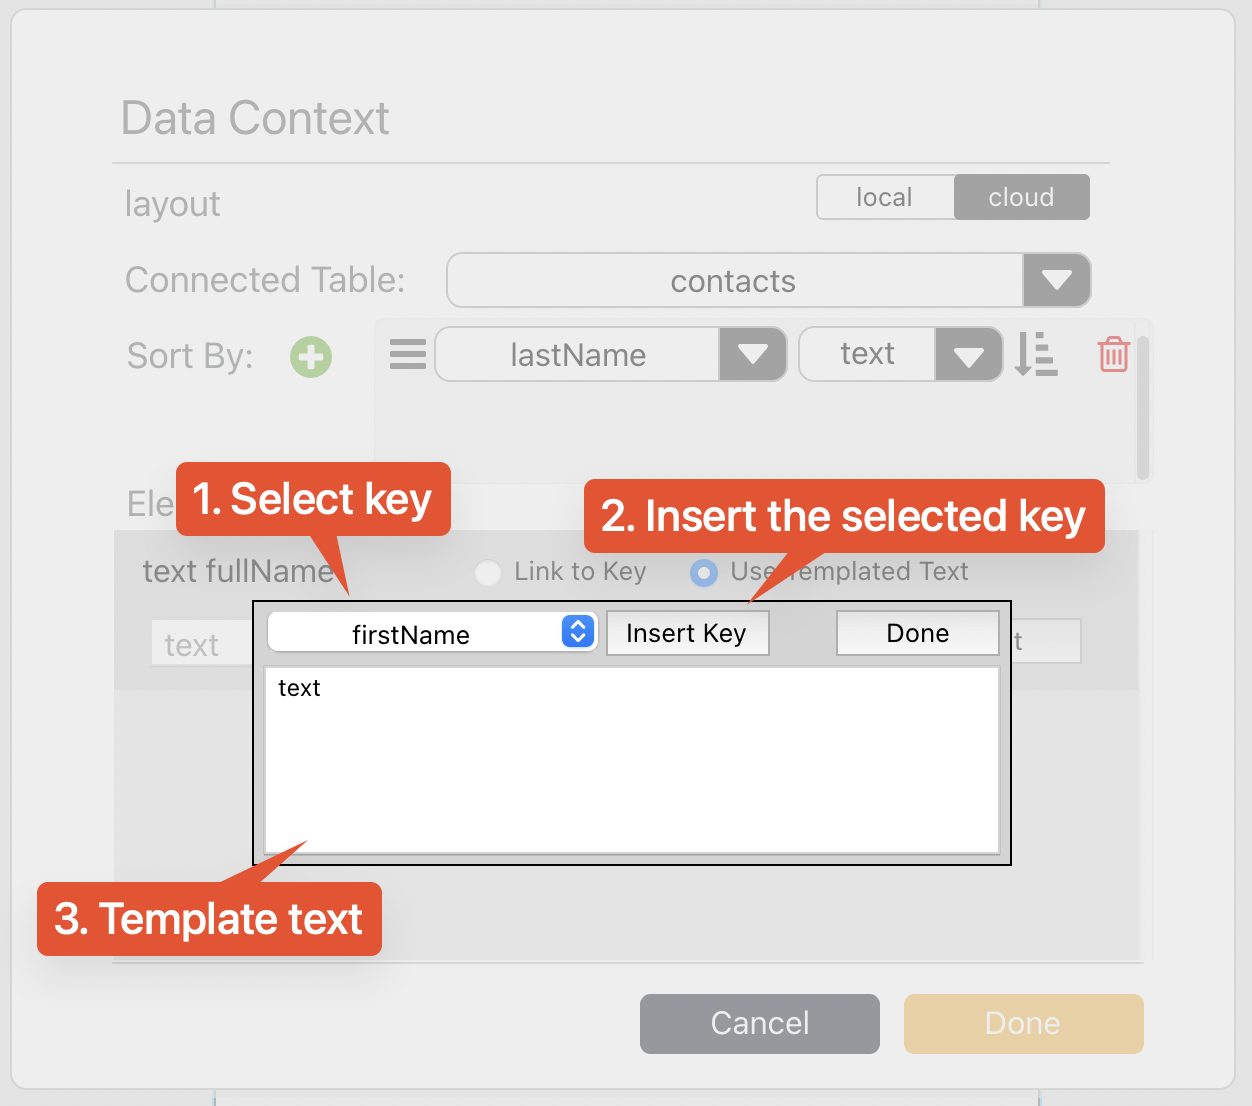
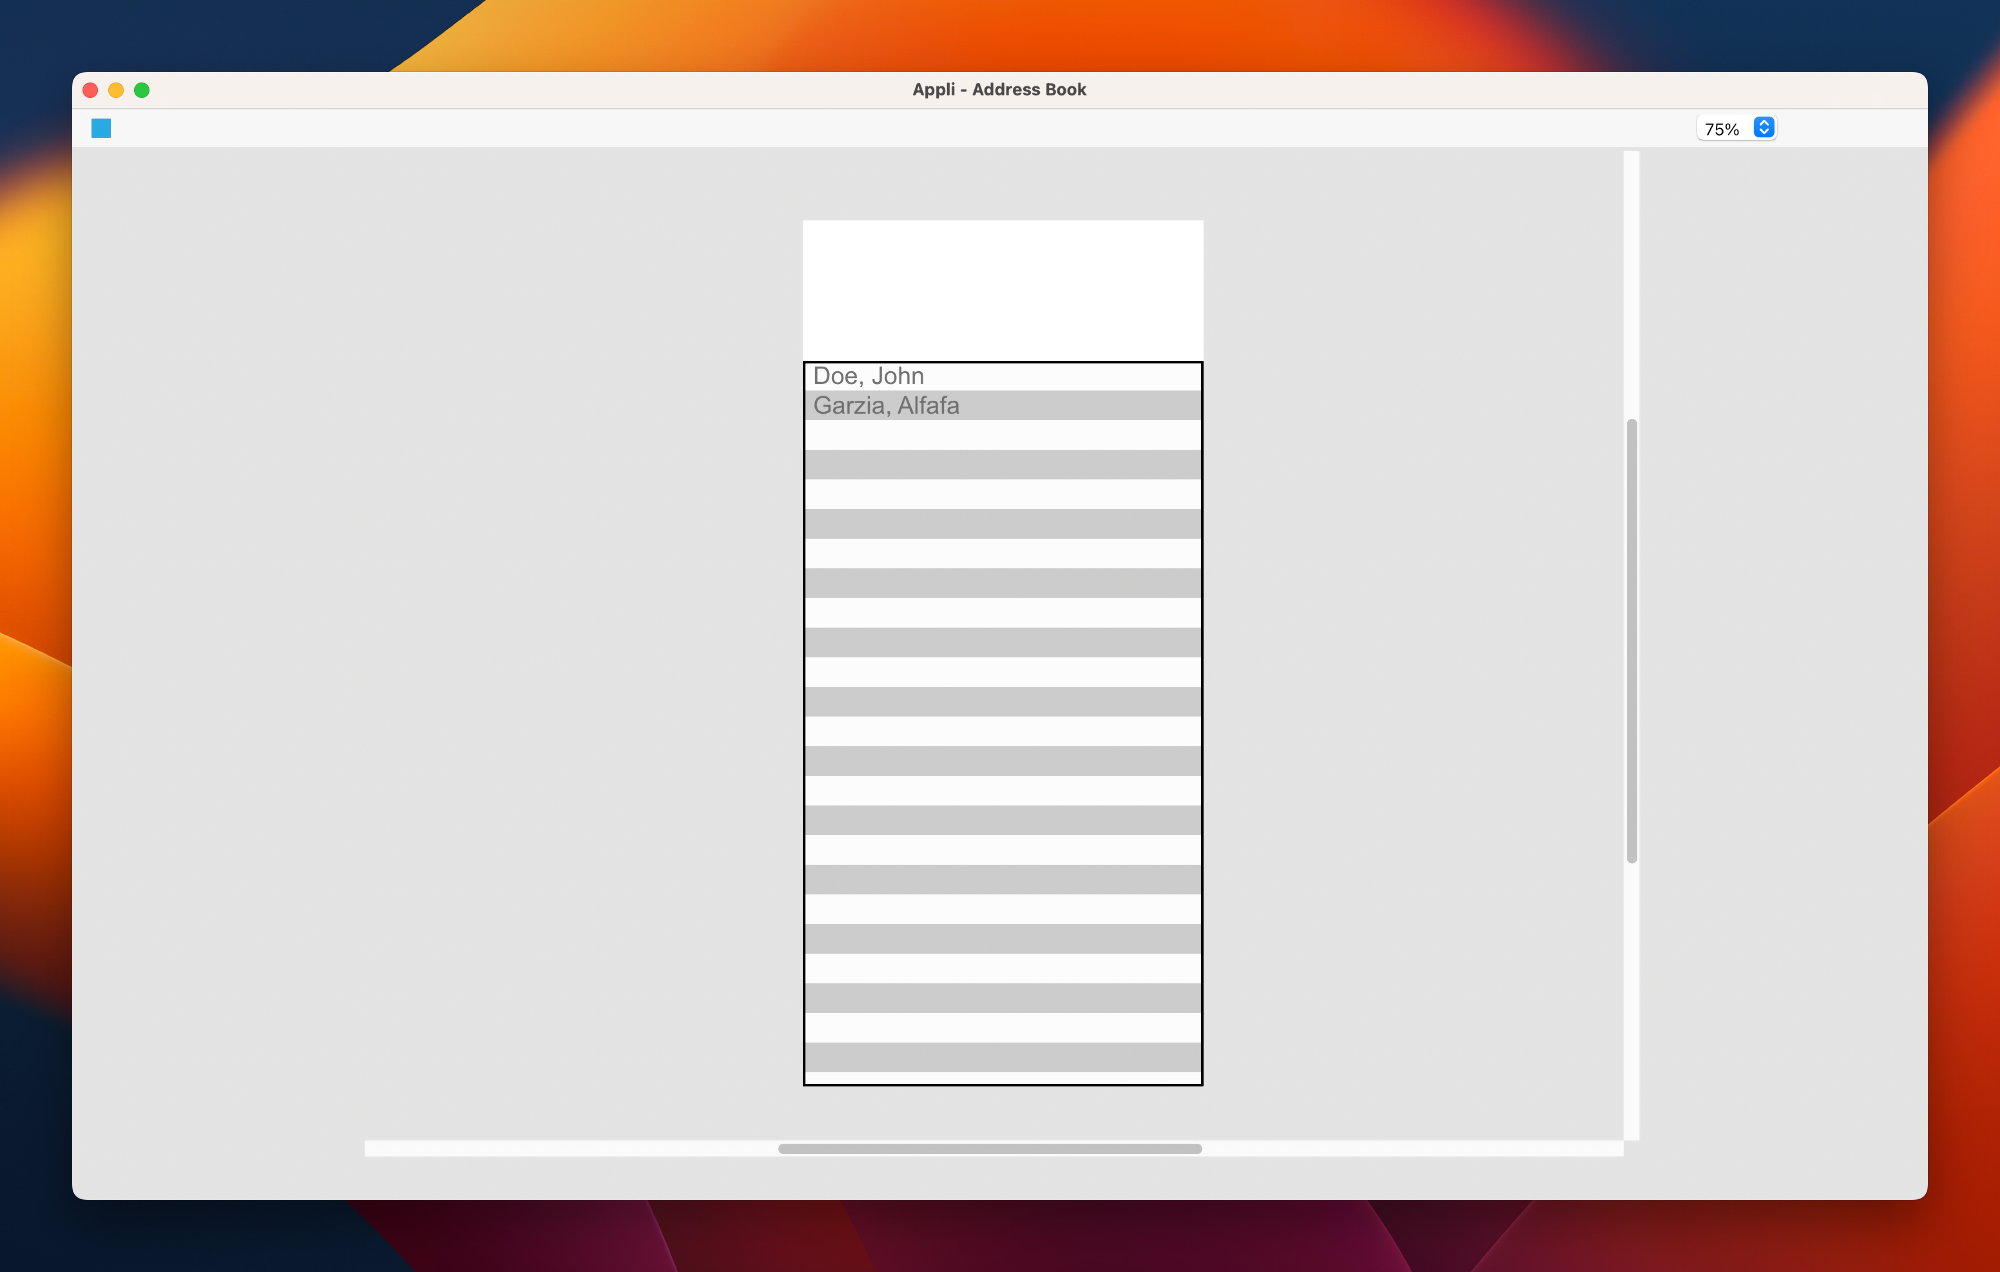
We want to list our contacts using their last name followed by a
comma and then their first name (i.e. such as Doe, John). To do
that, we can select the lastName key in the dropdown box,
click the Insert Key button, edit the template text to put a
comma after it, then do the same to insert the firstName.
The final template text should look like this:
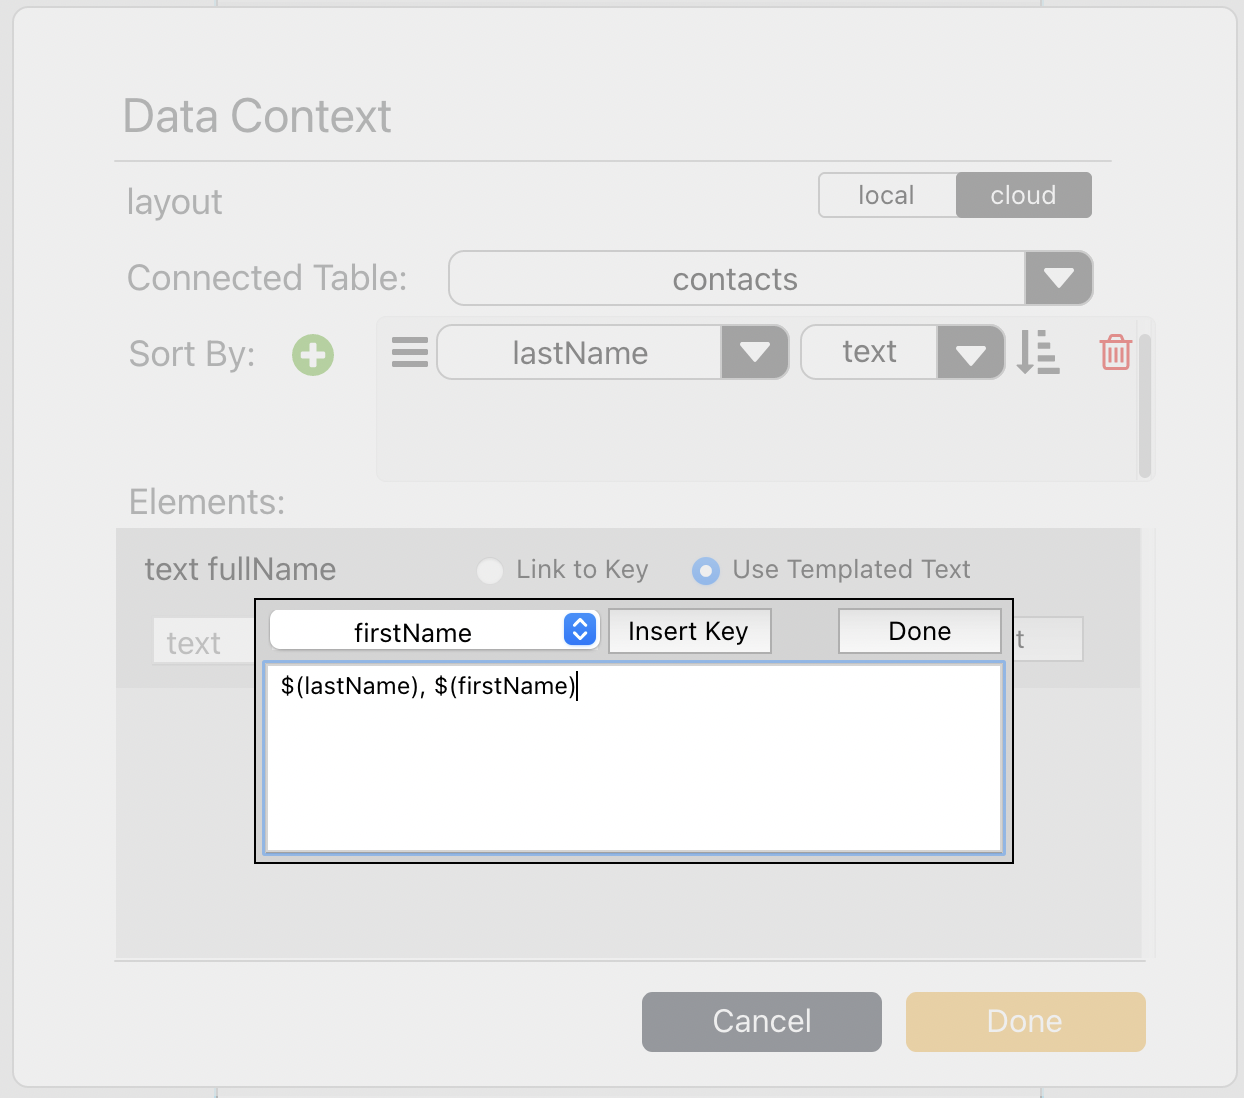
After that, click done to close that template editor, and then done to close the data context setup.
To make sure that this layout is always up to date when we go to this
screen, select the screen in the project browser and open its low-code
editor. You can simply click the </> icon next to the
screen name in the project browser.
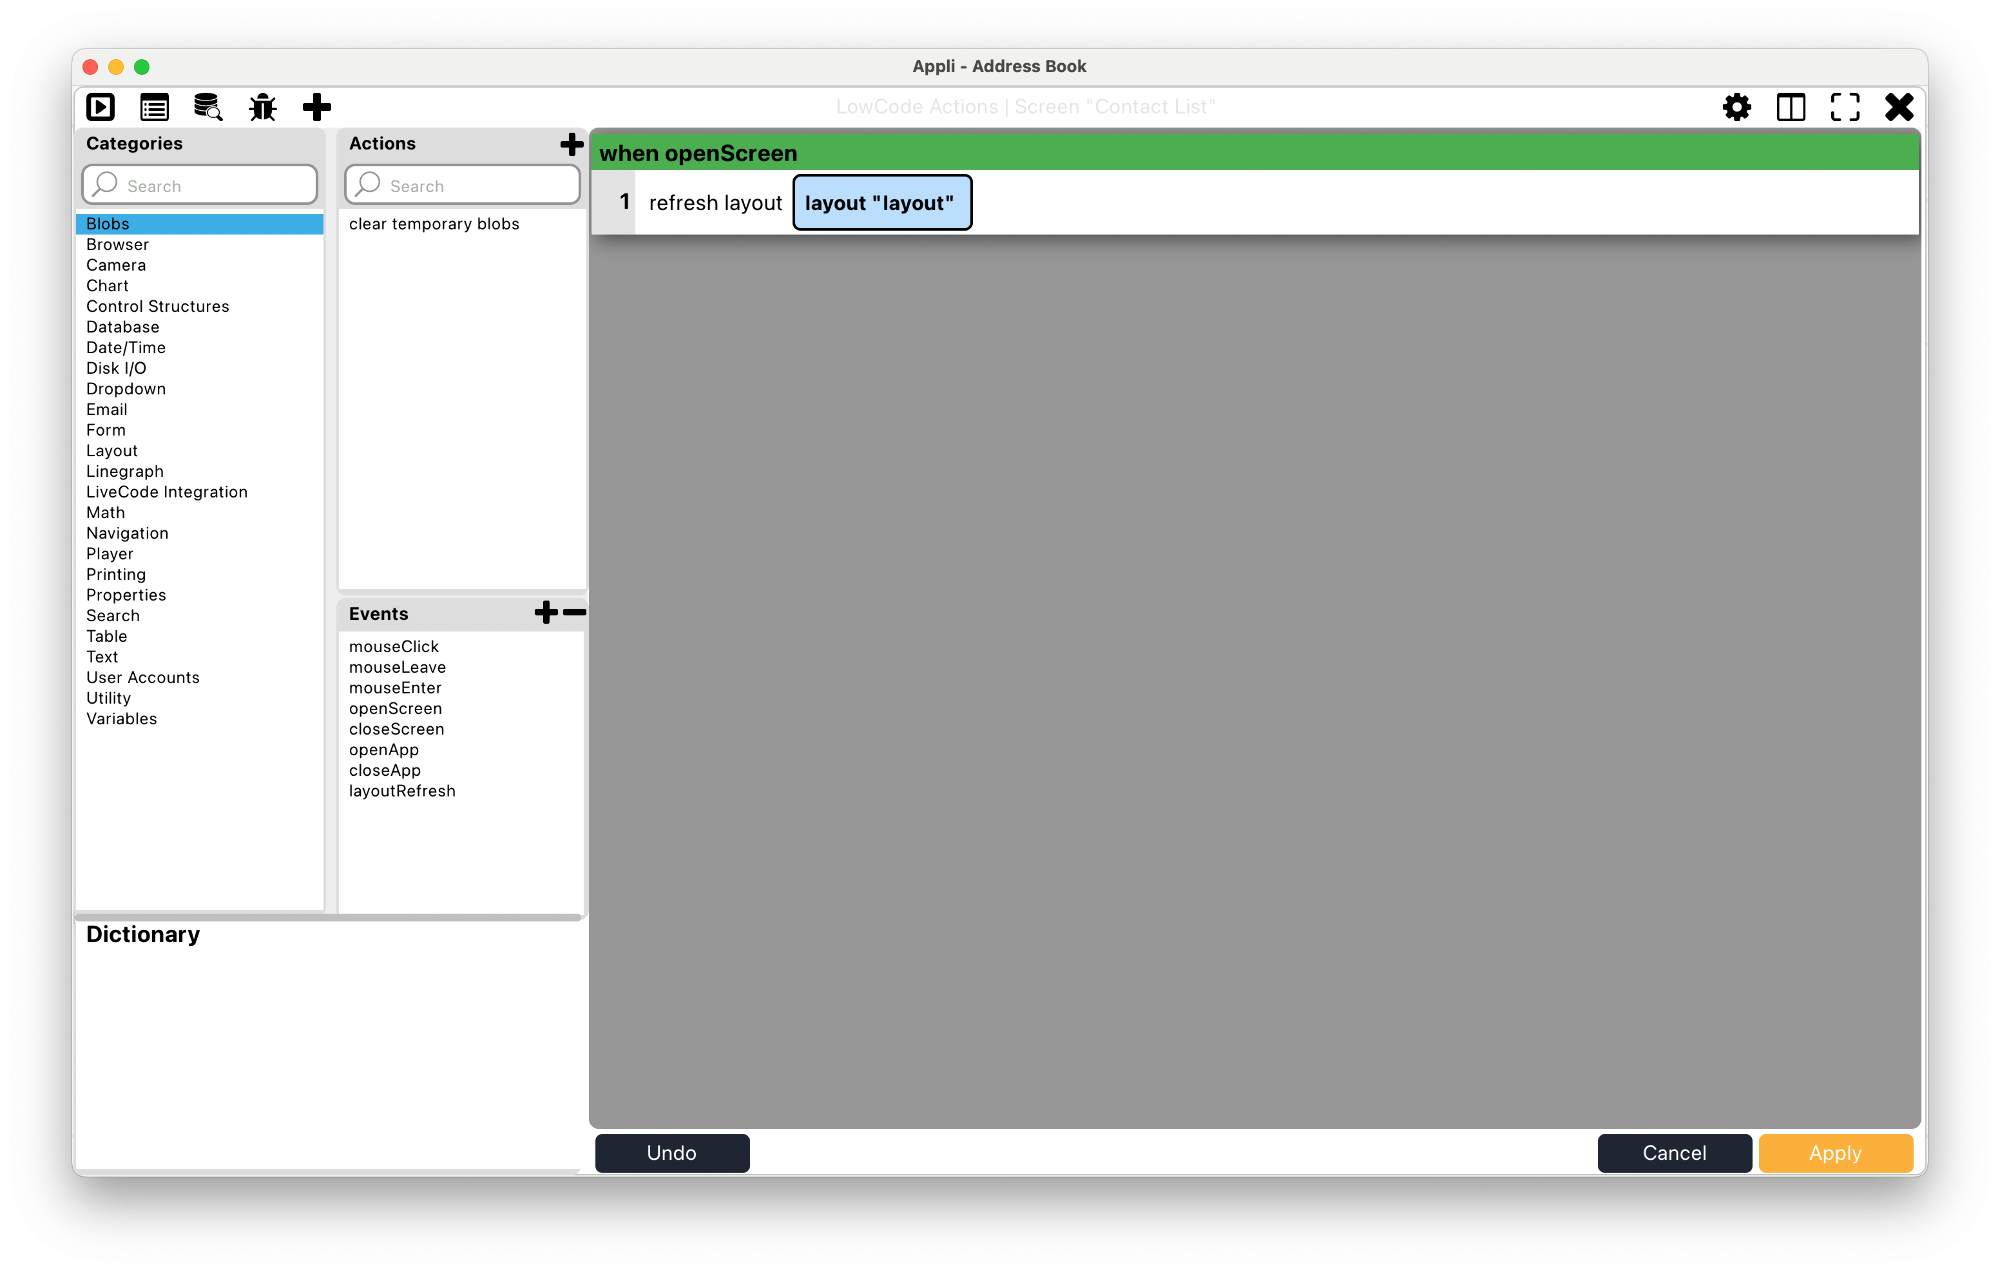
Be aware that we’re adding a openScreen event and not the mouseClick event like we usually do. This event will trigger every time that screen opens.
Using the pop-up menu in the footer to select screens, drag and drop the screens to reorder them so that Contact List is the first one.
Go into play mode and see your contact list working.
Before we move on, let’s dress up this screen a bit more. Add a text element to be used as a header, and a button to add new contacts.
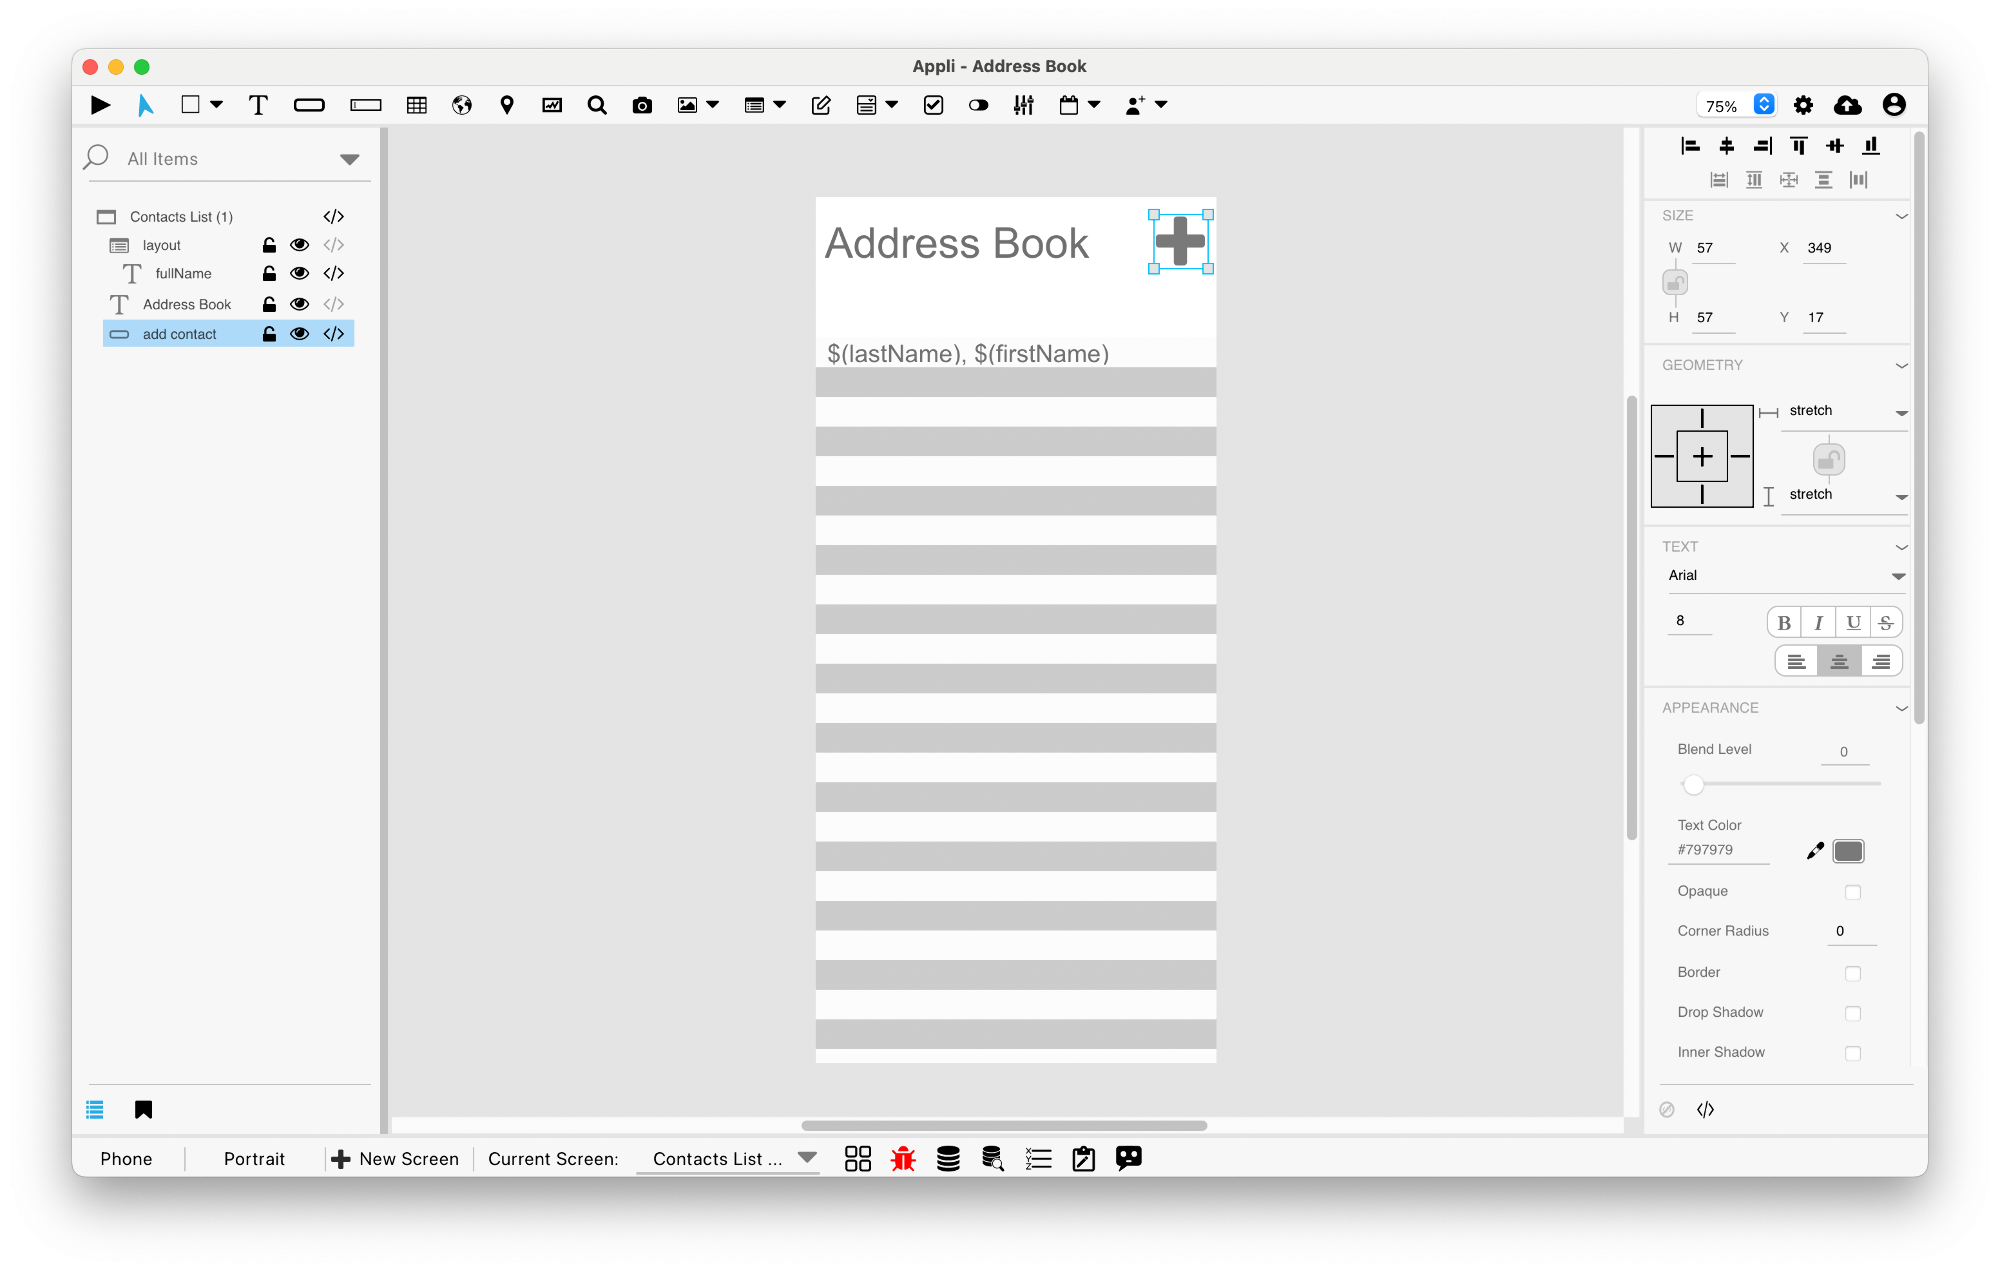
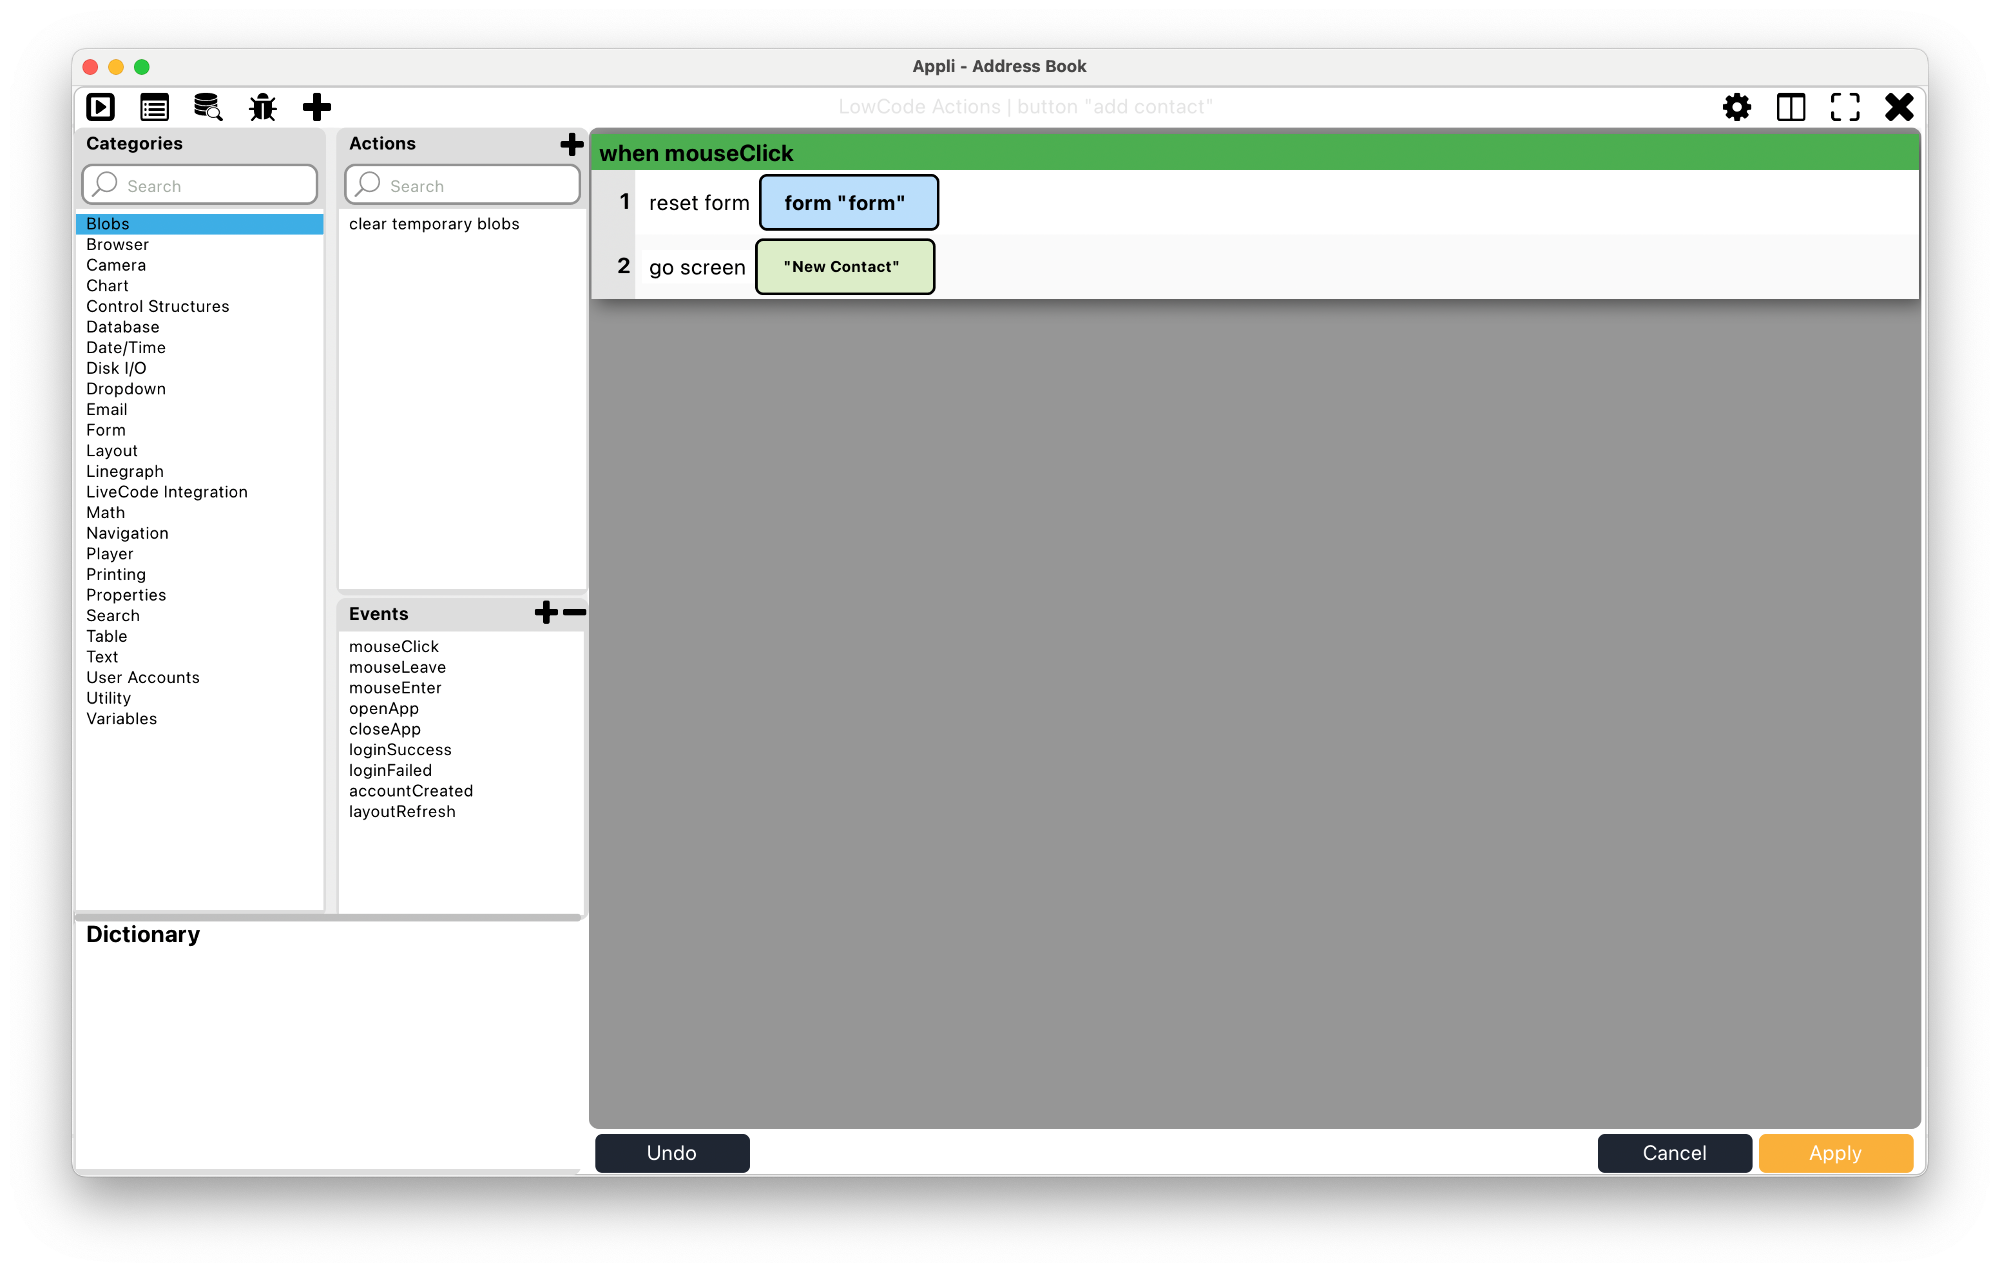
Using low-code, add a mouseClick to that plus button
that resets the form and navigates to the New Contact
screen.
In the New Contact screen, add an extra action to the save
button to go back to the Contact List screen. Add a low-code
mouseClick to the go back button to navigate back
to the Contact List as well.
Go into play mode, use the plus button to go to the New
Contact screen and add a new contact. It should navigate back to
the Contact List screen after it saves your new contact and
thanks to the openScreen action, the layout should show
your recent contact there.
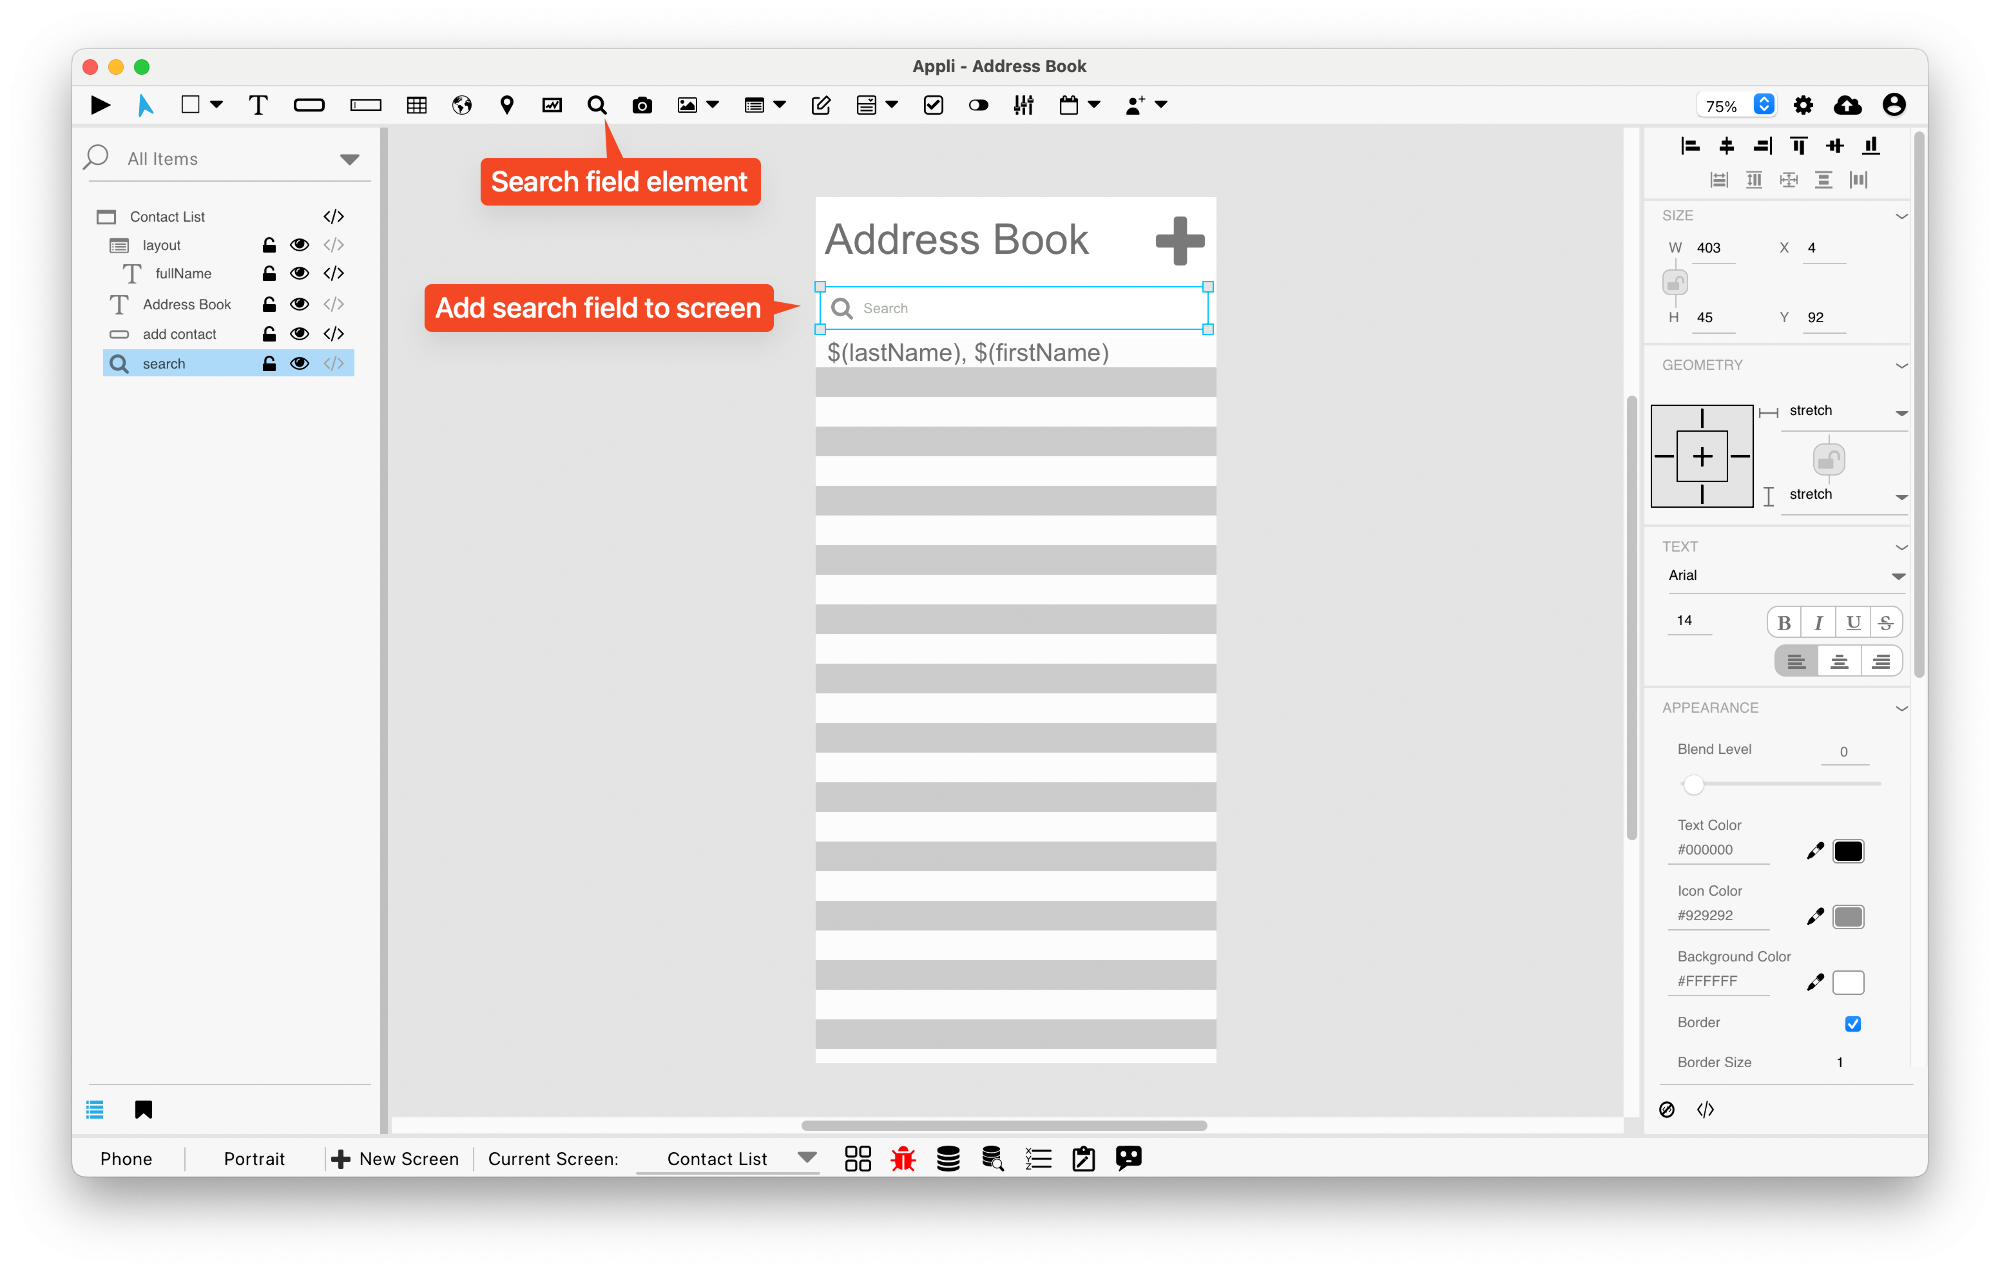
Searching contacts
No record list is perfect without a way of searching it. Appli helps us by having a search field element ready for use. Simply add it to the screen by placing it above the layout.
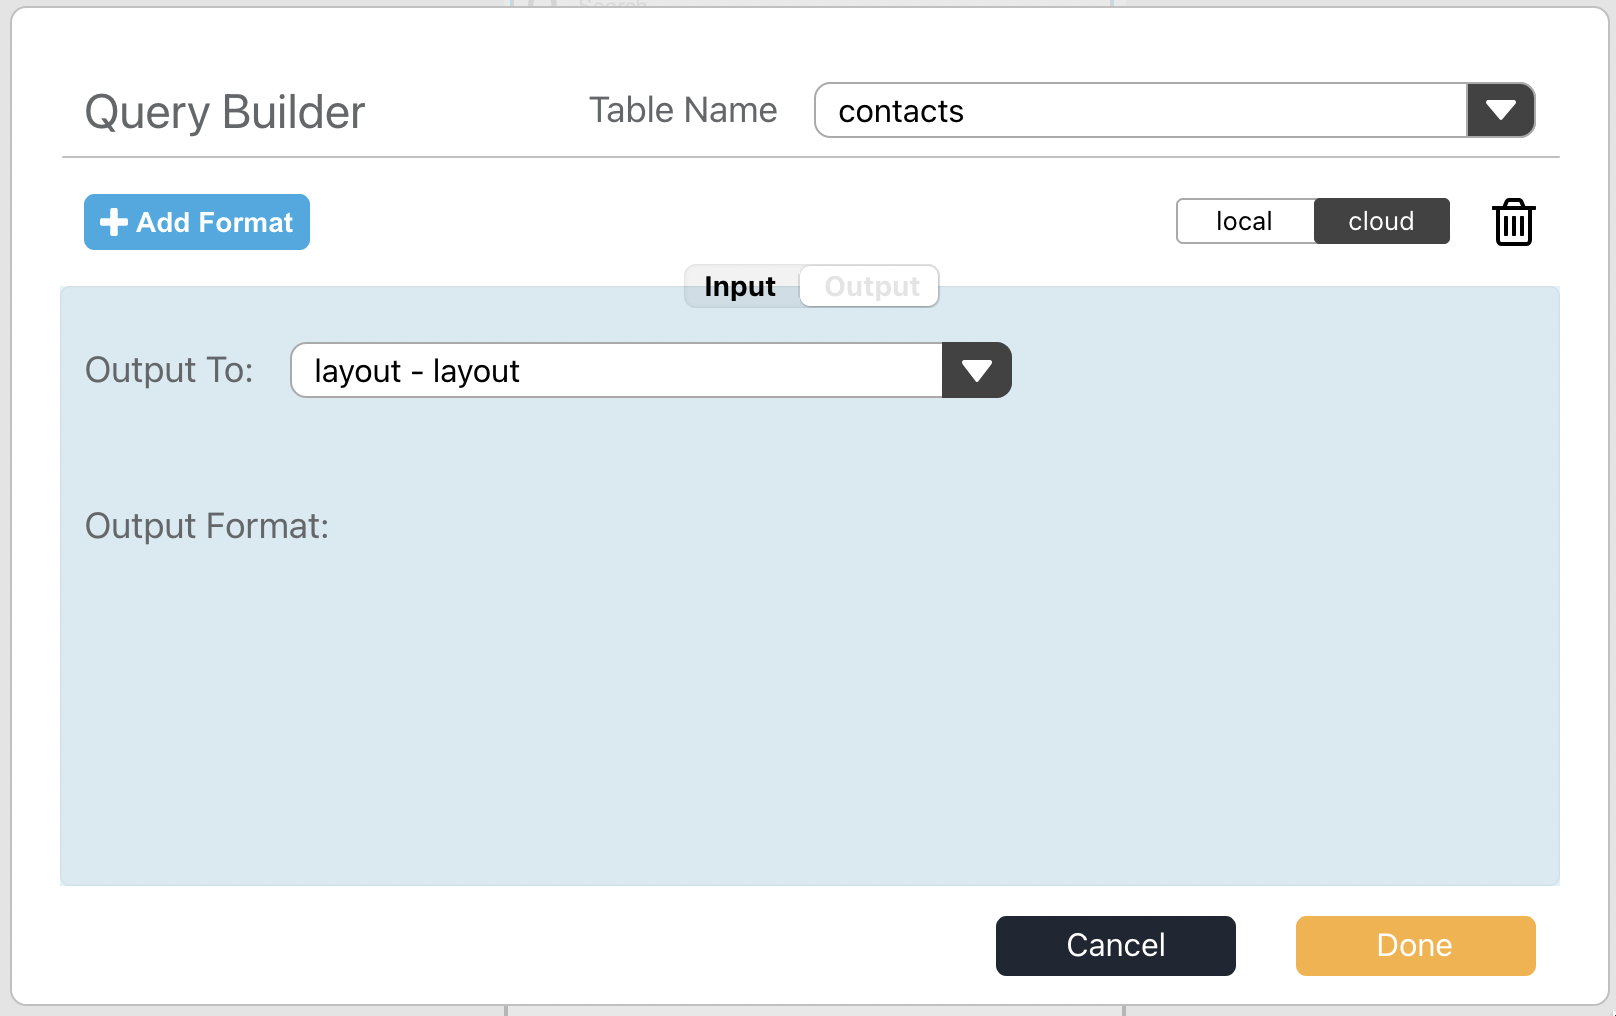
Search fields are configured using no-code. The no-code interface for a search field element is a query builder. A query is a way to ask a table to list only records that matches a certain criteria. We’re going to use the query builder to ask for records that match our search terms to either the first or the last names.
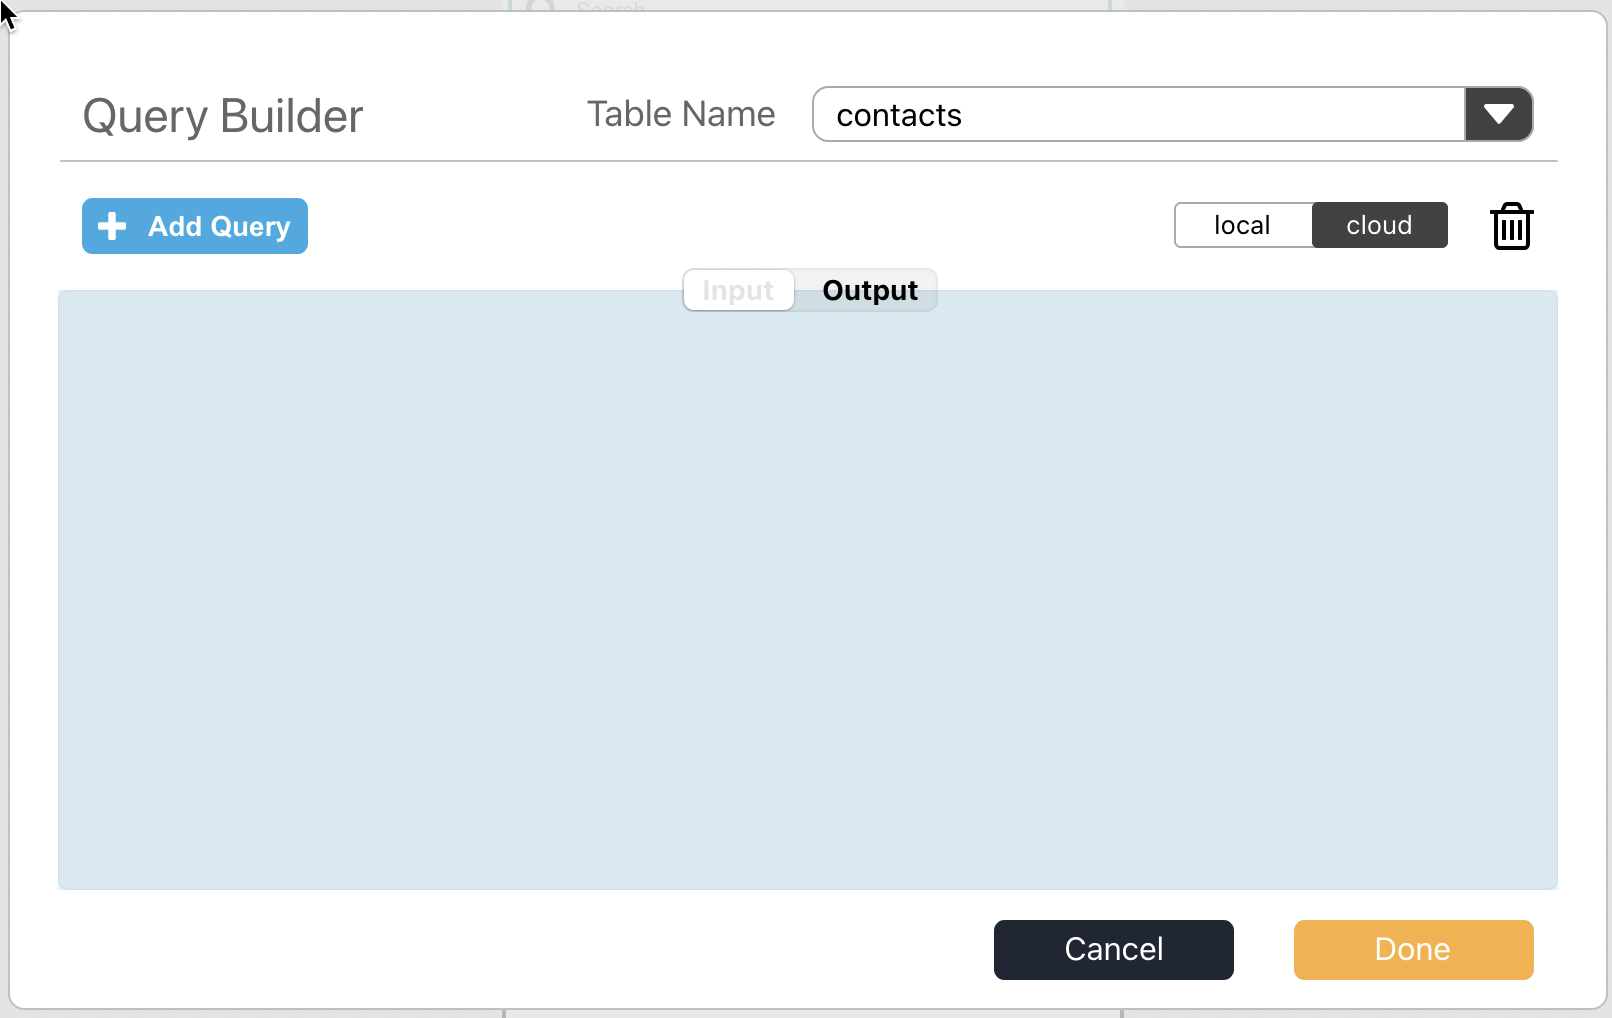
On the query builder interface, select the contacts table and cloud.
Click Add Query to begin a new query. It will create a placeholder for an empty part of the query that looks like a blank rectangle. Click on it to display the controls.
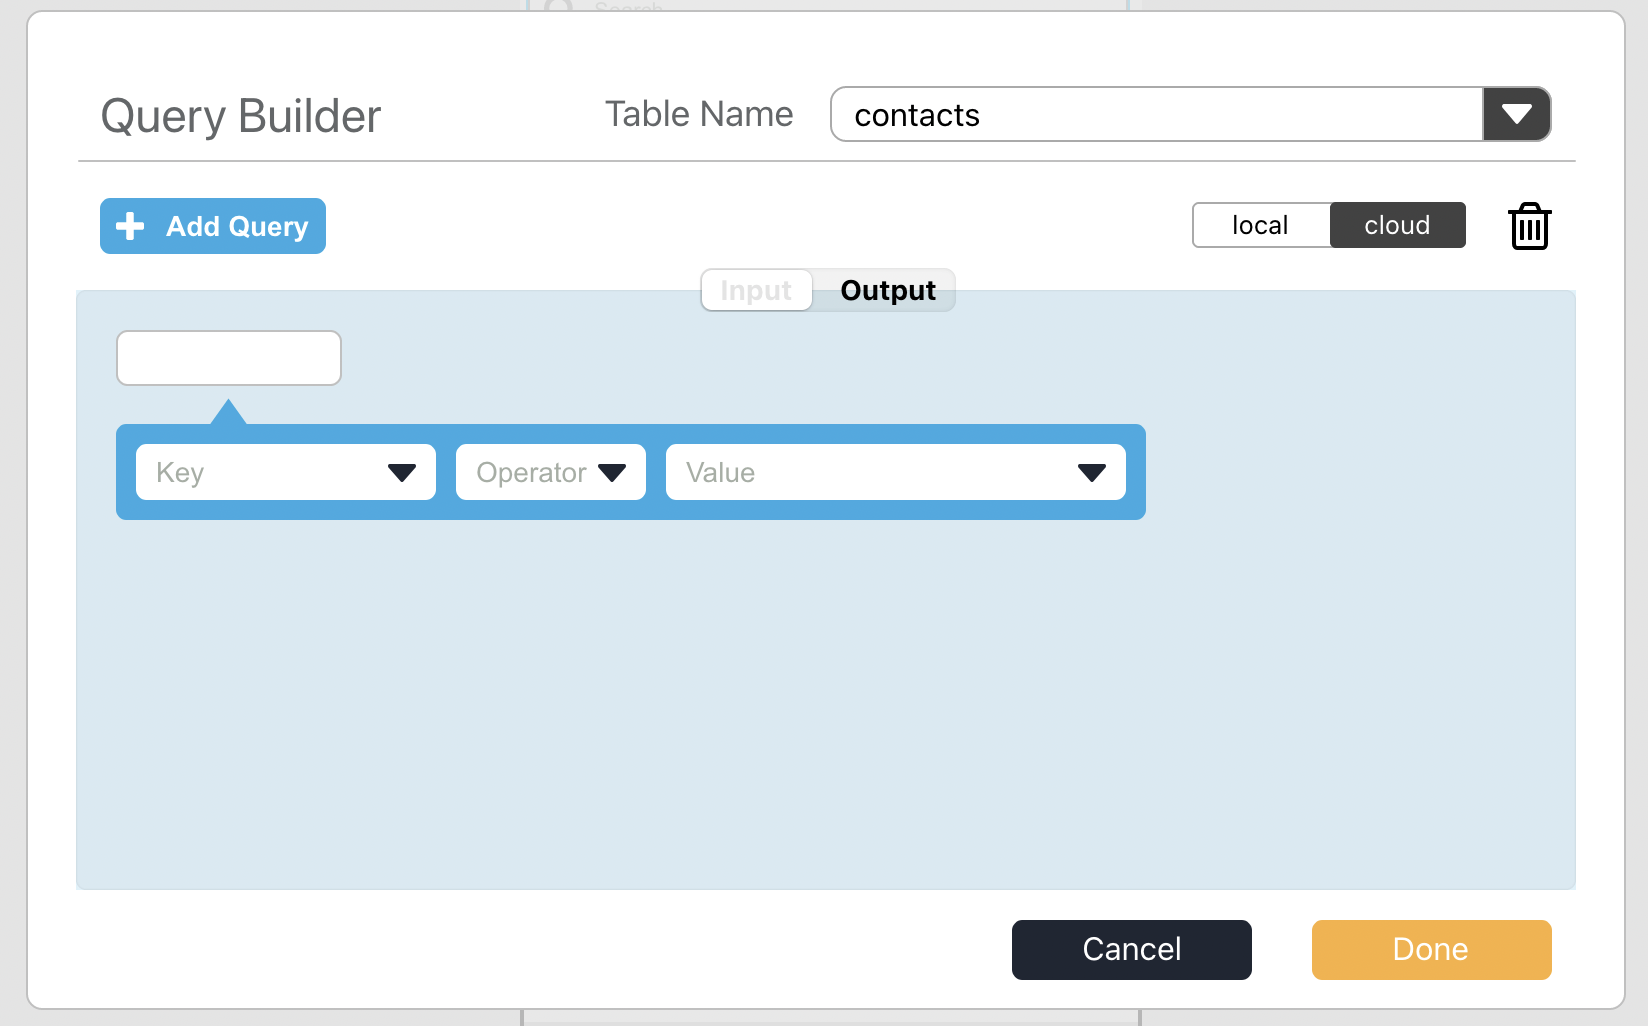
Queries are built by defining criteria. Expressions such as “last name should contain the search terms” and so on. To assemble that, we need to select what table key we want to examine, an operator (more about it in a bit), and an argument.
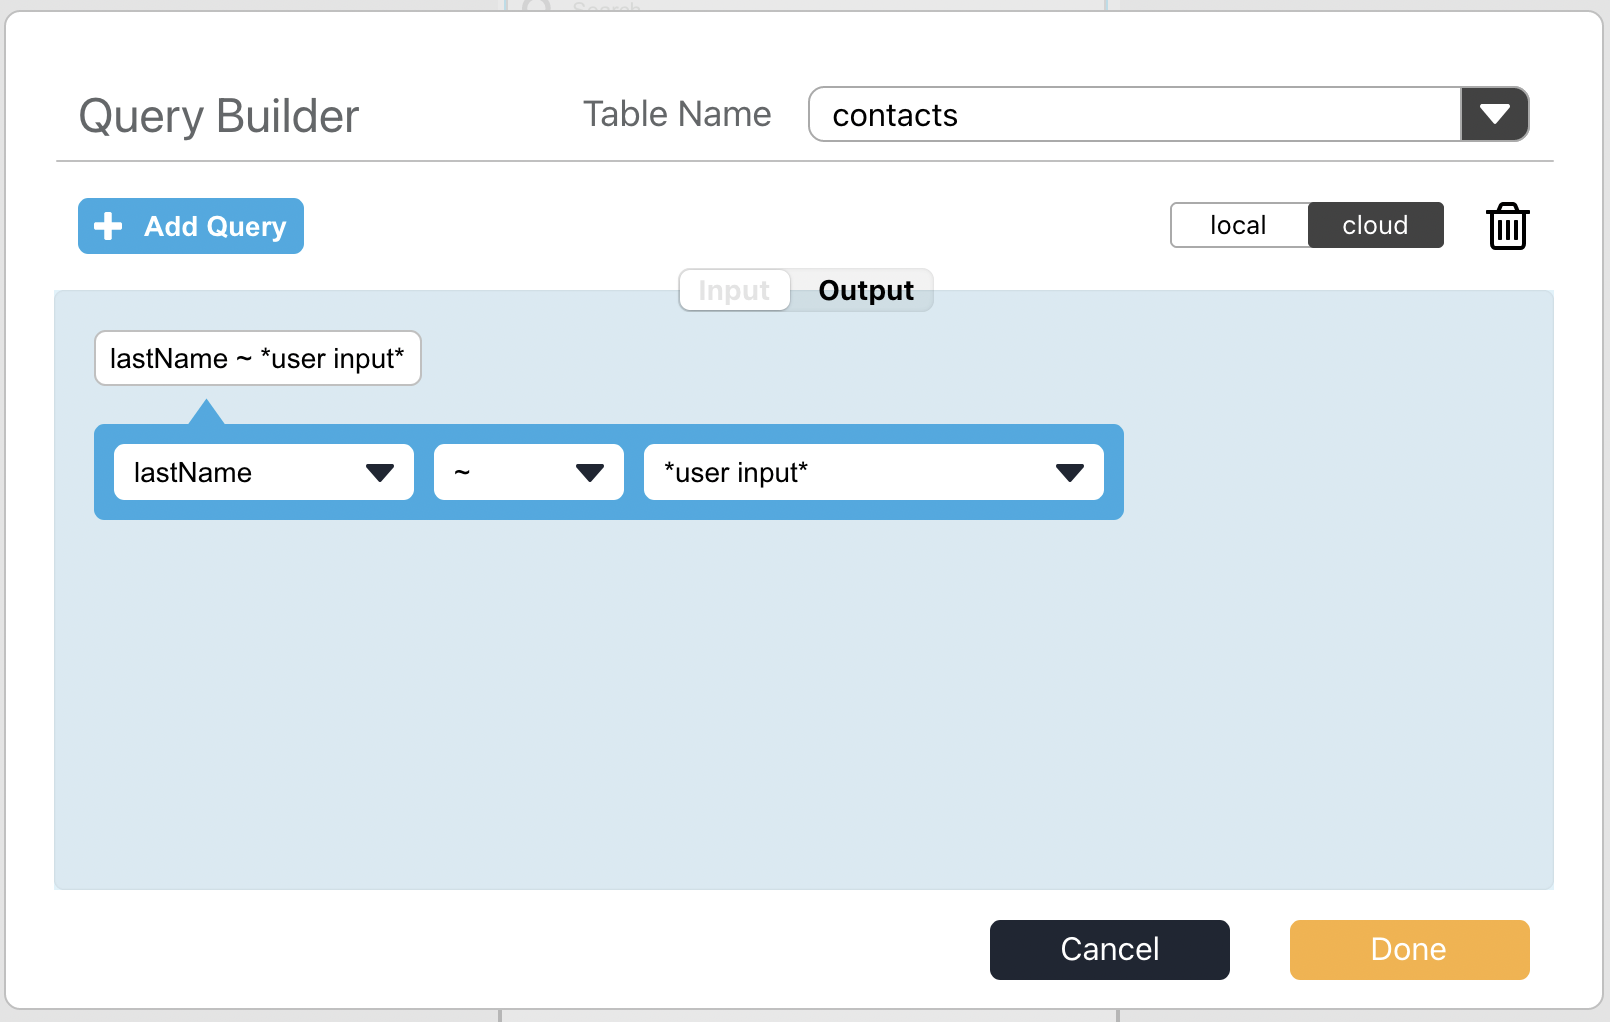
Select lastName as the key. For the operator, select
~, that means contains, and for the value select
user input which is the search terms.
It should look like this:
To learn more about each operator check the canelaDB documentation.
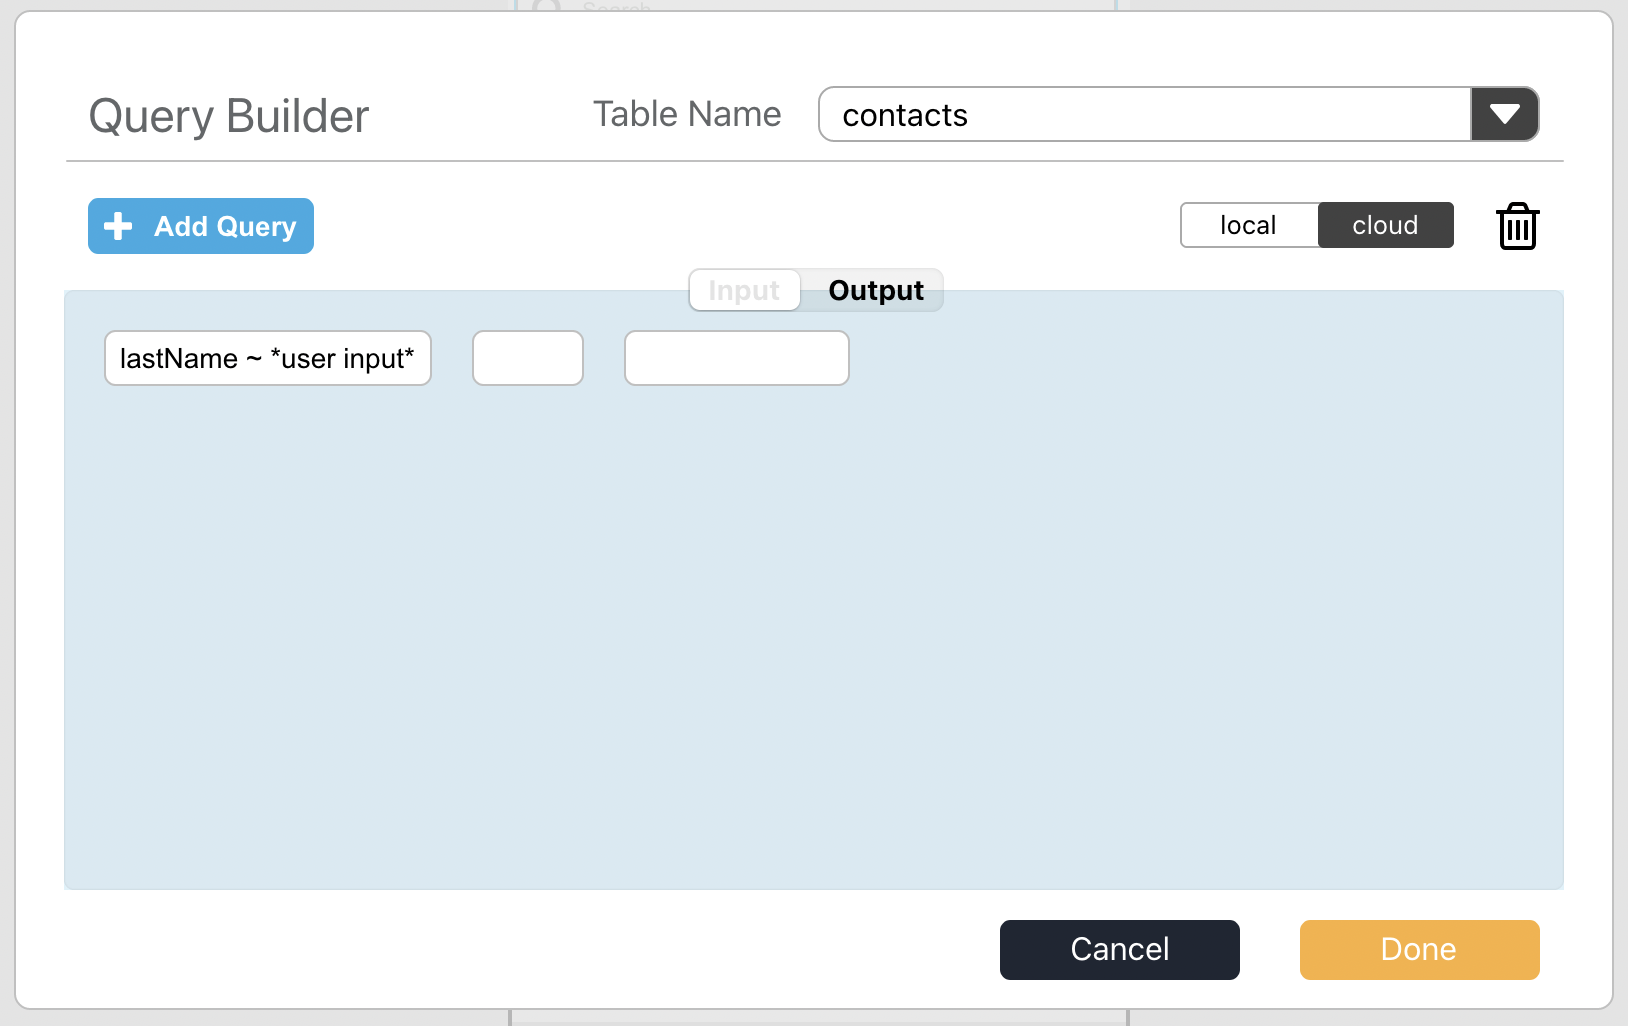
Click the Add Query again to add another criteria to our query. This time, it will create two square placeholders, one for the second criteria and one in between them to configure how they relate to one another.
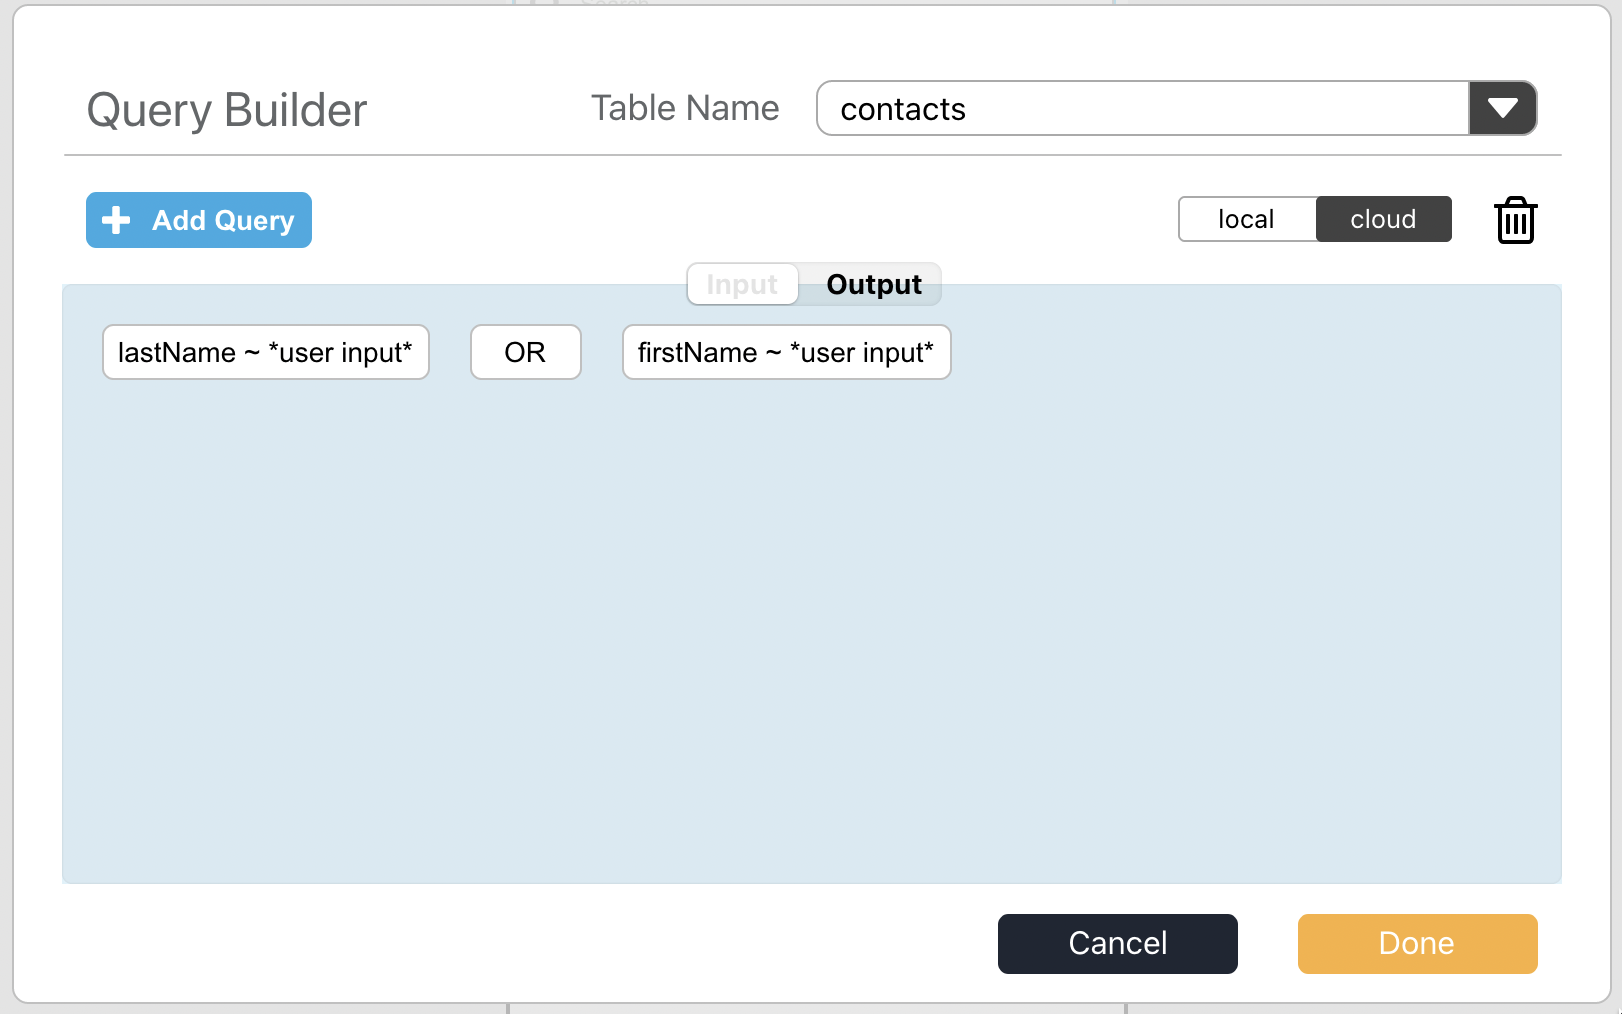
Select the firstName key and make it similar to the
previous one by using the ~ contain operator and selecting
user input as the value. We want values that match either
firstName or lastName, so pick OR
from the fields between the two queries.
The final query should look like the screenshot below.
Switch to the output tab to select where to display the search results. Select the layout element we created earlier.
Go into play mode and use the search element to filter the list of contacts.
Editing a contact
Our final feature for this tutorial is viewing and editing a contact. We’re going to combine both features into a single screen. Create a new screen called Edit Contact and lay it out just like the New Contact screen with a form and fields for each table key plus two buttons — one for going back and another one for saving — it should look exactly like New Contact.
Then make the phone and email fields shorter and add a button next to each of them. Those buttons will allow us to send email and start a phone call.
Your screen should look like this:
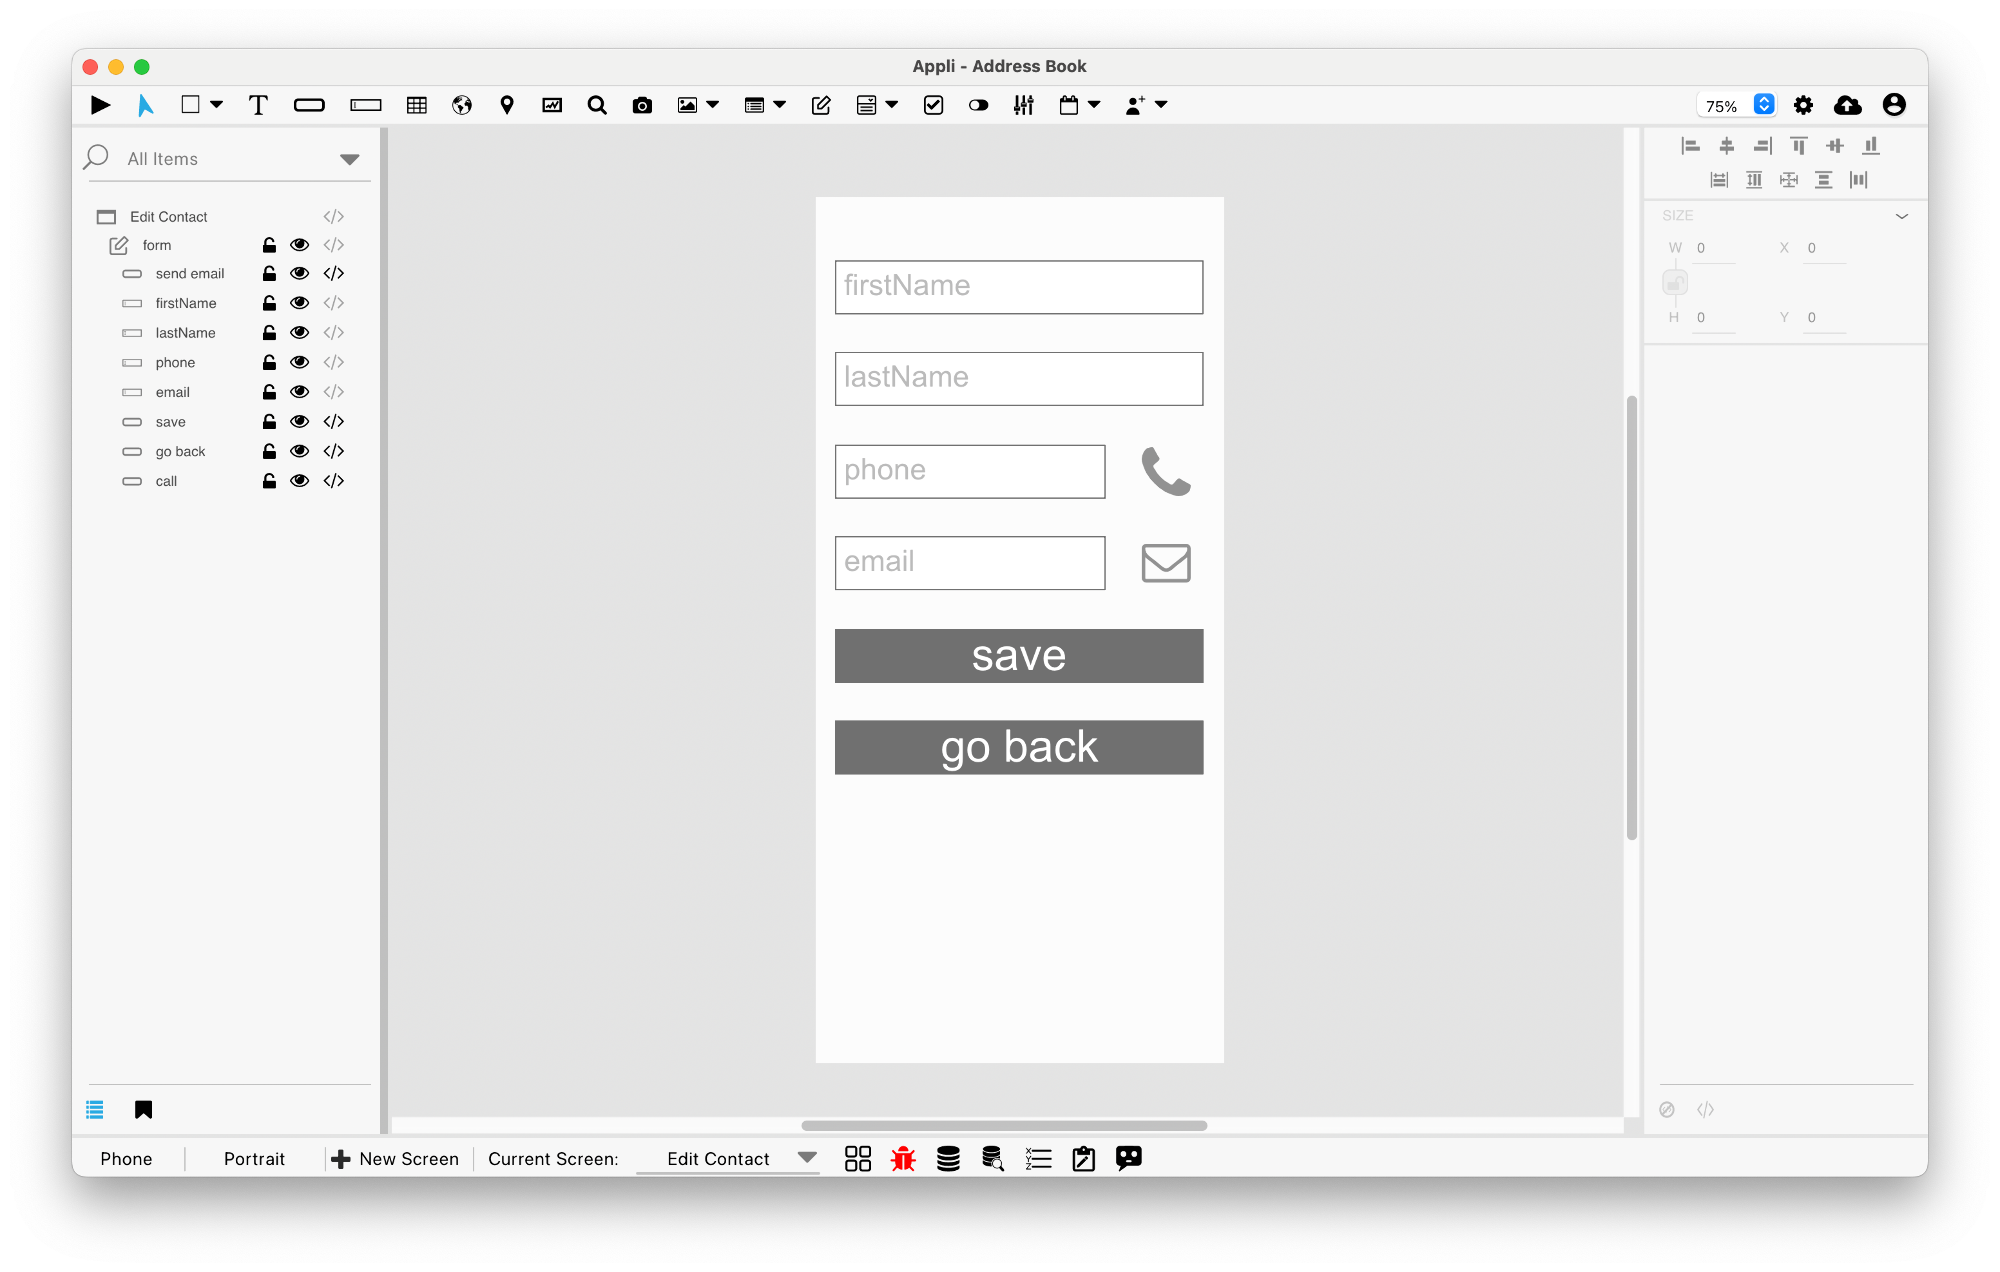
Bind all the elements in the form to the correct key using the form’s no-code editor. The code for the Save button and the Go Back button is the same as the one you used for the New Contact form.
Making a call
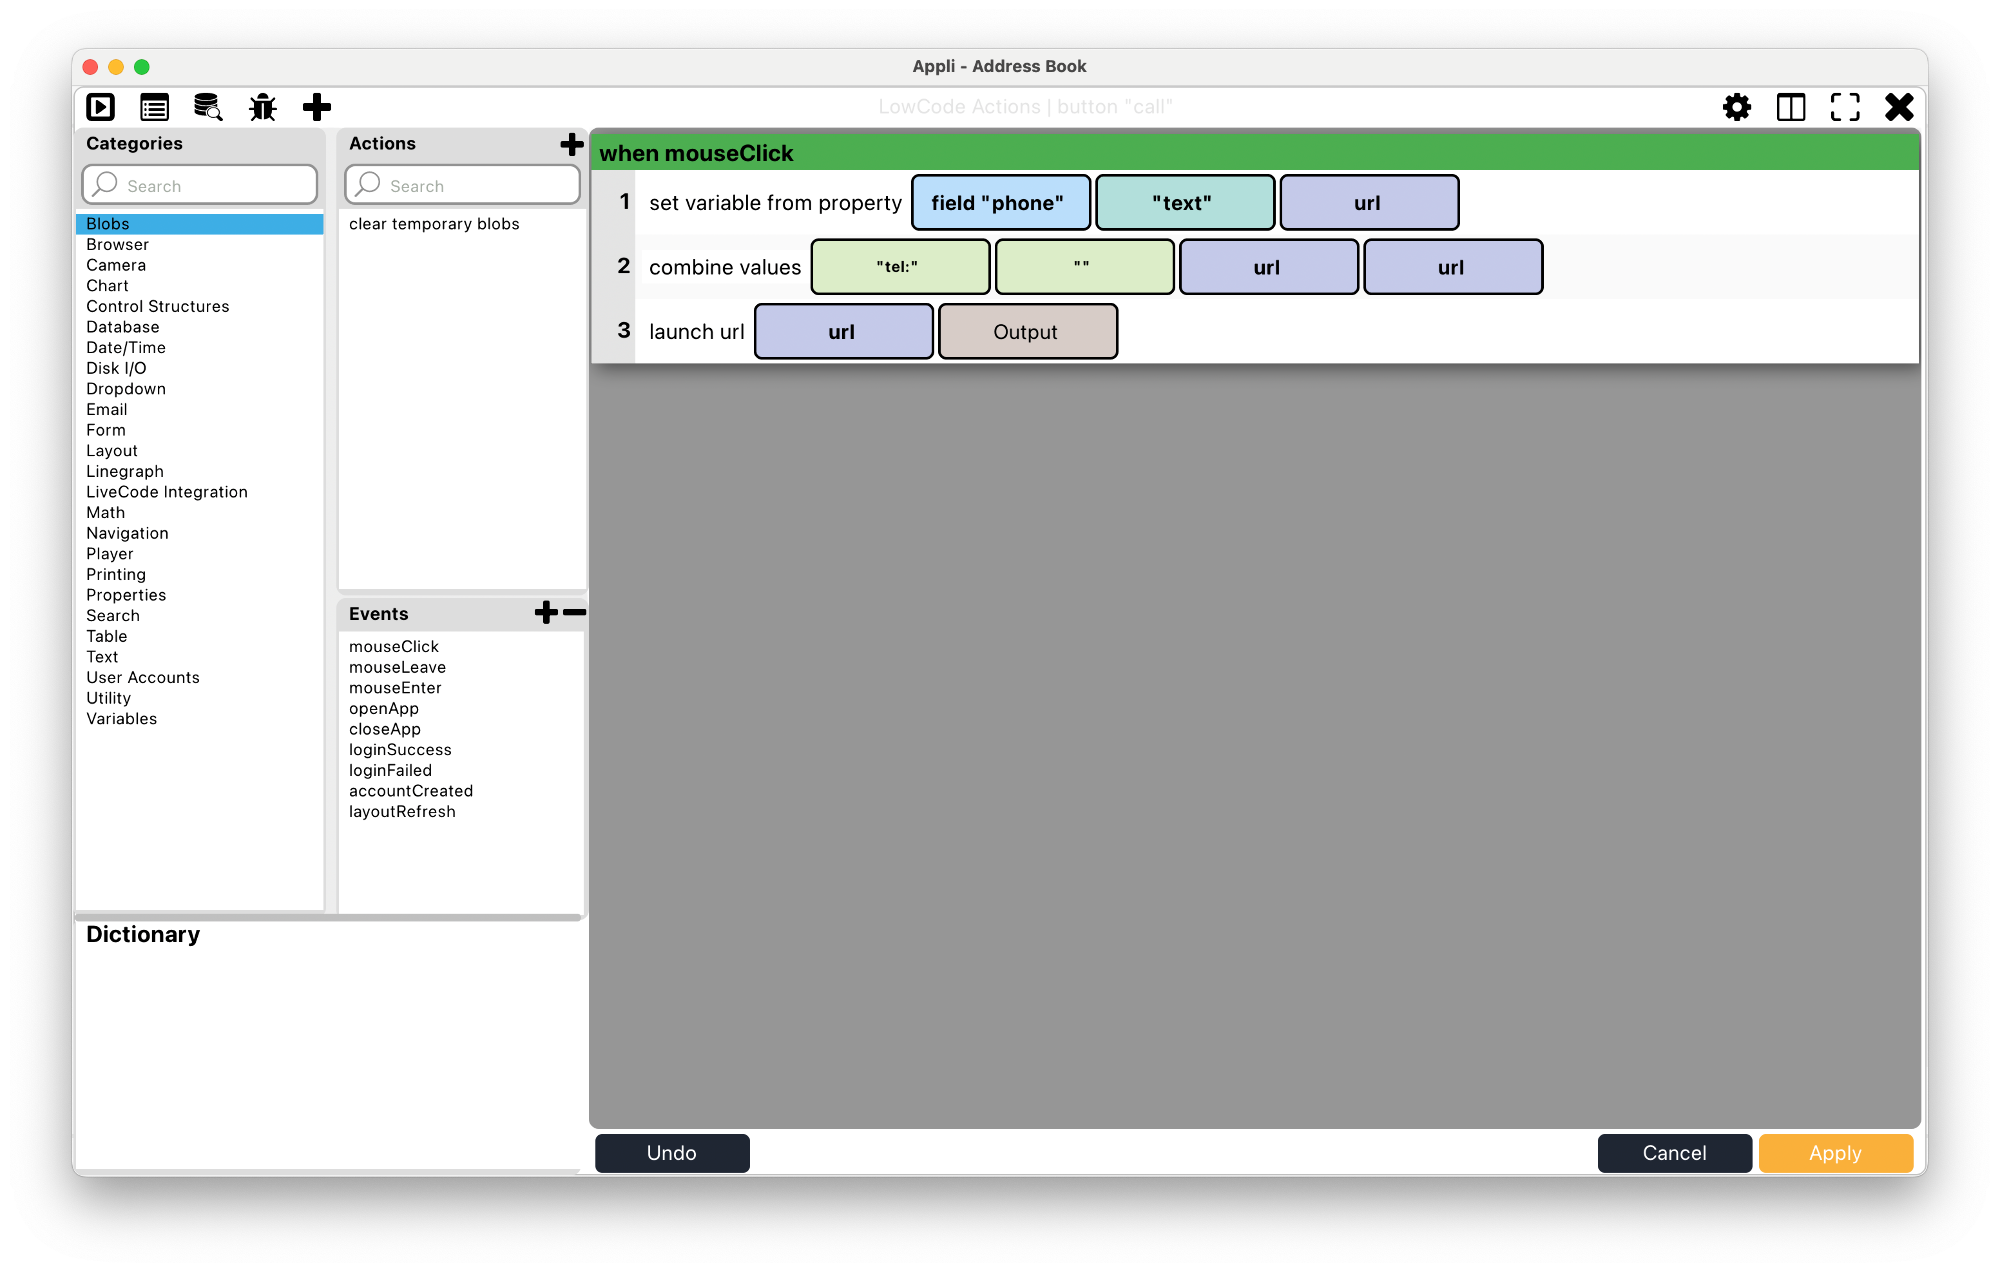
On a mobile phone, you can start a call by launching an url that
begins with tel: and contains the phone you want to call.
So if you want to call 555-323-444, you can launch the URL
tel:555323444 to open the dialer with the phone number
filled in.
To do this in Appli, we need to pick the value from the phone
field element and create a variable with tel: before
the number, then launch a URL based on that variable. The script for the
Call button is:
Sending email
The code for the email button is very similar, but email
URLs start with mailto: instead of tel:.

Be aware that Appli has a powerful send email action. You could craft a new screen with the fields needed and send email from inside your app without the need to open a third-party app like this example.
With those two buttons in place, we need to go back to the Contact List screen. We need to connect the clicked contact in the layout with what needs to be edited on the Edit Contact screen.
Select the fullName text element in the layout and add the following low-code:
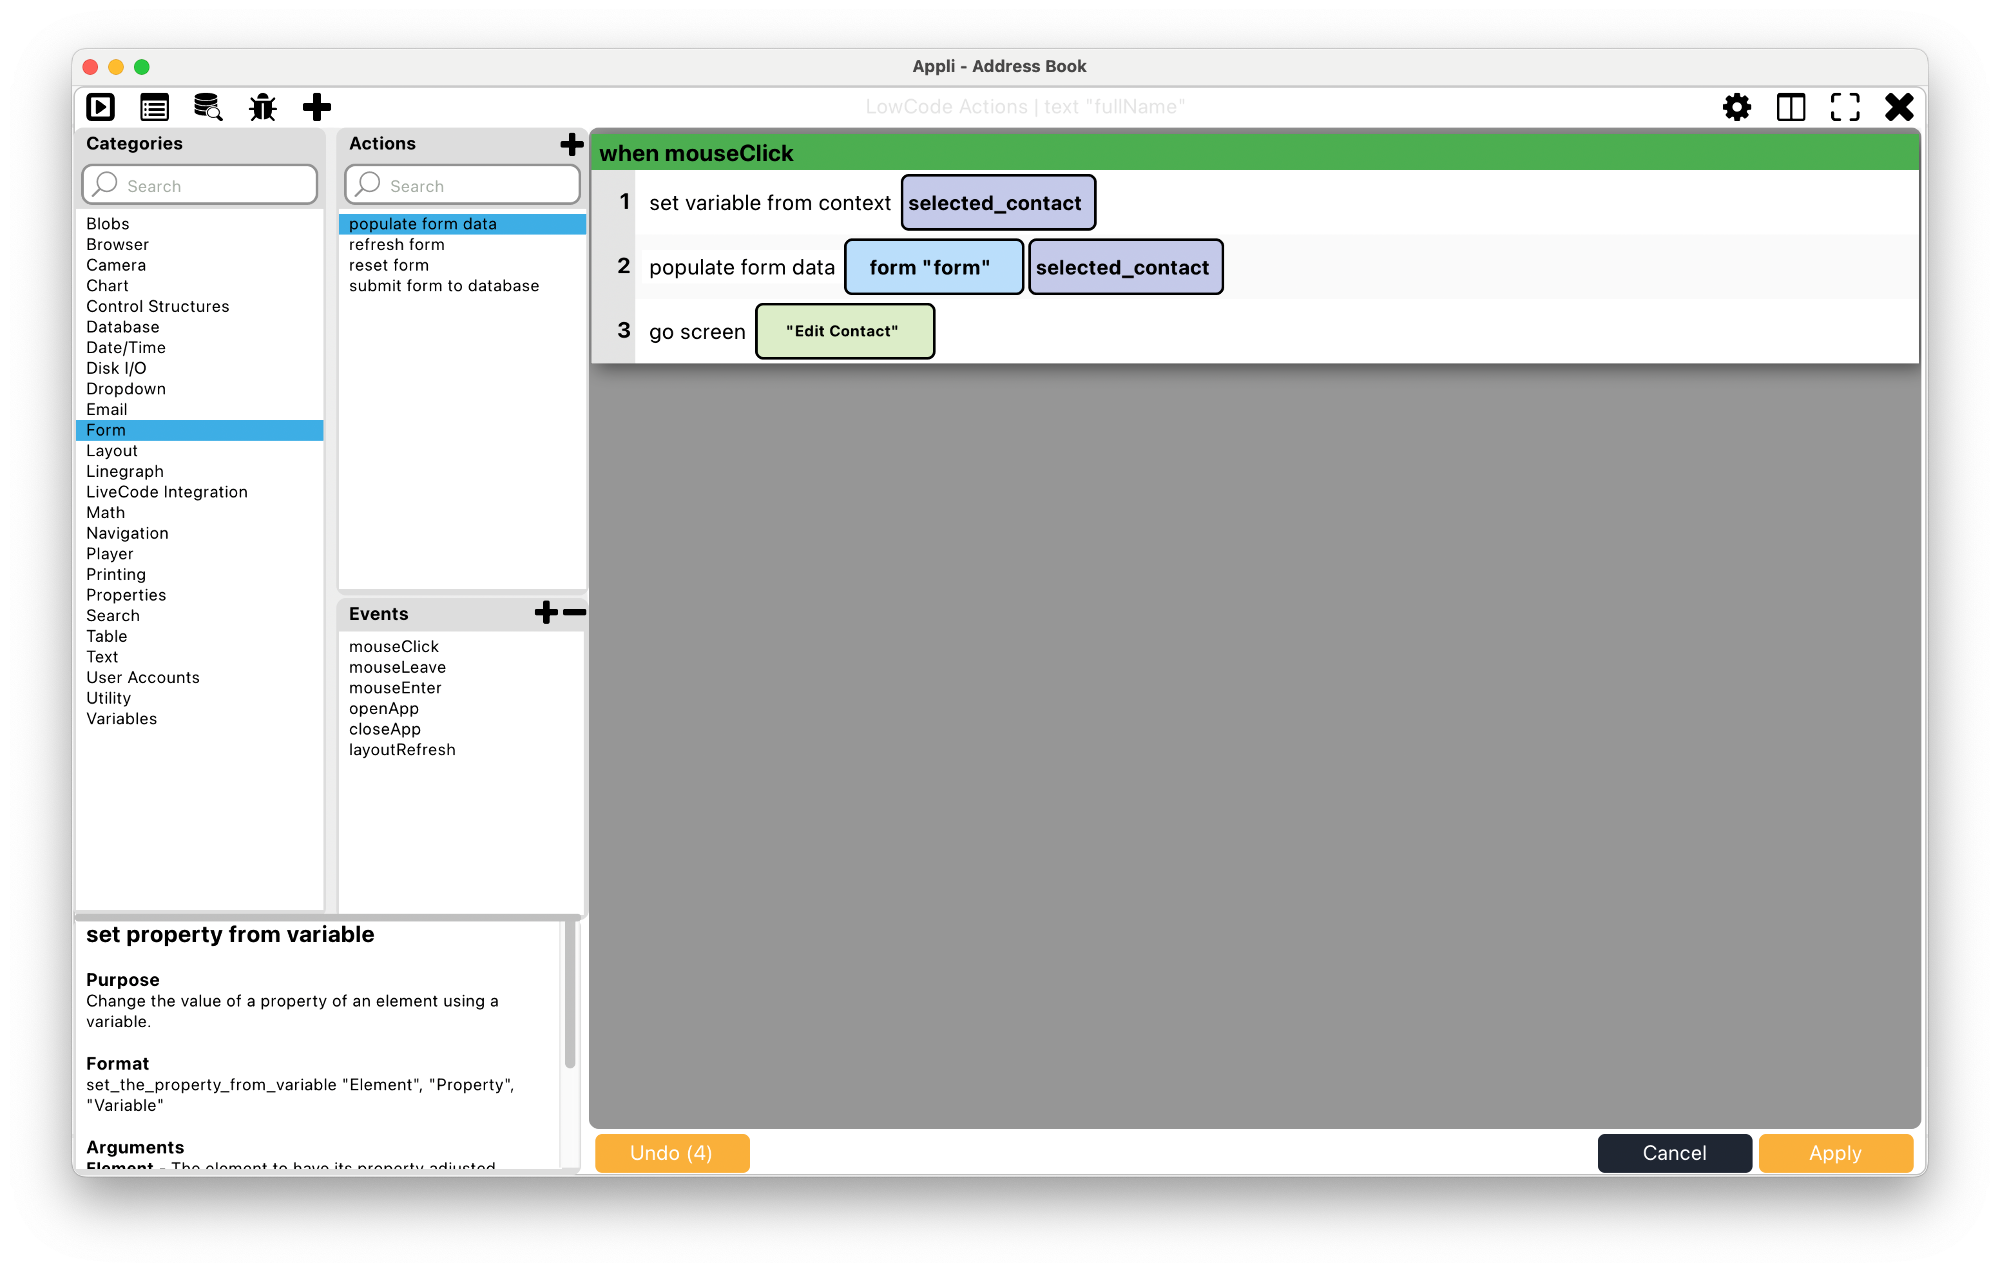
There are some important concepts hidden in that simple script. First
is that a form can have its RecordID property set
to a specific record. When that is set, the record data is displayed on
the form and saving the form updates the record in the database. Second
is that a layout has a context which is the current clicked
record. By setting a variable called selected_contact using
the value from that form context, we’re essentially placing the
clicked contact RecordID into the variable, we can then use
populate form data to set the RecordID property of
the form in the Edit Contact screen to that value and load that
record into it.
Next steps
Now that you’re familiar with the basics of database-based workflow, take your time to explore Appli’s built in help in the low-code editor and check out the other powerful actions in the database category.
This chapter was last updated on Mon 16 Oct 2023 17:32:51 BST