Tutorial: LiveCode Integration
Even though we are updating Appli collection of low code actions, there are times when you might need features we haven’t yet covered. In these cases, Appli allows you to create custom code using LiveCode language.
The custom code action allows you to write LiveCode scripts that interact with Appli’s variables and elements. You can also access tables using LiveCloud API which is the database technology behind Appli.
In this brief tutorial, we’re going to build a small application to display cool facts from history. We’ll use a LiveCode based script to access a Web API that provides us with facts and then use Appli to present those facts to the user. By the end of this tutorial, you’ll know how to leverage LiveCode integration and how to pass data back and forth between Appli and LiveCode.
The same sample app can be built using Appli without relying on LiveCode integration by using the
rest api callaction. I’ll show how to replace the LiveCode integration version with the pure Appli version at the end.
For this tutorial we’ll access a Web API called On this day which is provided by Wikipedia. This API received a day and a month and returns cool historical facts that happened on the same day and month.
You can see it right now on your web browser. Just navigate to:
https://api.wikimedia.org/feed/v1/wikipedia/en/onthisday/all/04/03
and you’ll see a JSON response that contains historical events that
happened on the 3rd of April. The last two numbers there are month and
day.
JSON might seem strange if you never seen it before, but it is an easy format for computers to understand. Our sample app will pick the current day and month, make a request to that API, and then show the results to the user.
The On this day API returns a collection of items divided into three categories: selected, births, and deaths. So for any combination of day and month, it will tell us selected historical events, notable births and deaths as well.
Our sample app will only show the selected events. We’ll build it in a way that it shows the first historical event in the returned collection (the API might return more than one event).
Building the user interface
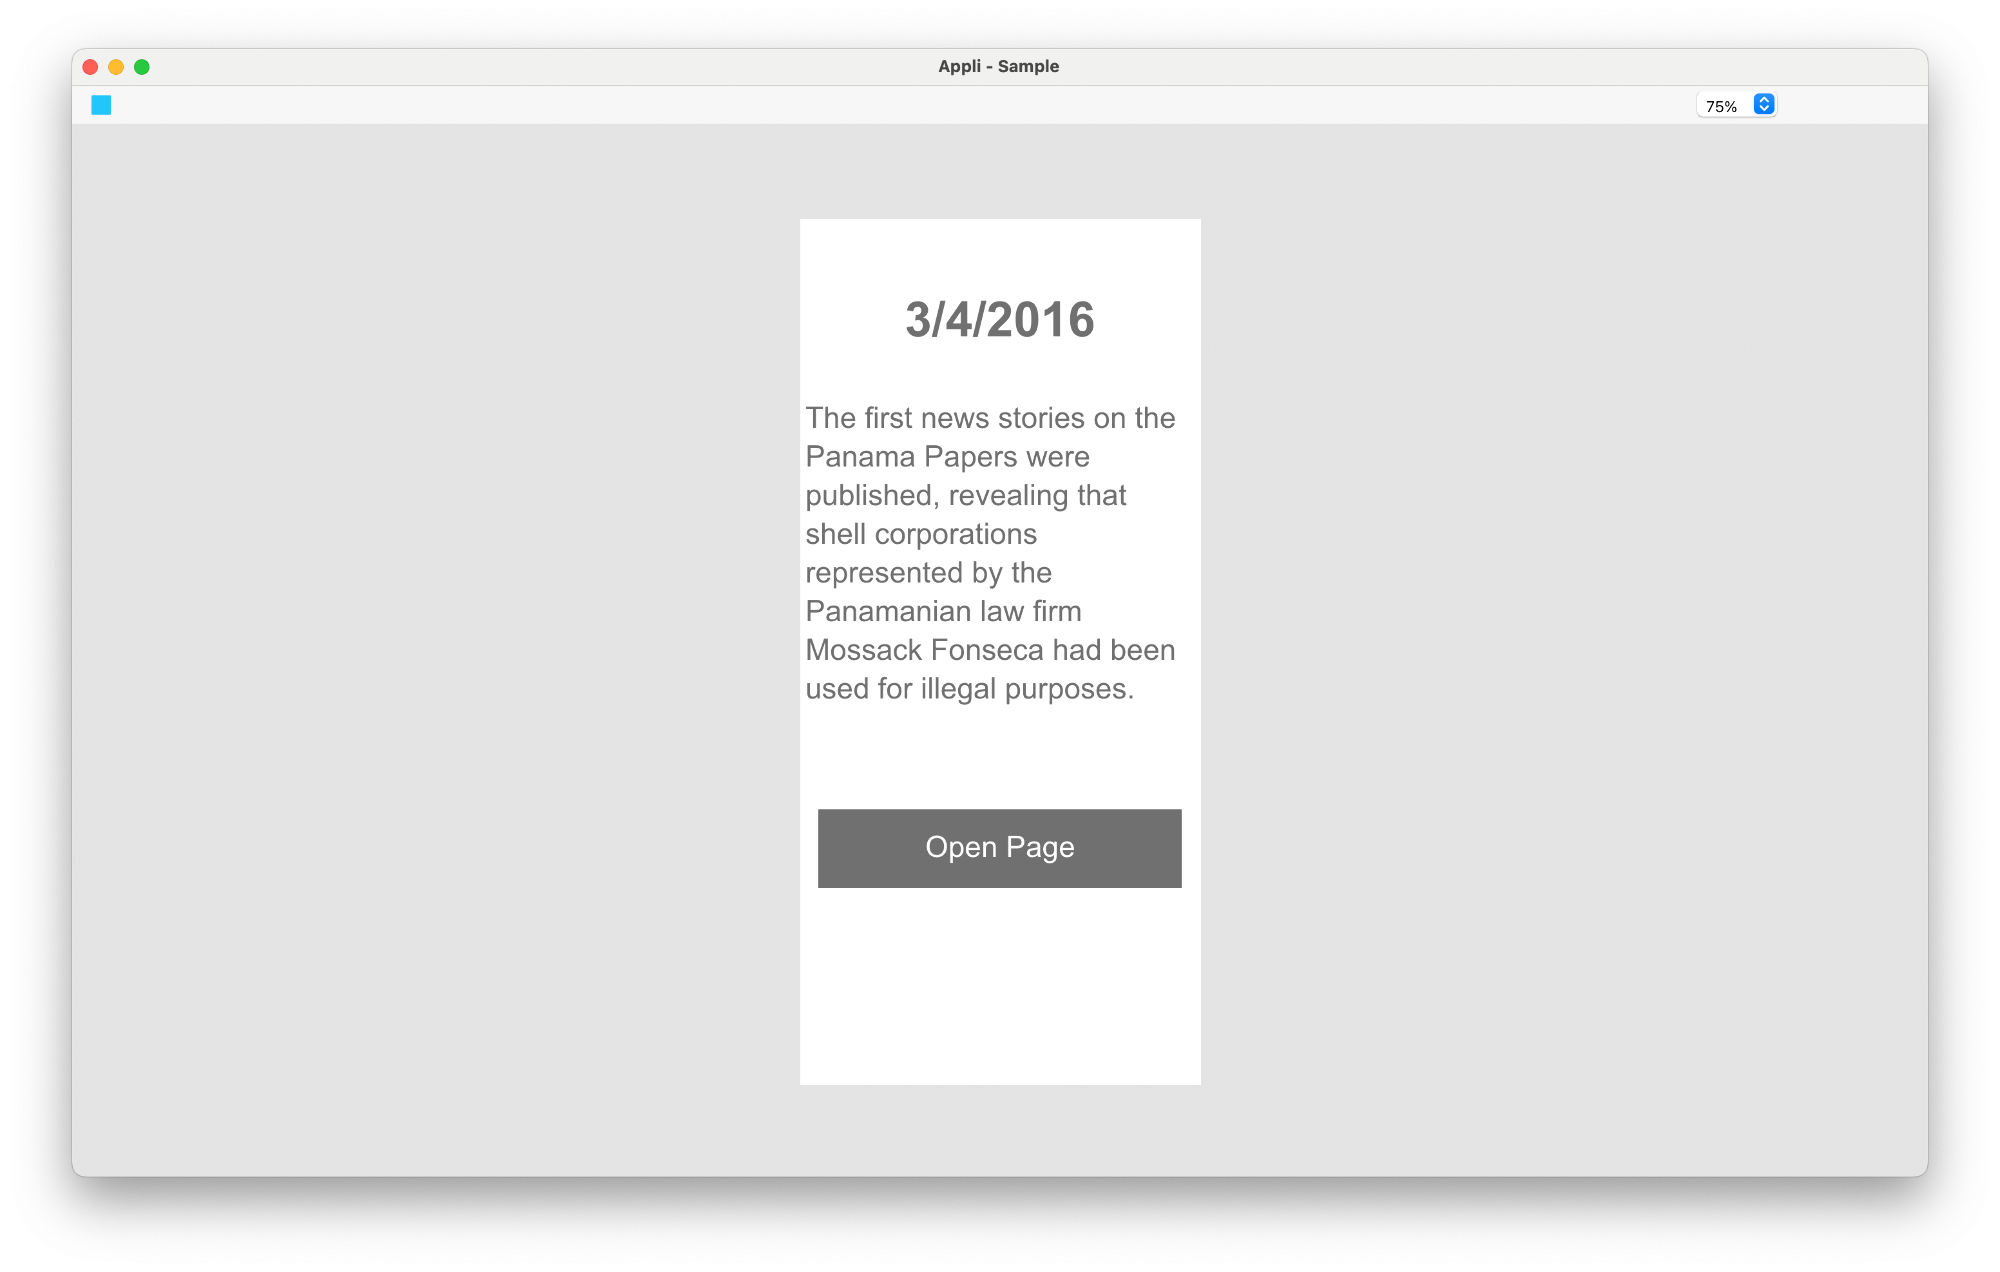
We’ll use two fields, one for the data and another one for the historical fact. We’ll also add a button to open the Wikipedia page with the relevant entry on the user’s default browser. This is how our user interface looks:
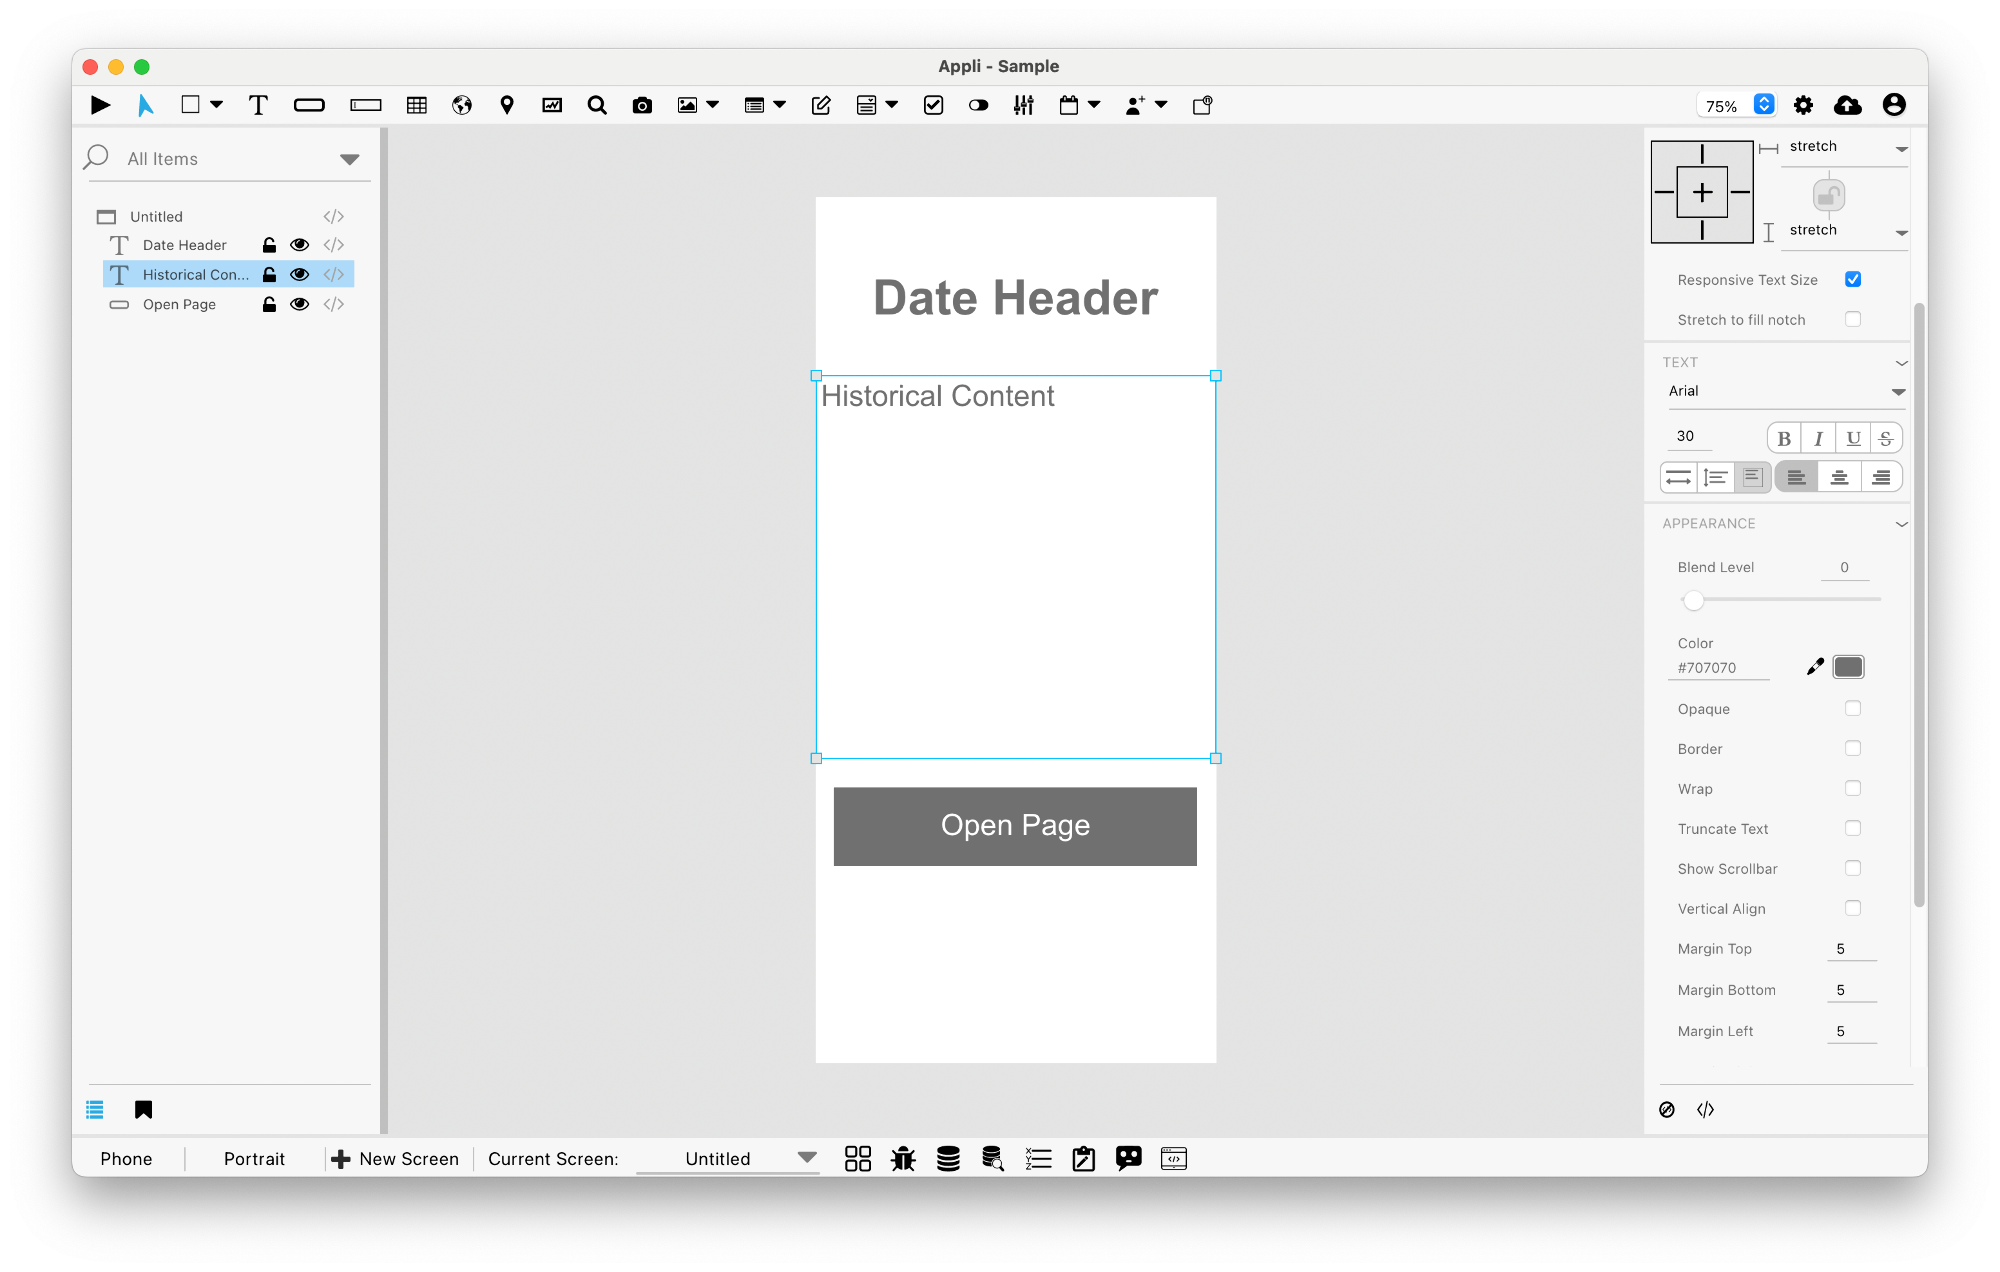
- A text element called Date Header.
- A text element called Historical Content.
- A button element called Open Page.
Initial setup
Before we work with LiveCode custom code, we’ll create a mock version of our app just to illustrate how it should work. Later, we’ll replace the mock part of it with the actual request.
The objective is to display a historical fact when the application
launches, so our low code actions will go on the OpenScreen
event for the screen. That event is triggered as soon as the screen is
displayed.
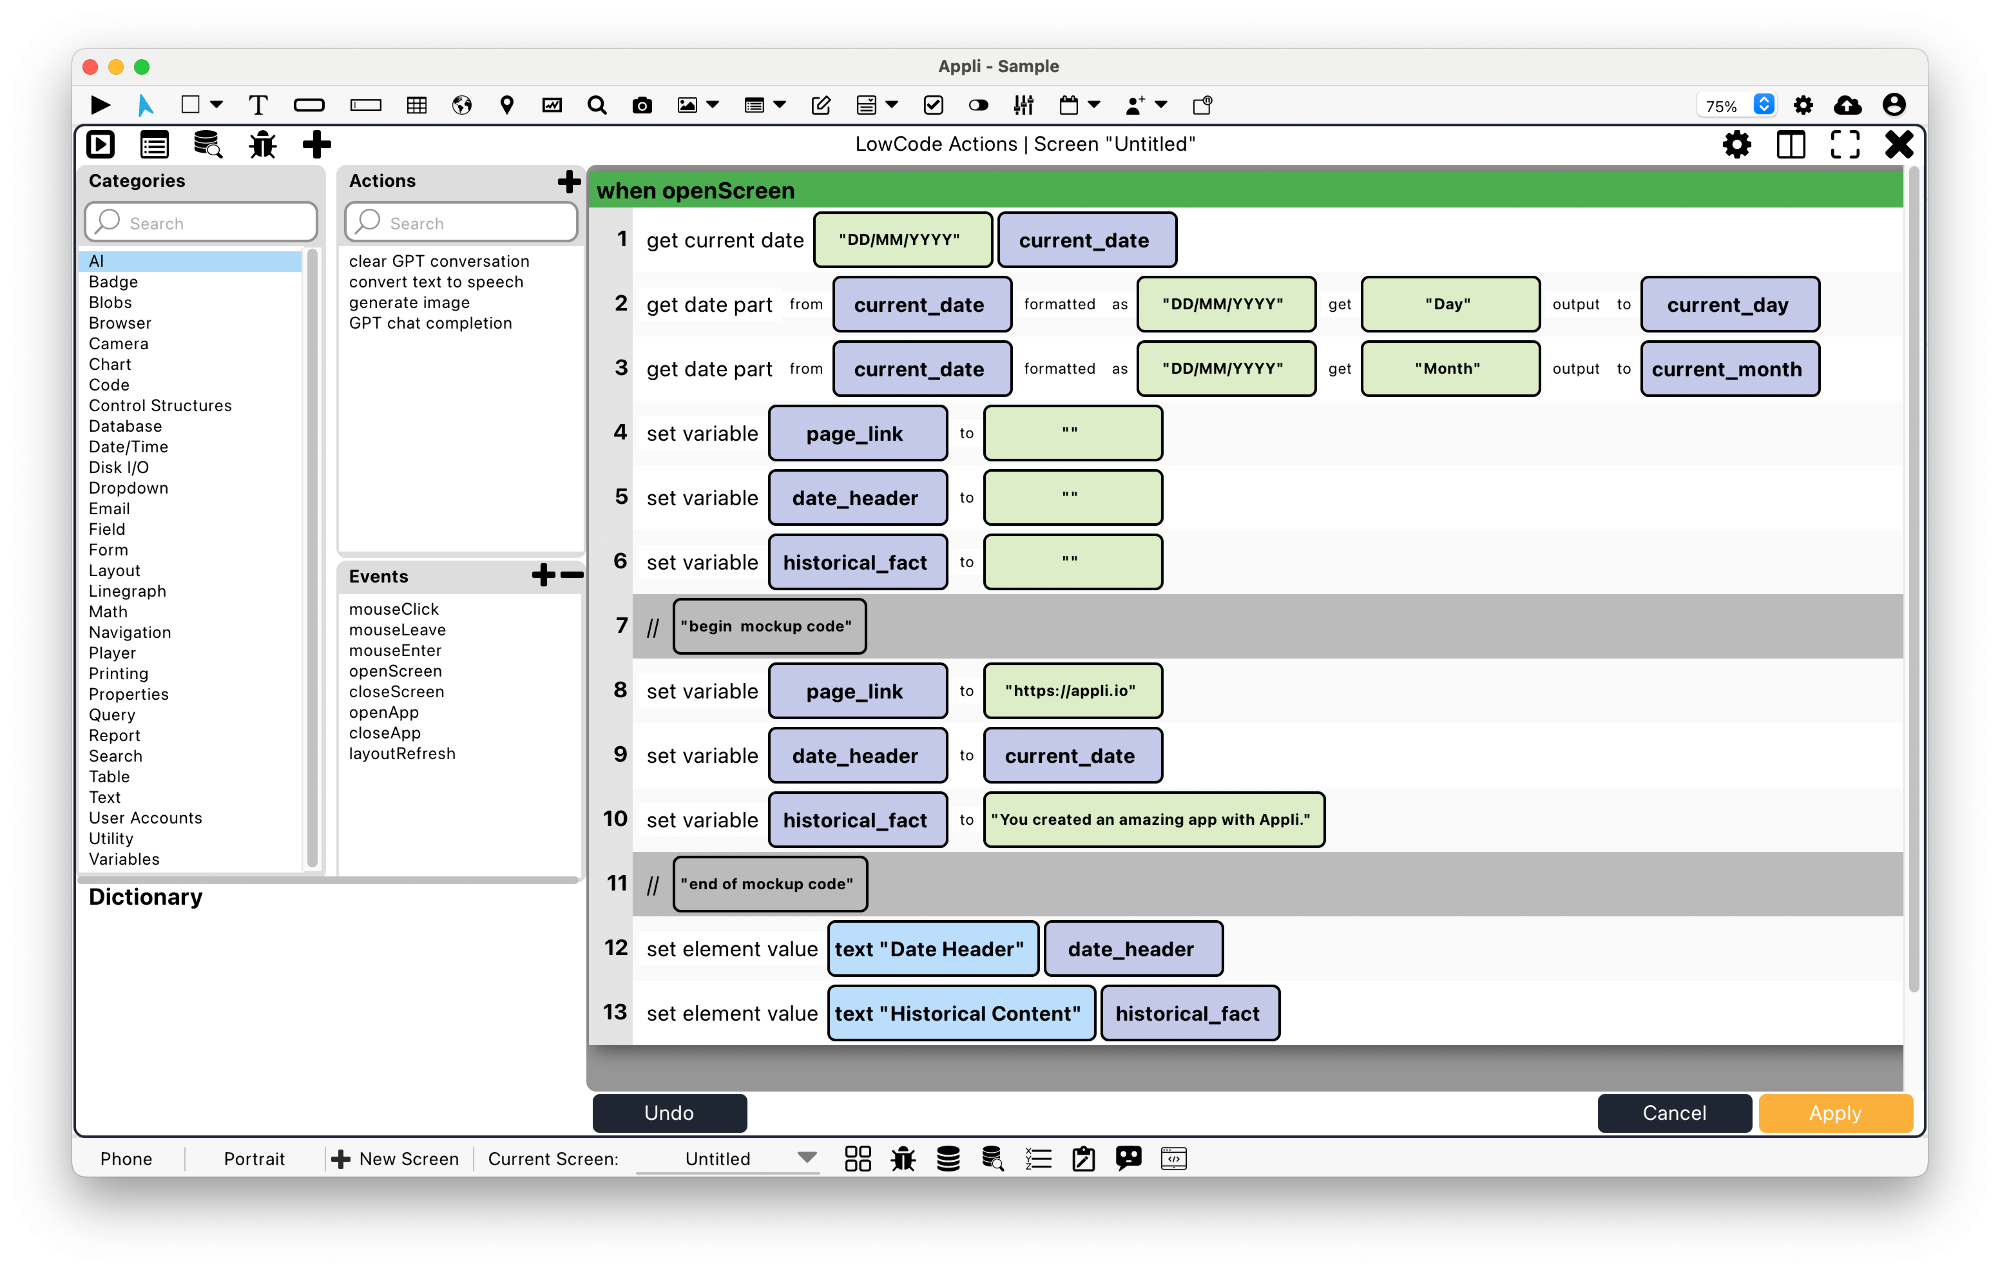
Our script picks the current date and month and set two variables:
current_day and current_month. Then it sets
the page_link, historical_fact, and
date_header variables to empty. These variables are going
to be used in the custom code script to return data back to Appli.
Our mock (which is just jargon for fake) code comes afterwards and
fills the variables page_link date_header and
historical_fact with hardcoded values.
After that we use those variables to insert data into the elements in the user interface.
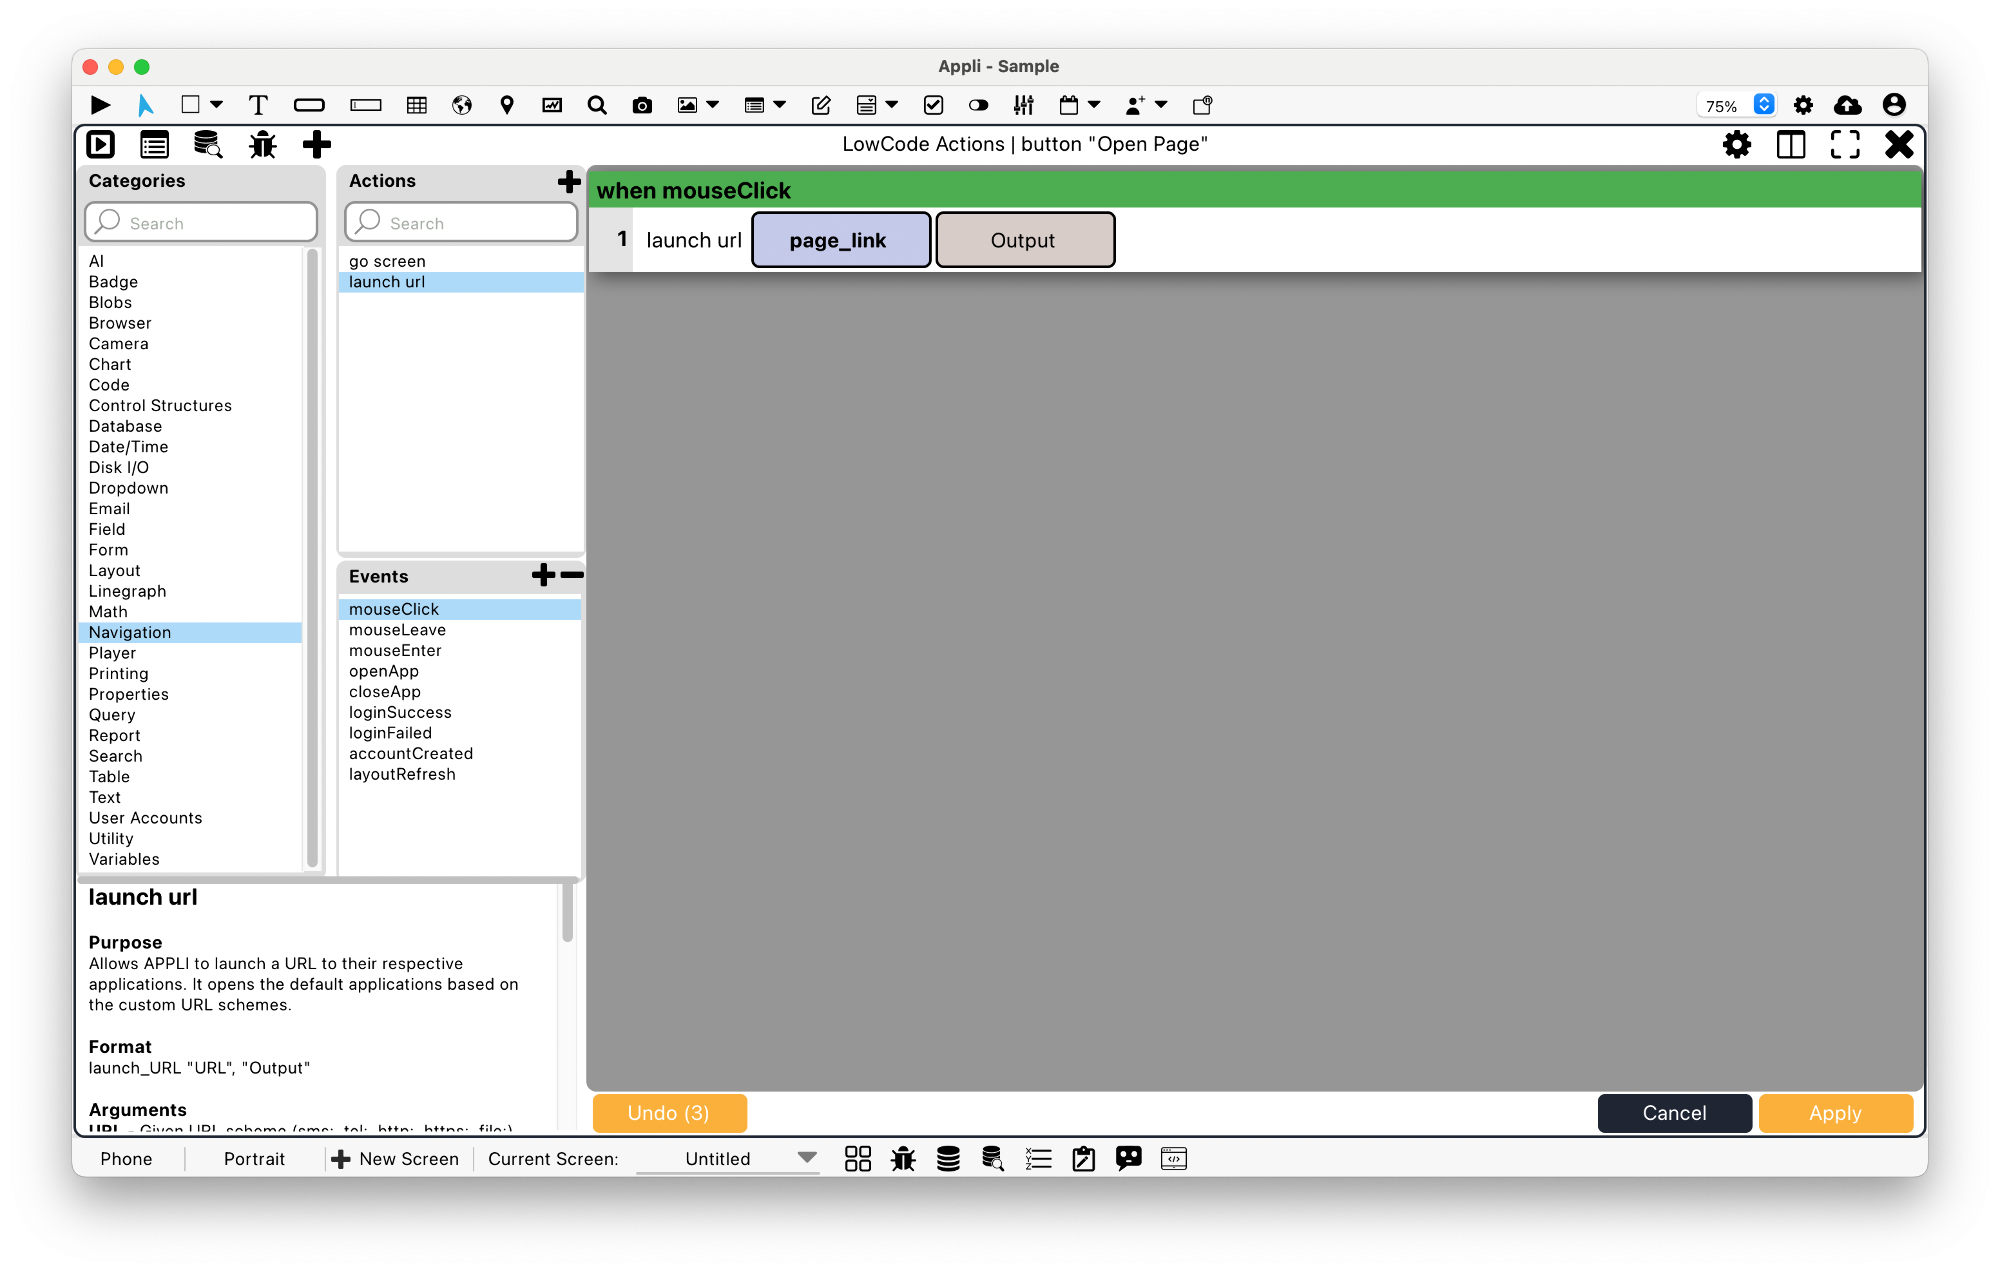
The button action just launches the browser pointed at the content of
page_link.
Switching to play mode, we can see our app working even if the mocked data. Time to make the actual request work and make our app real.
Using the custom code editor
The custom code editor lives in the footer. It is the icon with the clipboard and angle brackets. Click it to open the interface.
You can have as many custom code scripts as you want. You can give them names and then from Appli you can trigger them by the name you set.
Appli will execute the first function found in the custom code script. You can have more than one handler there, but the first one is the one that is executed.
There will be only one function in our script and we’ll call it
makeRequest. We’ll use the same name for our custom code.
Click the plus icon on the tab bar to add a new script. Name it
makeRequest. To rename the custom code, double click on the
name on its tab.
This is our LiveCode script:
function makeRequest
  put URL ("https://api.wikimedia.org/feed/v1/wikipedia/en/onthisday/all/" & current_month & "/" & current_day ) into tResponse
  put jsonToArray(tResponse) into tDataA

  put tDataA["selected"][1]["text"] into historical_fact
  put tDataA["selected"][1]["year"] into tYear
  put current_day & "/" & current_month & "/" & tYear into date_header
  put tDataA["selected"][1]["pages"][1]["content_urls"]["desktop"]["page"] into page_link
end makeRequest
Explaining LiveCode code is beyond the scope of this documentation, but you can read more about it on their own user guide.
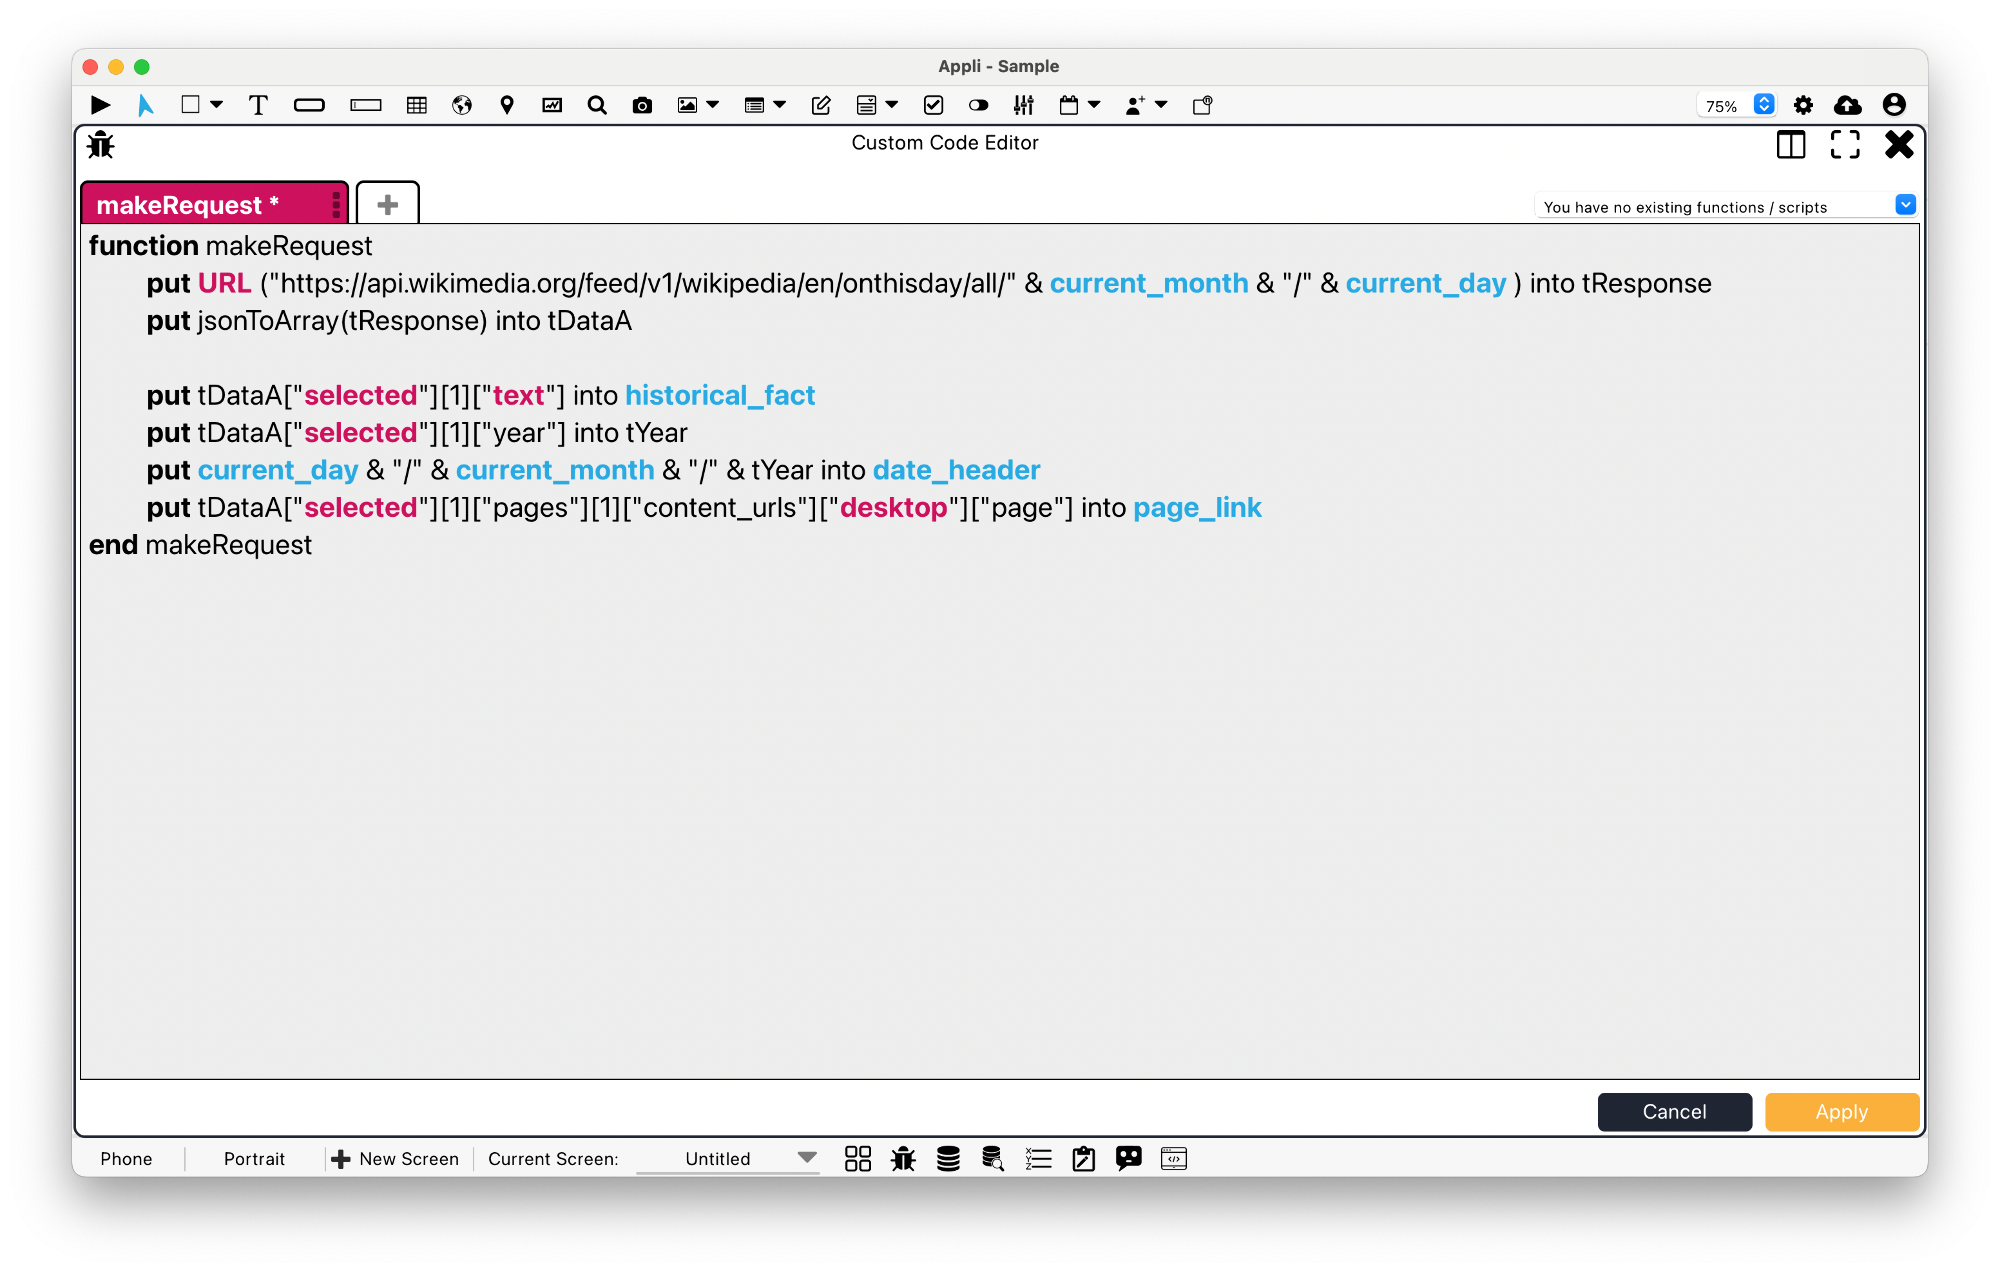
Those among you that know both LiveCode and Appli might be looking funny at the script. Yes, you’re seeing it right, you can access and use Appli’s variables as if they were LiveCode variables. Our backend system takes care of it. You can read from them and write to them and Appli will make sure it works.
Calling the custom code from Appli
So we can replace all that mock section in OpenScreen
with a call to code and configure the parameter to the name
of our function makeRequest.
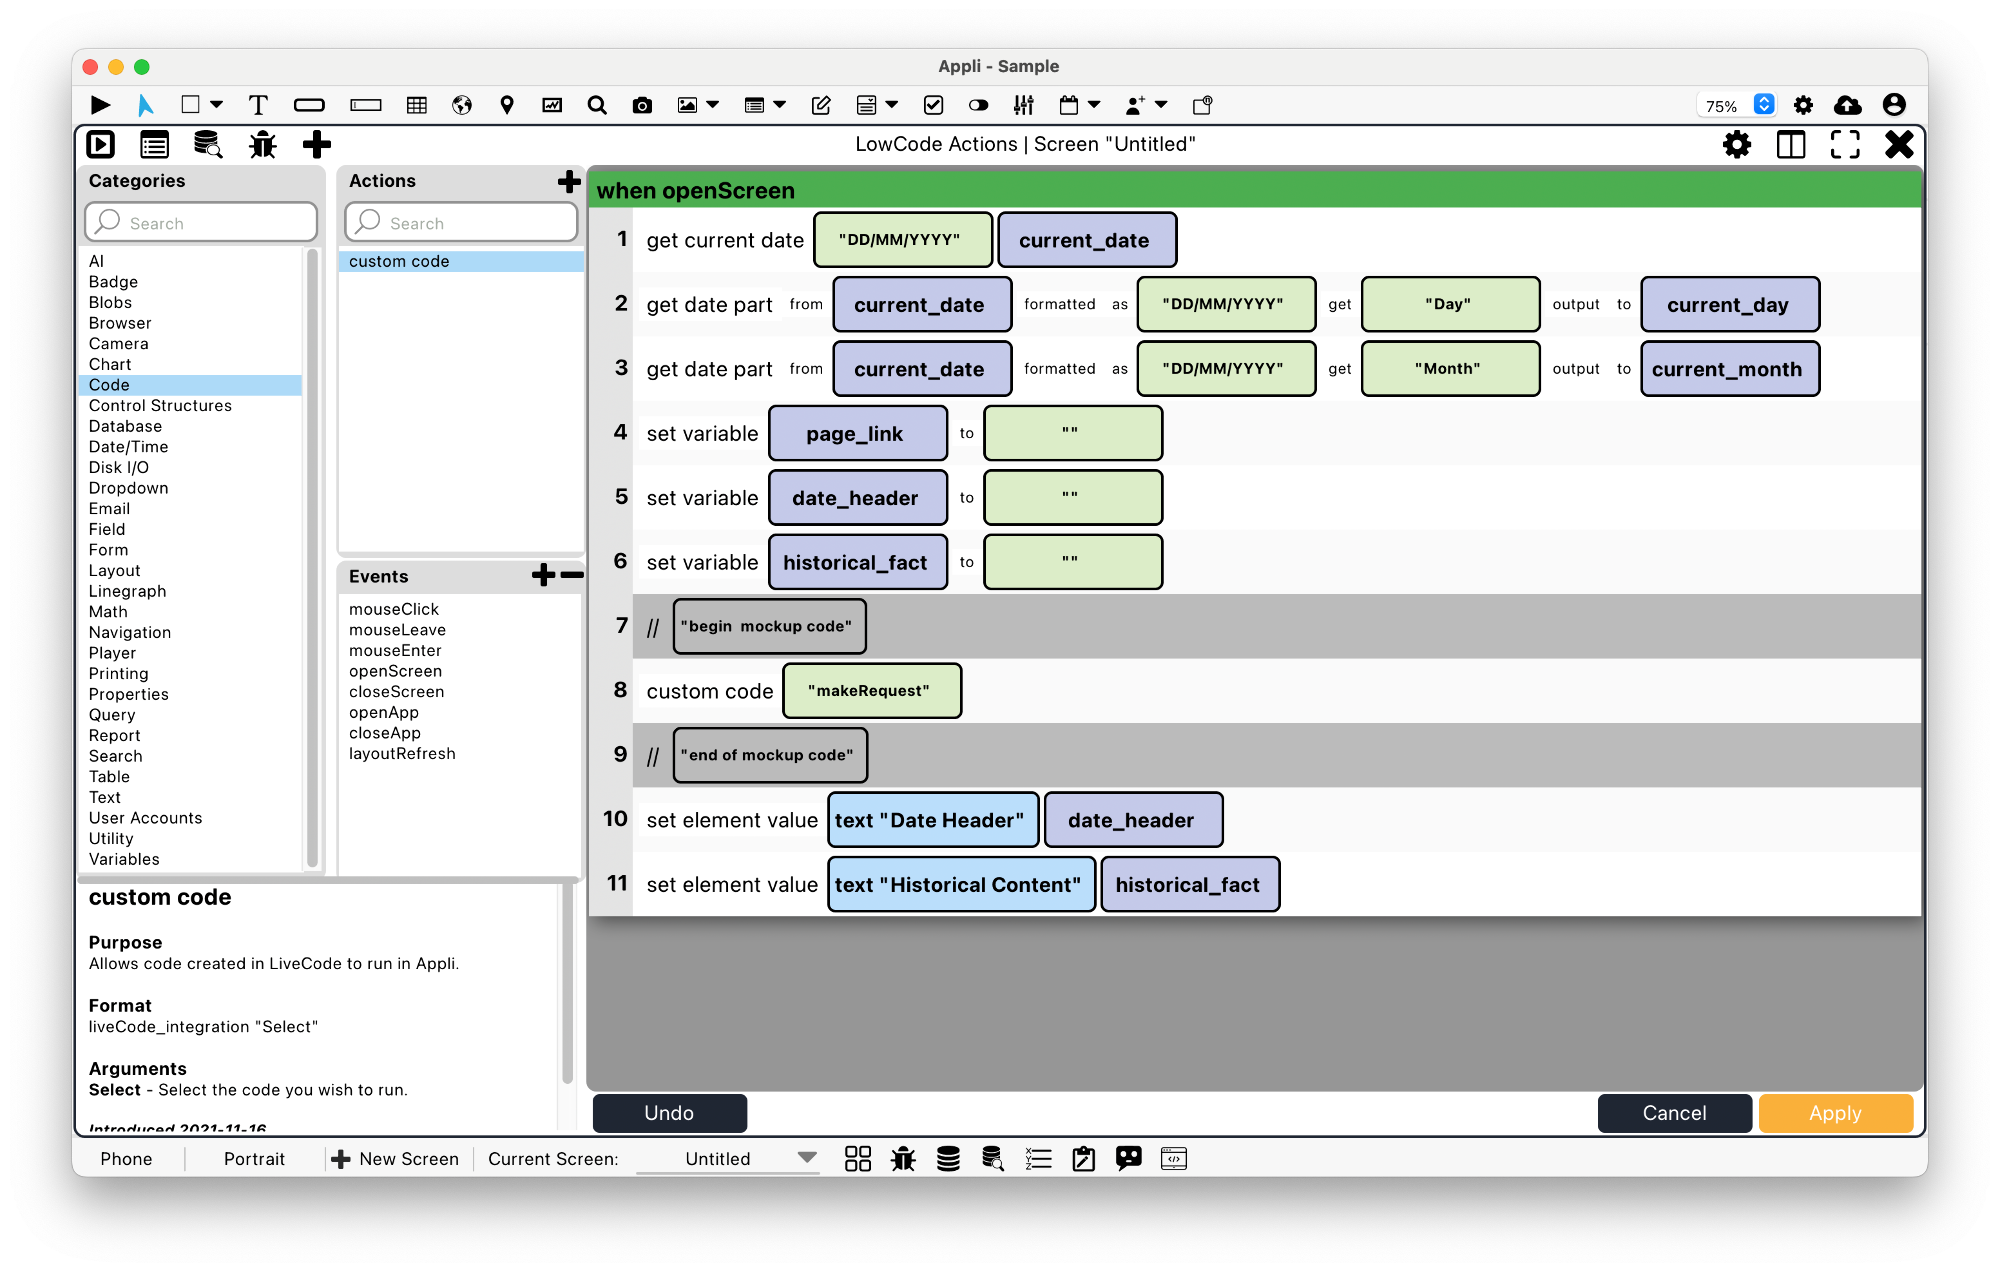
If you switch to play mode now, you’ll see real historical facts.
A pure Appli version
With the introduction of rest api call in
Appli 1.3.11, you can now make Web requests from low-code. Let’s build a
version of this app that uses that instead of LiveCode integration.
Before we begin, change the name of the Untitled screen
to LiveCode Integration Screen. Using the contextual menu
(right click) on the project browser, click the screen name and choose
Duplicate Screen:
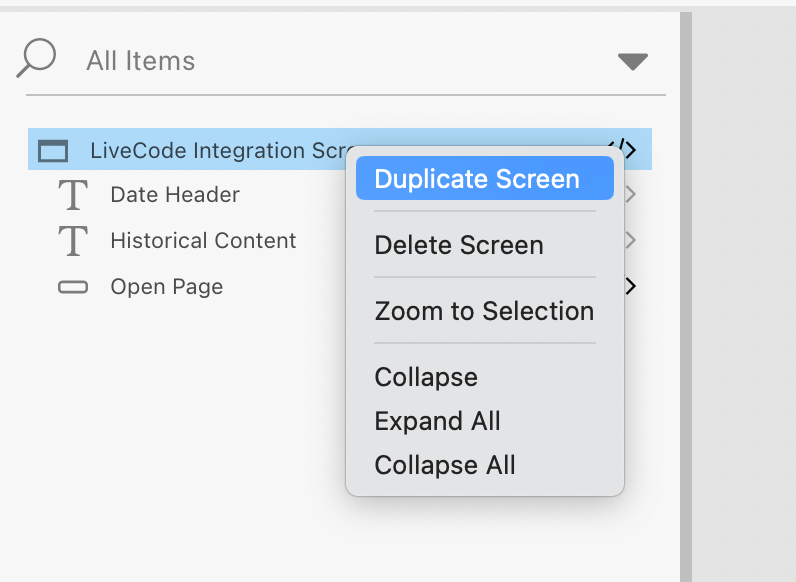
Appli will ask for the name for the new screen. Call it
Pure Appli Screen. After Appli creates the screen, it will
automatically switch to the new screen.
Remember those Mockup code comments in the
OpenScreen event? We’ll change the code between them. They
shouldn’t be there anyway since we replaced the mocked version with a
real version, we just didn’t update the comments.
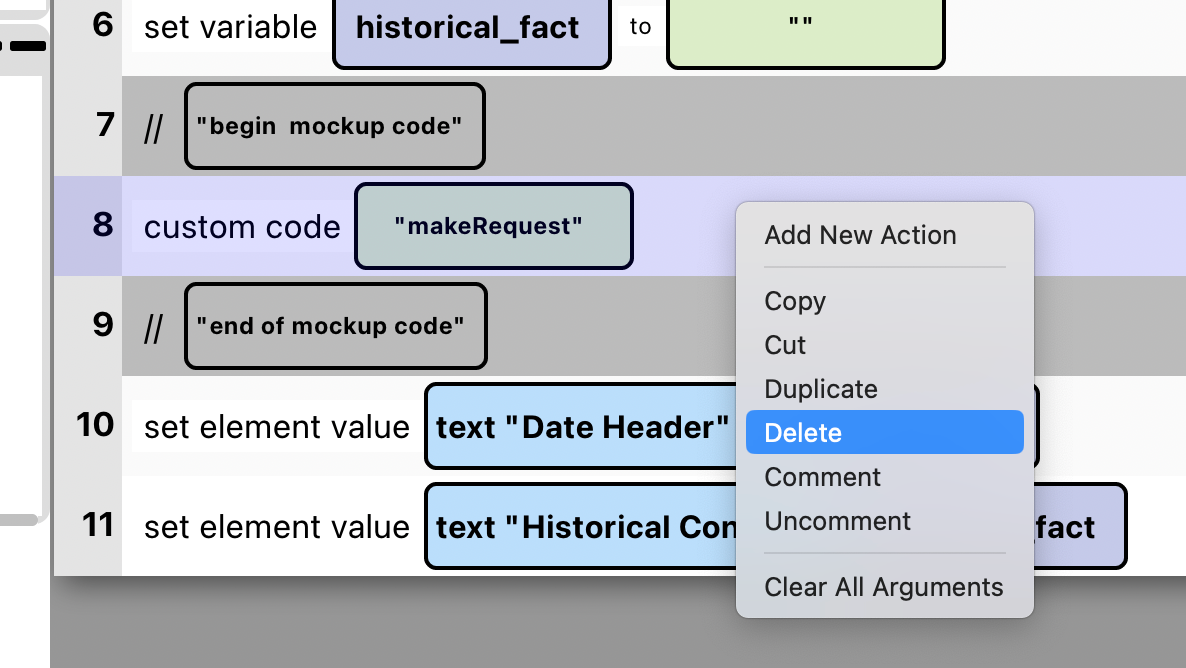
We’ll make heavy use of contextual menus to edit that script. You can right click a line to delete it and also to add a new action below it.
Let’s delete that custom code call.
And using the Add Action menu item, add a new action
bellow the Begin mockup code comment. When you do that, it adds
an input field below the action. You can type part of the action there
and select it from a popup list. It is a very fast way to add actions to
your script. Faster than selecting them from the categories.
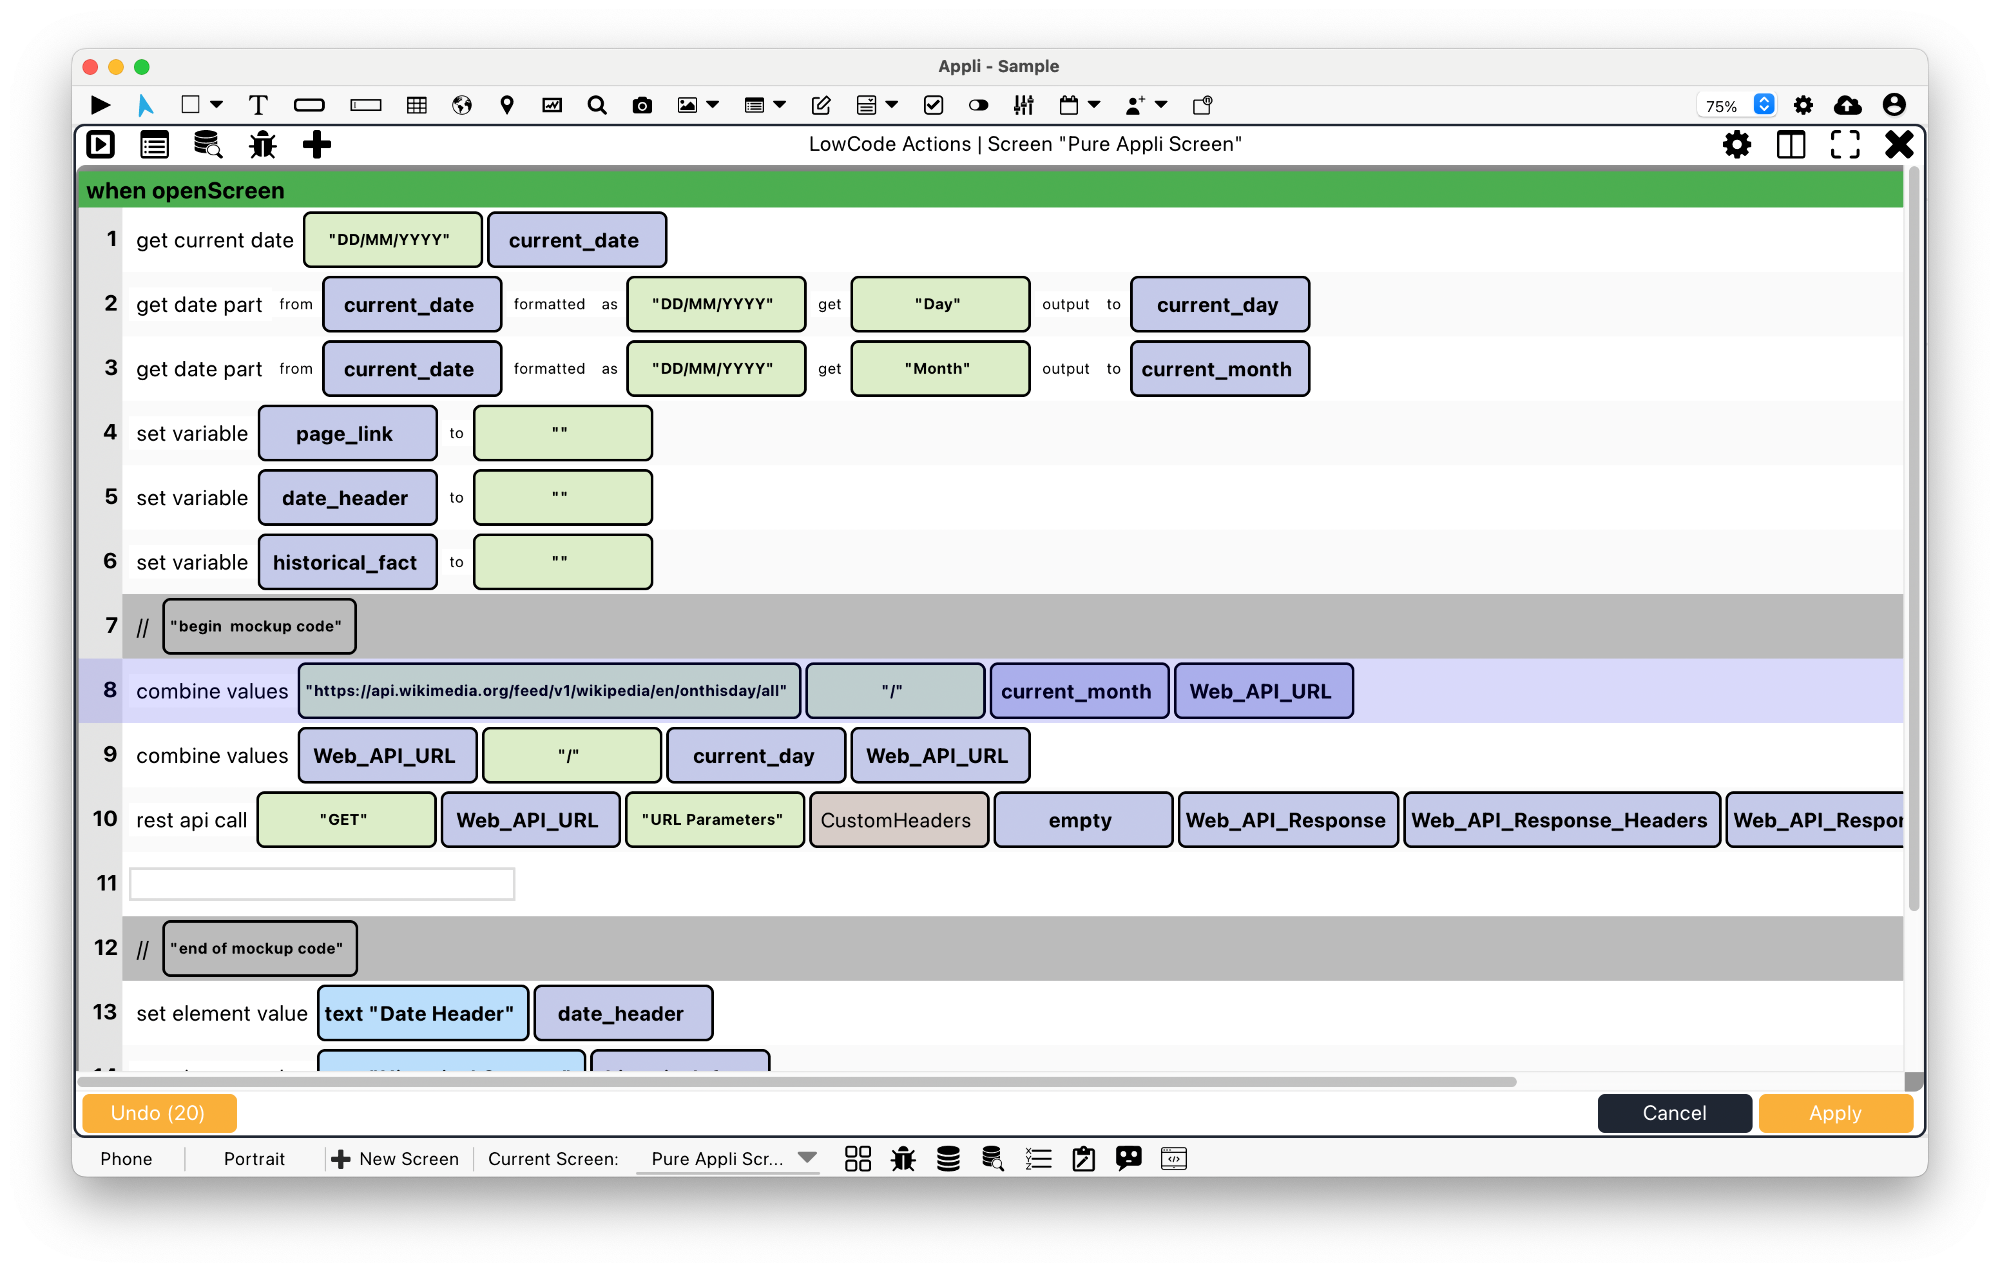
Lets add two Combine values actions. We’ll use them to
assemble the URL for the Web API call:

After that, we add a rest api call action. That action
has lots of parameters.
That’s mostly because some parameters are configuration for the request, that means they are used to tell Appli what kind of request it is and what the format for the data being sent is. It also needs to specify which data is being sent and which variables will be used for the data coming back.
Data for a web request is transmitted using different formats. It can
be sent as the body of a request, part of the address for the request,
or even sent as HTTP headers. Some Web APIs require you to send data
using a combination of these formats. It is common for example to send
authentication HTTP headers and JSON request bodies. The
rest api call action allows you to specify all of that, but
it also requires you to specify all of that. That means you’ll spend
some time configuring the action.
Here is a list of the parameters to use:
GET: Thats the request method we’re using.Web_API_URL: That’s the endpoint URL, we assembled it using the combine actions above.URL Parameters: We’re not really using URL Parameters but we need to select something, so that will do.Custom Headers: Leave it untouched, it is optional and we’re not using it.empty: At the moment, theRequestBodyparameter is required. We’re not sending any data because all we need for this Web API is specified in the URL. Unfortunately, we can’t leave that argument empty. So we just create a new variable namedemptythat has no content.Web_API_Response: A new variable that will contain the response data from the Web API requestWeb_API_Response_Headers: A new variable that will contain the response HTTP headers from the Web API request.Web_API_Response_Code: A new variable that will contain the response status code from the HTTP request.
We’re not really interested in the last two variables, we’ll not use them but they are required to complete the action.
At this point, you can switch to Play mode and run the code. It won’t work, as in you won’t see any fact but the request will be made and the variables will be filled in with data. After switching to play mode, wait for the request to happen and switch back to Pointer mode and open the Variable Viewer (it is the icon on the footer with X,Y,Z).
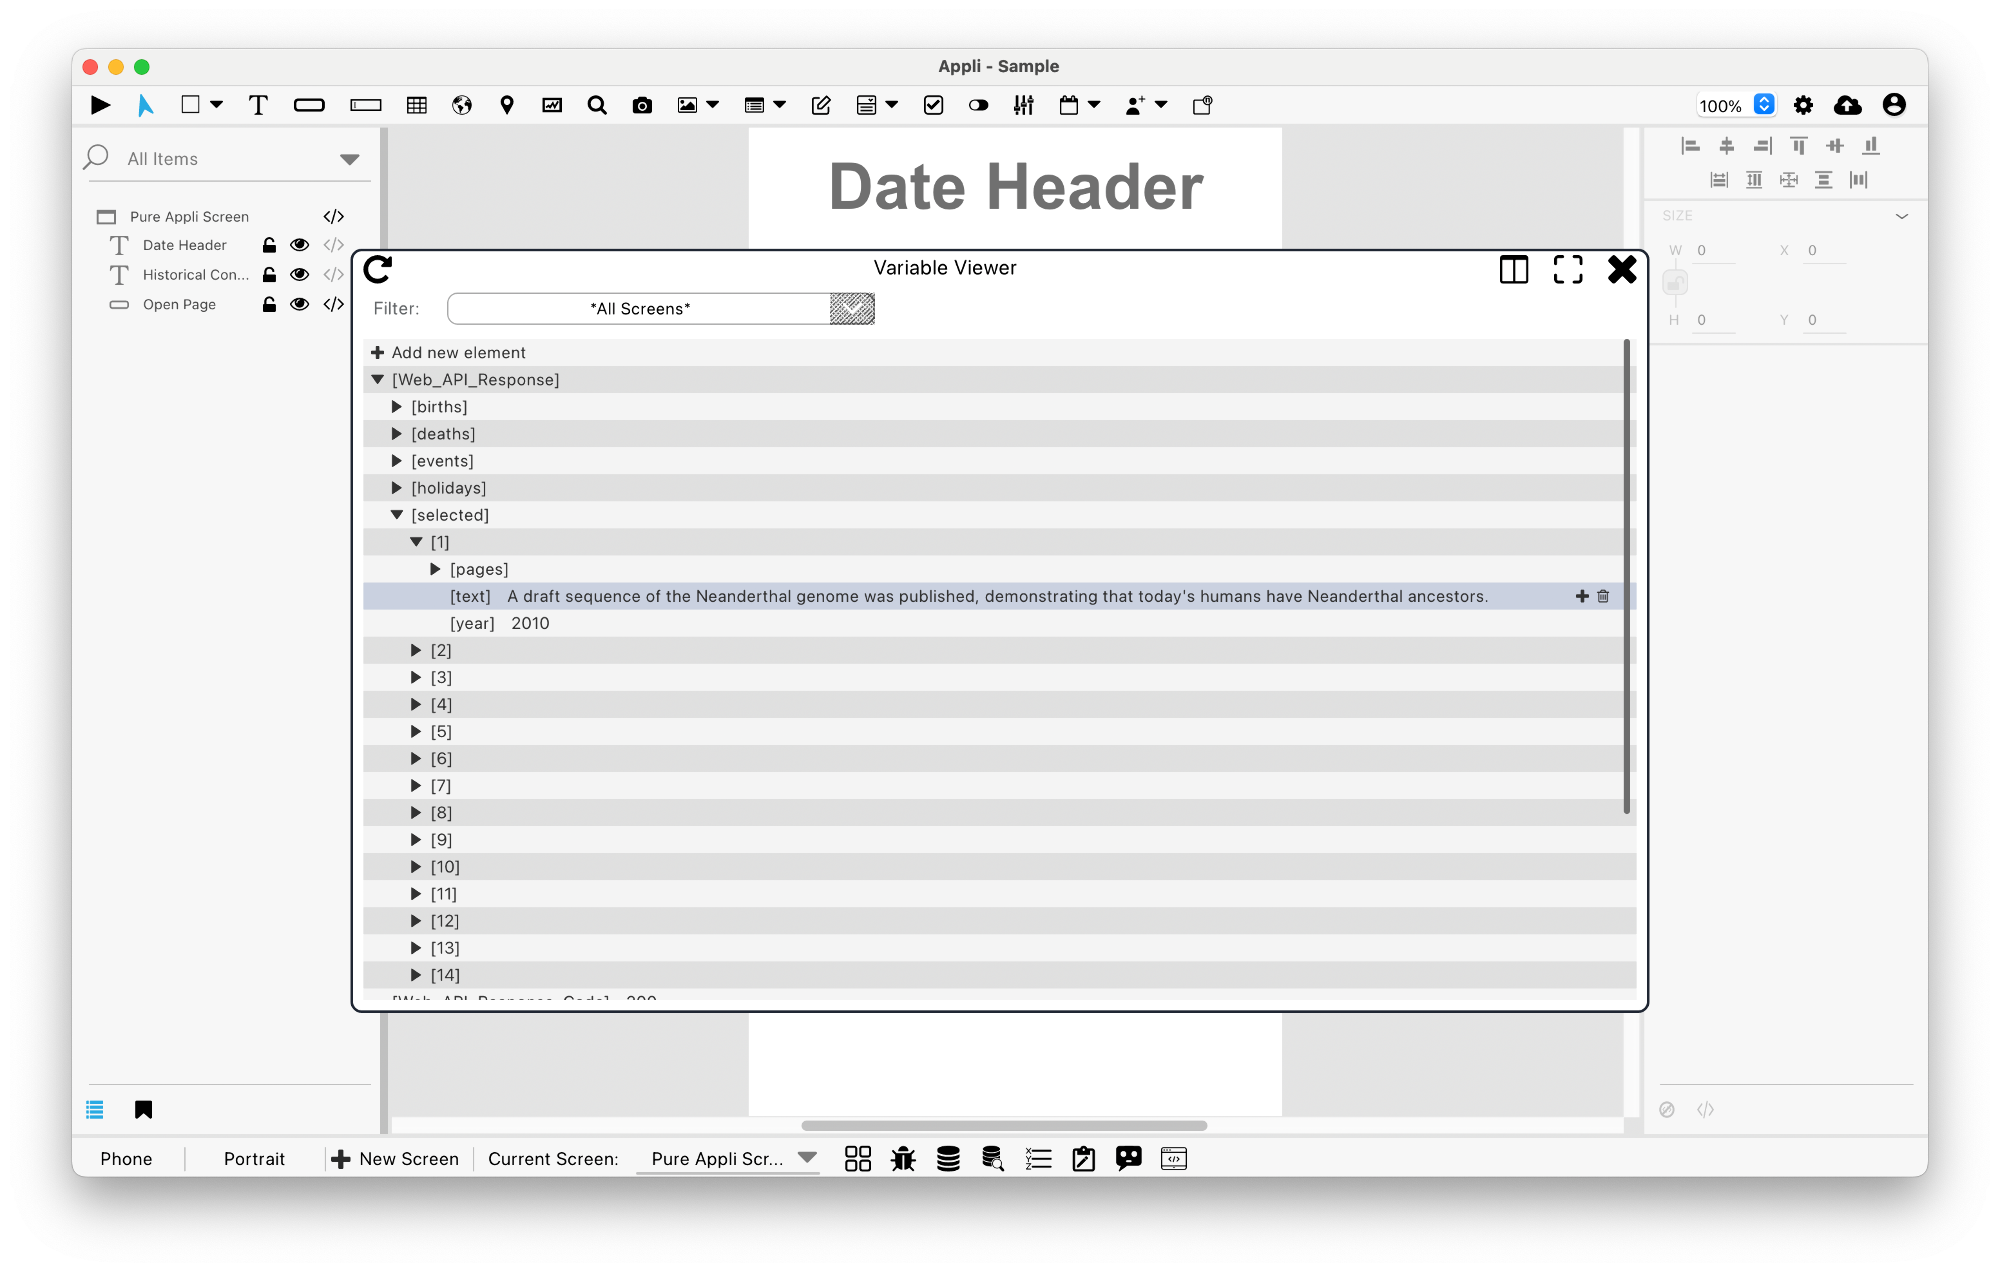
By checking the content of the Web_API_Response array,
we can figure out how to fill the historical_fact,
date_header, and page_link variables.
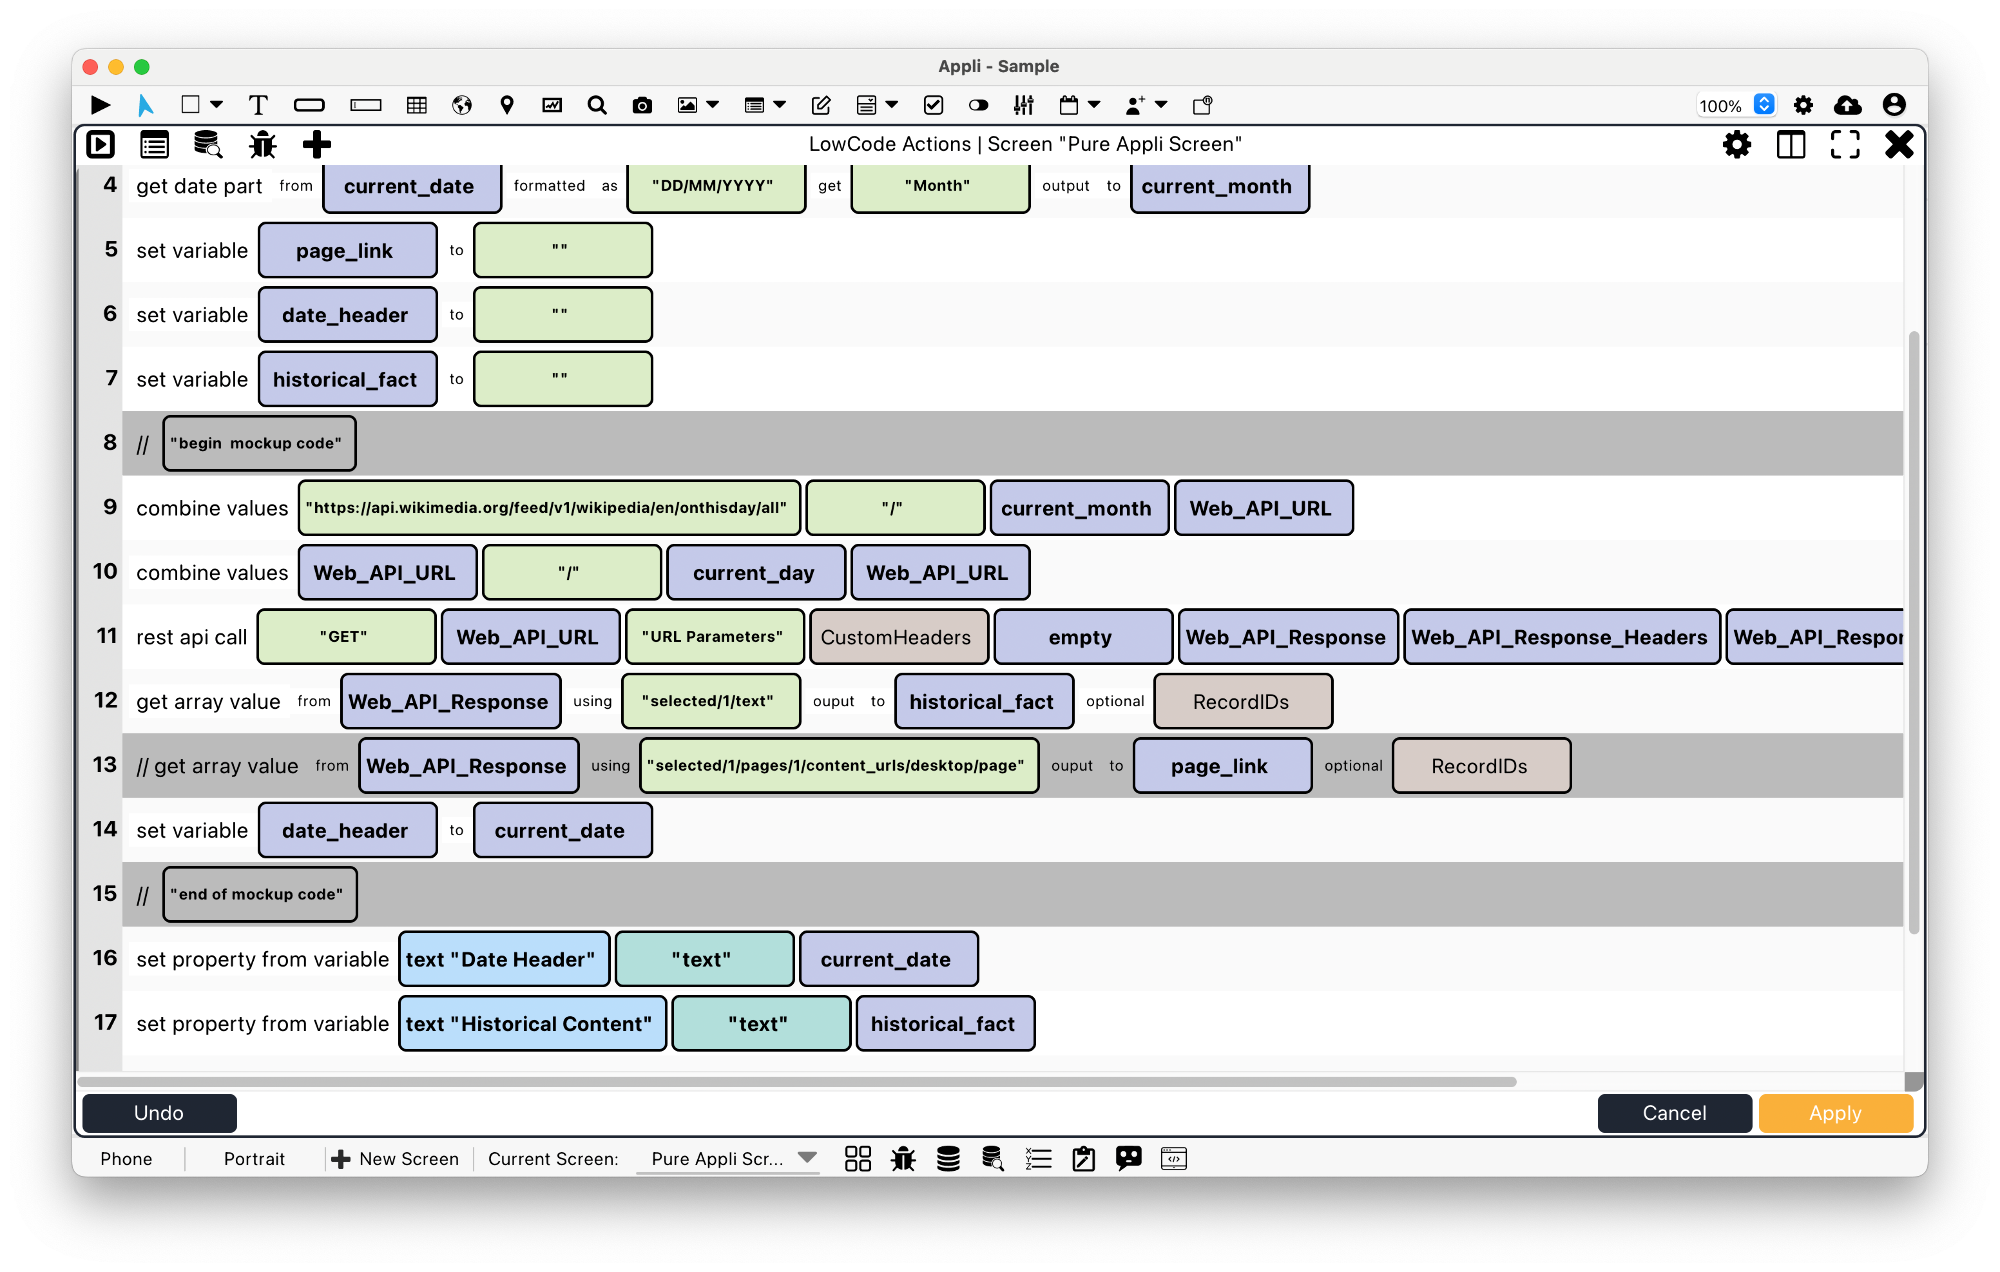
Once the script is done, you have a full historical fact gathering app built with Appli.
Final words and next steps
LiveCode integration allows you to make more complex apps by leveraging the ease of use of Appli development workflow combined with the powerful features of LiveCode, thus being able to create apps that wouldn’t be possible by just using low code and no code.
By using LiveCloud APIs, you can read and write to tables in Appli. Some next steps you might want to attempt on your own are:
- Can you write the historical facts to a table instead of variables?
- Can you display more than one fact using a layout?
This chapter was last updated on Tue 11 Jun 2024 17:27:35 BST